| Third attack on Anzac Cove | |||||||
|---|---|---|---|---|---|---|---|
| Part of the Gallipoli Campaign | |||||||
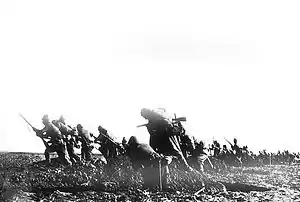 Turkish troops going over the top in an assault on a British trench line in Anzac Cove. | |||||||
| |||||||
| Belligerents | |||||||
|
| |||||||
| Commanders and leaders | |||||||
|
|
| ||||||
| Units involved | |||||||
| ANZAC |
2nd Division 5th Division 16th Division 19th Division | ||||||
| Strength | |||||||
| 17,300 | 42,000 | ||||||
The third attack on Anzac Cove (19 May 1915) was an engagement during the Gallipoli Campaign of the First World War. The attack was conducted by the forces of the Ottoman Turkish Empire, against the forces of the British Empire defending the cove.[nb 1]
On 25 April 1915, the Australian and New Zealand Army Corps (ANZAC) landed on the western side of the Gallipoli Peninsula, at what thereafter became known as Anzac Cove. The first Turkish attempts to recapture the ANZAC beachhead were two unsuccessful attacks in April. Just over two weeks later, the Turks had gathered a force of 42,000 men (four divisions) to conduct their second assault against the ANZAC's 17,300 men (two divisions). The ANZAC commanders had no indication of the impending attack until the day before, when British aircraft reported a build-up of troops opposite the ANZAC positions.
The Turkish assault began in the early hours of 19 May, mostly directed at the centre of the ANZAC position. It had failed by midday; the Turks were caught by enfilade fire from the defenders' rifles and machine-guns, which caused around ten thousand casualties, including three thousand deaths. The ANZACs had less than seven hundred casualties.
Expecting an imminent continuation of the battle, three Allied brigades arrived within twenty-four hours to reinforce the beachhead, but no subsequent attack materialised. Instead, on 20 and 24 May two truces were declared to collect the wounded and bury the dead in no man's land. The Turks never succeeded in capturing the bridgehead; instead the ANZACs evacuated the position at the end of the year.
Background
Beachhead
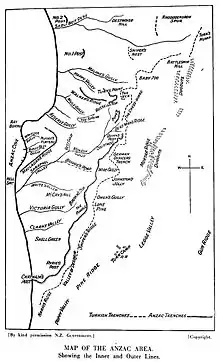
On 25 April, at the start of the Gallipoli Campaign, the Australian and New Zealand Army Corps (ANZAC), commanded by Lieutenant-General William Birdwood,[2] landed at Beach Z, later to become known as Anzac Cove.[3][4][nb 2] The beachhead was not a large position. Including two isolated outposts in the north, No.1 Post and No.2 Post, it stretched south only 2 mi (3.2 km) to Chatham's Post, and at the most had a depth of 750 yd (690 m).[7][8] Other sources put the dimensions as 1.5 mi (2.4 km) long, and 1,000 yd (910 m) deep.[9] Two of the central positions, Quinn's and Courtnay's Posts, had a steep cliff to the rear of the ANZAC trenches. In places the Turkish trenches were dug as close as ten yards (9.1 m) from the Allied lines.[10]
The First Turkish counter-attack on Anzac Cove in April, by the 19th Infantry Division (57th, 72nd and 77th Infantry Regiments) commanded by Colonel Mustafa Kemal, had initially pierced the ANZAC line but was eventually repulsed. On 5 May the Turkish Army commander, the German officer Otto Liman von Sanders, ordered his troops to adopt a defensive posture. However, the Turkish General Staff considered the ANZAC beachhead to be such a precarious position that even a small Turkish success would "drive them back into the sea". Another consideration was that eliminating the ANZAC position would release four or five divisions to move against the British and French beachhead at Cape Helles.[11]
Turkish forces
The Ottoman Turkish Army of the First World War was badly underestimated by the Allies, and during the war it would defeat forces from the British, French and Russian armies.[12] Before the landings, the Gallipoli peninsula was defended by several divisions, based on infantry battalion strong-points overlooking the potential landing beaches.[13] By April 1915, they had 82 fixed and 230 mobile artillery pieces sited to defend the peninsula.[14] Virtually all the Turkish Army commanders, down to company commander level, were very experienced, being veterans of the Balkan Wars. But their command structure was weaker at the non commissioned officer (NCO) level, with only one NCO in each company.[15][nb 3] One advantage that the Turkish Army had over the British supplied forces was their hand grenades, which were not used by the British forces.[17][nb 4] The British also acknowledged that the Turkish snipers' "marksmanship was generally superior" to that of the Allies.[19]
The assault was under the direct command of Major-General Essad Pasha.[9] The plan was to gather the assault force secretly behind the Turkish lines on 18 May. Then at 03:30 19 May, while it was still dark, the Turkish forces would simultaneously attack all along the ANZAC perimeter. The aim was to force the defenders out of their trenches and back into the sea.[20] To maintain surprise the attack would not be preceded by an artillery bombardment; but the previous day all the available Turkish artillery bombarded the ANZAC lines between 17:00 and midnight. This was something they had done twice before that month.[21] The signal to start the attack was supposed to have been the detonation of a large mine at Quinn's Post, in the centre of the ANZAC lines, but by 19 May the tunnel for the mine had not been completed.[22][nb 5] The attacking force, from north to south, comprised the 19th Division (now made up of the 27th, 57th and 72nd Infantry Regiments), 5th Division (13th and 14th Infantry Regiments), 2nd Division (1st, 5th and 6th Infantry Regiments), 16th Division (33rd, 47th, 48th and 125th Infantry Regiments) and the now independent 77th Infantry Regiment. In total this was around 42,000 men. The 2nd and 16th Divisions were fresh, having just arrived on the peninsula, while the other two had taken part in some of the previous counter-attacks at Anzac Cove.[23][nb 6]
ANZAC forces
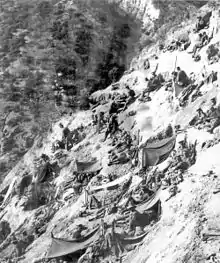
By now the ANZAC Corps comprised two divisions, with around 17,300 men and 43 artillery pieces. The New Zealand and Australian Division defended the northern half of the beachhead, while the 1st Australian Division defended the southern half.[24] The perimeter was divided into four sections, from north to south, the New Zealand Mounted Rifles Brigade in No.4 Section, the 1st Light Horse Brigade and the 4th Australian Brigade in No.3 Section, the 1st Australian Brigade in No.2 Section, and finally the 3rd Australian Brigade in No.1 Section.[25] The understrength 2nd Australian Brigade, the only corps reserve, was held where Shrapnel Valley met Monash Valley, and was ordered to deploy two battalions to form a reserve defence line.[24] The New Zealand Infantry Brigade had been sent to Cape Helles to support the British.[26][nb 7]
The ANZAC command had no inkling of the impending attack, and as late as 16 May they recorded that they were opposed by only between 15,000 and 20,000 troops.[21] On 18 May an aircraft from the Royal Naval Air Service was sent to direct naval gunfire, and flew across the peninsula on its return. The aircraft's crew observed that the valleys opposite the ANZAC position were "densely packed with Turkish troops". A second aircraft, sent to confirm the sighting, also reported that even more troops were being landed at Eceabat on the peninsula's eastern coast, only around five miles (8.0 km) from the ANZAC beachhead. At 17:15 the news was relayed to the two ANZAC divisions, who were told to expect an attack that night.[28] Just after dark the British battleship HMS Triumph reported seeing a "considerable" number of mounted troops and artillery moving north from Krithia.[29]
At about 23:45 18 May, a Turkish bomb detonated at Quinn's Post, and the Turks opened fire with their small arms until around 00:10 19 May.[30] With all the evidence pointing to an impending Turkish assault, the ANZAC troops were ordered to stand-to at 03:00, half an hour earlier than normal, and they improvised defences by throwing out rolls of barbed wire on rests to the front of their lines.[31]
Attack
No.2 Section
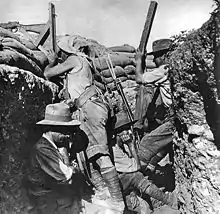
The first sign of the coming battle was shortly after stand-to at No.2 Section, where the Australian 4th Battalion reported seeing movement, and light reflecting off bayonets, in the valley between Johnston's Jolly and German Officers' Ridge.[30] The 5th Division started attacking without, as was normal, blowing their bugles and shouting war cries.[32] Their trenches were only two hundred yards (180 m) from the Australians' trench, and the Australian 1st and 4th Battalions opened fire on the advancing Turks. The 5th Division was closely followed by the 2nd and 16th Divisions.[33] The 2nd Division, coming from Johnson's Jolly, advanced diagonally across the 4th Battalion's front, and the 4th Battalion engaged them in their flank with rifle and machine-gun fire. The Turks that survived the enfilade fire moved either into Wire Gully or back to their own lines. Waves of Turkish reinforcements attempted to follow the first line, but they were also mown down and by daylight the only movement seen was the wounded trying to reach help.[34][35]
To the immediate south, opposite Lone Pine, the Australian 2nd and 3rd Battalions had been digging a new trench into no man's land. It was intended to provide a better firing position and, starting from both battalions' lines, headed into no man's land at an angle of forty-five degrees to the old line. Eventually it was expected that the two extensions would meet in the middle, but by the time of the attack there was still a gap of around fifty yards (46 m) between them. It was here the Turkish 16th Division attacked. At first the Turks were in a gully which sheltered them from Australian fire. The 48th Infantry Regiment, moving through the heavy Australian fire, advanced into the gap between the two battalions. Despite one of the 3rd Battalion's machine-guns jamming, this assault and the following waves were beaten back, although some Turks did reach the Australian trenches. The Turks came so close to the supporting Australian artillery that the artillerymen disabled their guns, so they could not be used against them, and joined the infantry in the trenches.[36] The 16th Division attempted four successive assaults, but each wave was mown down by the Australian fire.[37] At Wire Gully a group of Turks got close enough to a 2nd Battalion machine-gun to destroy it with a hand grenade, allowing them to move forward and reach the Australian trench. Some individual Turkish soldiers also reached the trench before they were all shot down. This continued until around 05:00, when the surviving Turks started withdrawing to German Officers' Ridge.[35][38]
No.1 Section

Part of the 16th Division also attacked the 3rd Brigade in No.1 Section from Lone Pine southwards. They advanced in two waves through a field of wheat, but only three men survived the Australian fire to reach the 10th Battalion's trench, and were then shot on the parapet. Turkish wounded and survivors could be seen moving back to a gully, but in the growing light they were in full view of an 11th Battalion machine-gun, which caused devastation amongst their ranks. The Australians continued firing at targets until around noon, but it was obvious the assault by the 16th Division had failed here.[39] In the extreme south of the ANZAC beachhead the 9th Battalion trench was attacked by the independent 77th Infantry Regiment. However, here as elsewhere, the attacking Turks were whittled down by the Australian fire, the last of them as they reached the belt of barbed wire in front of the Australian trenches.[40]
No.3 Section
Another part of the 5th Division had gathered unseen below Courtnay's Post, which was held by the 14th Battalion, and at 04:00 they rushed the trench, throwing hand grenades. The post was only defended by an Australian section, two of whom were killed and another two wounded; as the Turks occupied that part of the post the surviving Australians retreated. The Turks were now in a position to observe and bring fire down on Monash Valley. However, from another section of the post Private Albert Jacka led a small group of men in a counter-attack on the Turks. Jacka shot five of the Turks, bayoneted another two, and chased the rest out of the post. For this feat he was awarded the Victoria Cross.[35][41][42]
Next in the line, to the north, was Quinn's Post, defended by the 15th Battalion and the 2nd Light Horse Regiment.[43] For some time after the start of the Turkish attack, the Turks opposite Quinn's just threw hand grenades at the post. Around 03:30 the Turks' machine-guns and rifles opened fire at the Australians. This lasted for about an hour when the Turks went over the top and assaulted the post. As elsewhere, they were stopped by the weight of the Australian fire, not only from the trench they were attacking, but also by the defenders at Pope's and from the 2nd New Zealand Artillery Battery. Three more Turkish attacks were also repulsed in a similar fashion.[35][44]
On the other side of Monash Valley, the right flank of the 5th Division and the 19th Division attacked Pope's. Sentries from the 1st Light Horse Regiment opened fire on a group of Turks moving down the valley; this group, several hundred strong, started an attack on Pope's. The defenders from the 1st and 3rd Light Horse Regiments opened fire, and only three Turkish soldiers reached the Australian positions before being shot.[45]
No.4 Section
On Russell's Top the Auckland Mounted Rifles were in a precarious position; their trenches were still far from being fully constructed, and three saps heading towards The Nek had yet to be joined up. The 19th Division, using hand grenades, attacked the New Zealanders' position in three waves. The Wellington Mounted Rifles to the north were able to bring their machine-guns to bear on the attackers. The flanking fire caused devastation amongst the Turkish ranks. At the same time the Aucklands charged them in a counter-attack, forcing the survivors to withdraw.[45][46]
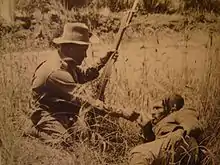
Daylight
All along the ANZAC perimeter, Turkish troops continued trying to advance using fire and manoeuvre. This gradually petered out as the morning progressed, and the Turks tried to regain their own lines instead. The Australians and New Zealanders continued to fire on them, sometimes showing themselves above their trenches. The Turks were now able to return fire, which caused the majority of the ANZAC casualties.[47] It was now clear to the Australians and New Zealanders that the Turkish attack was a failure. However, a report arrived at Turkish headquarters suggesting that some objectives had been captured. So the Turkish commanders issued orders, at 05:00, for a second assault, this time to be supported by an artillery bombardment. Over the next few hours several new attacks began. At 05:25 the 2nd and 5th Divisions attacked again, but instead of moving directly at the Australian lines, they advanced at an angle, and were again mown down.[48][49] At No.1 Post in the No.4 Section the Canterbury Mounted Rifles observed the Turks forming in Malone's Gully, in preparation for another assault on Russell's Top. The location of the post was such that they could turn their machine-gun and engage the Turks from the rear, which broke up the attack. The Turks attacked Quinn's four more times, and on one occasion an officer and around thirty men managed to reach the junction of Courtney's and Quinn's before being killed. This pattern of attack was kept up until around 10:00, when Allied observers reported a reluctance among the Turkish troops to leave their trenches.[35][50]
The seriousness of the Turkish defeat gradually dawned on the ANZAC commanders. At 05:25 Birdwood suggested to his junior commanders that they counter-attack against the Turkish flanks. But he was convinced that any attack into the Turkish artillery was doomed to failure. However, at 15:35 British General Headquarters (GHQ) ordered him to exploit the situation and use any opportunity to attack. Birdwood replied that anything less than a general assault would be futile.[51] In the northern sector Major-General Alexander Godley, commanding the New Zealand and Australian Division, decided to attack. The Wellington Mounted Rifles was ordered to attack the Turkish trenches at The Nek. The trench that was their first objective was one hundred yards (91 m) across no man's land with no cover at all. The regiment prepared to obey the order, but arranged the attack so that no single squadron would be wiped out. The men were selected in equal proportion from all three squadrons, and Captain William Hardham VC was chosen to command them. Brigadier-General Andrew Russell, commanding the New Zealand Mounted Rifles Brigade, contacted Godley to advise him of the circumstances of such an attack, and Russell was told to "use his own judgement" so promptly called it off.[52][53] The Turks kept up their artillery bombardment on the beachhead for the remainder of the day. That, along with a prisoner disclosing that another attack was imminent, persuaded GHQ to recall the New Zealand Infantry Brigade from Cape Helles to Anzac Cove that night.[51]
Aftermath
By the end of the day the ANZAC artillery had expended 1,361 18-pounder rounds, 143 howitzer rounds, 1,410 smaller mountain artillery rounds, and 948,000 rifle and machine-gun rounds.[54] Turkish figures are not known, but the attacking Turkish forces had around ten thousand casualties,[55] including three thousand dead.[35][nb 8] The heaviest casualties were amongst the 5th Division, and the least for the relatively inactive 19th Division, which still had over one thousand casualties.[54] Talking about the failed attack, one Turkish soldier described the scene "[c]ountless dead, countless! It was impossible to count."[57] The ANZACs had only 160 killed and 468 wounded.[35][57] Among the Australian dead was Private John Simpson Kirkpatrick, whose exploits in the campaign earned him a place in Australian folklore as "the Man with the Donkey".[58][59]
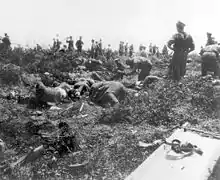
The next day, 20 May, the smell of rotting corpses in no man's land and the numerous wounded still located between the lines convinced the New Zealand and Australian Division staff to suggest an armistice. Soon an informal truce began under the flags of the Red Cross and Red Crescent.[60] Turkish stretcher-bearers headed into no man's land to collect the dead and wounded. Just after 19:00 it appeared that the Turks were massing troops for an attack while gathering their wounded, so the 9th Battalion opened fire on them. The Turks responded with their artillery bombarding the Australian trenches.[61][62]
By now the beachhead had been reinforced; the New Zealand Infantry Brigade, the 2nd Light Horse Brigade and the 3rd Light Horse Brigade had all arrived during the day. Communication between the two sides resulted in a more formal truce on 24 May. At 07:30 all firing ceased and parties moved out to bury the dead. This lasted until 16:30 when the truce ended and both sides returned to their own lines.[63][64]
Private Victor Laidlaw of the 2nd Australian Field Ambulance, described the truce in his diary:
The armistice was declared from 8:30 a.m. this morning till 4:30 p.m. it is wonderful, things are unnaturally quiet and I felt like getting up and making a row myself, the rifle fire is quiet, no shell fire. The stench round the trenches where the dead had been lying for weeks was awful, some of the bodies were mere skeletons, it seems so very different to see each side near each others trenches burying their dead, each man taking part in this ceremony is called a pioneer and wears 2 white bands on his arms, everybody is taking advantage of the armistice to do anything they want to do out of cover and a large number are down bathing and you would think today was Cup Day down at one of our seaside beaches.[65]
Firing recommenced at 16:45.[63][64] The Turkish commanders now realised just what would be required to capture the beachhead. Instead of trying again they left two of their depleted divisions, the 16th and 19th, to man their lines while the others were withdrawn. The still independent 77th Infantry Regiment also remained behind, in the same position covering the south.[66]
The Turks never succeeded in capturing the beachhead, and at the end of the year the ANZAC forces were evacuated to Egypt. During the 260 days of the Gallipoli Campaign, the British Empire forces took 213,980 casualties.[67] 35,000 of those were from the Australian and New Zealand Army Corps,[68] which included 8,709 Australian and 2,721 New Zealand dead.[69][70] The exact number of Turkish casualties is not known, but has been estimated at 87,000 dead[71] from a total of around 250,000 casualties.[72]
References
- Footnotes
- ↑ At the time of the First World War, the modern Turkish state did not exist, and instead it was part of the Ottoman Turkish Empire. While the terms have distinct historical meanings, within many English-language sources the terms "Turkey" and "Ottoman Empire" are used synonymously, although sources differ in their approaches.[1] The sources used in this article predominantly use the term "Turkey".
- ↑ While Australians and New Zealanders formed the vast majority, many other units also landed there. These included the Ceylon Planters Rifle Corps, the Indian Mule Cart Transport, the Zion Mule Corps, the 7th Indian Mountain Artillery and the Royal Naval Brigade.[5] The beach was called Ari Burnu until 1985, when it was officially renamed Anzac Cove by the then Turkish government.[6]
- ↑ By comparison a British infantry company had ten sergeants, and several more junior NCOs.[16]
- ↑ The patent for the British Mills bomb hand grenade was not filed until 15 June 1915.[18]
- ↑ The mine was eventually detonated in the early hours of 29 May.[22]
- ↑ Some Turkish sources differ on the numbers of troops involved. Amin Bey says there were 47,000 men, while Kiazim Pasha says there were only 30,000 men.[23]
- ↑ While the mounted and light horse brigades had an establishment of around 1,900 men, when dismounted their rifle strength was only the equivalent of an infantry battalion.[27]
- ↑ Moorhead in 1997 claimed there were 5,000 dead.[56]
- Citations
- ↑ Fewster, Basarin, Basarin 2003, pp.xi–xii
- ↑ "No. 29115". The London Gazette (Supplement). 29 March 1915. p. 3099.
- ↑ "Dardenelles (sic) Commission report: conclusions". National Archives. Archived from the original on 1 February 2014. Retrieved 18 January 2014.
- ↑ "The landing at Anzac Cove". The Australian War Memorial. Archived from the original on 21 February 2014. Retrieved 1 January 2014.
- ↑ "ANZAC Cove". Australian Government. Archived from the original on 11 February 2014. Retrieved 18 January 2014.
- ↑ Fewster, Basarin, Basarin 2003, p.12
- ↑ Waite 1919, p.136
- ↑ Powles 1928, p.27
- 1 2 Moorhead 1997, p.146
- ↑ Moorehead 1997, pp.146–147
- ↑ Bean 1941, p.132
- ↑ Erickson 2007, p.1
- ↑ Erickson 2007, p.16
- ↑ Erickson 2007, p.18
- ↑ Erickson 2007, p.26
- ↑ Gudmundsson 2005, p.28
- ↑ Waite 1919, p.149
- ↑ "Mills Grenade and other like apparatus". US Patents. Archived from the original on 29 April 2014. Retrieved 1 January 2014.
- ↑ Nicolle 2010, p.20
- ↑ Bean 1941, p.133
- 1 2 Bean 1941, p.136
- 1 2 Cameron 2013, p.39
- 1 2 Bean 1941, p.135
- 1 2 Bean 1941, p.139
- ↑ Bryne 1922, p.36
- ↑ Sumner 2011, p.8
- ↑ Kinloch 2005, pp.30–32
- ↑ Bean 1941, pp.137–138
- ↑ Bean 1941, p.138
- 1 2 Bean 1941, p.140
- ↑ Bean 1941, pp.138–139
- ↑ Moorehead 1997, p.149
- ↑ Bean 1941, pp.140–141
- ↑ Bean 1941, pp.141–142
- 1 2 3 4 5 6 7 "No. 29303". The London Gazette (Supplement). 20 September 1915. p. 1.
- ↑ Bean 1941, pp.142–143
- ↑ Bean 1941, p.144
- ↑ Bean 1941, pp.147–148
- ↑ Bean 1941, pp.145–146
- ↑ Bean 1941, p.146
- ↑ Bean 1941, pp.149–150
- ↑ "No. 29240". The London Gazette (Supplement). 23 July 1915. p. 7279.
- ↑ Bean 1941, p.152
- ↑ Bean 1941, pp.154–155
- 1 2 Bean 1941, p.151
- ↑ Waite 1919, p.140
- ↑ Bean 1941, pp.155–156
- ↑ Morehead 1997, p.150
- ↑ Bean 1941, pp.157–158
- ↑ Bean 1941, p.159
- 1 2 Bean 1941, p.164
- ↑ Wilkie 1924, pp.21–23
- ↑ Nicol 1921, pp.42–43
- 1 2 Bean 1941, p.162
- ↑ "Early Battles". New Zealand History. Archived from the original on 2 February 2014. Retrieved 18 January 2014.
- ↑ Moorhead 1997, p.151
- 1 2 "Turkish counter-attack". Australian Government. Archived from the original on 11 February 2014. Retrieved 18 January 2014.
- ↑ "Simpson and his donkey". Australian War Memorial. Archived from the original on 25 April 2012. Retrieved 19 January 2014.
- ↑ "John Kirkpatriick". Commonwealth War Graves Commission. Archived from the original on 1 February 2014. Retrieved 19 January 2014.
- ↑ Moorhead 1997, pp.152–153
- ↑ Bean 1941, p.166
- ↑ Waite 1919, p.142
- 1 2 Bean 1941, pp.166–168
- 1 2 Waite 1919, pp.142–145
- ↑ Laidlaw, Private Victor. "Diaries of Private Victor Rupert Laidlaw, 1914-1984 [manuscript]". State Library of Victoria. Archived from the original on 7 February 2023. Retrieved 18 May 2020.
- ↑ Bean 1941, p.168
- ↑ "Dardanelles Campaign". Encyclopædia Britannica. Archived from the original on 3 February 2014. Retrieved 17 January 2014.
- ↑ Tucker 2013, p.56
- ↑ "Australian fatalities at Gallipoli". Australian War Memorial. Archived from the original on 29 January 2014. Retrieved 17 January 2014.
- ↑ "Gallipoli Campaign". New Zealand History. Archived from the original on 22 January 2014. Retrieved 17 January 2014.
- ↑ "Gallipoli". New Zealand Ministry of Foreign Affair and Trade. Archived from the original on 2 January 2014. Retrieved 17 January 2014.
- ↑ Fewster, Basarin, Basarin 2003, p.6
- Bibliography
- Bean, Charles (1941). Official History of Australia in the War of 1914–1918. Vol. II (11th ed.). Brisbane: University of Queensland Press. ISBN 0-7022-1586-4. Retrieved 23 August 2015.
- Byrne, J. (1922). New Zealand Artillery in the Field 1914–18. Christchurch: Whitcombe and Tombs.
- Cameron, David Wayne (2013). Shadows of Anzac: An Intimate History of Gallipoli. Newport: Big Sky Publishing. ISBN 978-1-922132-19-2.
- Erickson, Edward. J (2007). Ottoman Army Effectiveness in World War I: A Comparative Study. Taylor and Francis. ISBN 978-0-203-96456-9.
- Fewster, Kevin; Basarin, Vecihi; Basarin, Hatice Hurmuz (2003). Gallipoli: The Turkish Story. Crows Nest, New South Wales: Allen and Unwin. ISBN 1-74114-045-5.
- Gudmundsson, Bruce (2005). The British Expeditionary Force 1914–15. Battle Orders. Vol. 16. Oxford: Osprey. ISBN 1-84176-902-9.
- Kinloch, Terry (2005). Echoes of Gallipoli: In the Words of New Zealand's Mounted Riflemen. Wollombe: Exisle. ISBN 0-908988-60-5.
- Laidlaw, Private Victor. "Diaries of Private Victor Rupert Laidlaw, 1914-1984". State Library of Victoria, Melbourne, Australia. [manuscript]. Retrieved 19 May 2020.
- Moorhead, Alan (1997). Gallipoli. Ware: Wordsworth Editions. ISBN 1-85326-675-2.
- Nicol, C.G. (1921). The Story of Two Campaigns: Official War History of the Auckland Mounted Rifles Regiment, 1914–1919. Auckland: Wilson and Horton. ISBN 1-84734-341-4.
- Nicolle, David (2010). Ottoman Infantryman 1914–18. Warrior. Vol. 145. Oxford: Osprey. ISBN 978-1-84603-506-7.
- Powles, Charles Guy (1928). The History of the Canterbury Mounted Rifles 1914–1919. Auckland: Whitcombe and Tombs. ISBN 978-1-84734-393-2.
- Sumner, Ian (2011). ANZAC Infantryman 1914–15: From New Guinea to Gallipoli. Warrior. Vol. 155. Oxford: Osprey. ISBN 978-1-84908-328-7.
- Tucker, Spencer (2013). The European Powers in the First World War. Oxford: Routledge. ISBN 978-1-135-50694-0.
- Waite, Fred (1919). The New Zealanders at Gallipoli. Christchurch: Whitcombe and Tombs. ISBN 1-4077-9591-0.
- Wilkie, A. H. (1924). Official War History of the Wellington Mounted Rifles Regiment, 1914–1919. Auckland: Whitcombe and Tombs. ISBN 978-1-84342-796-4.