Introduction
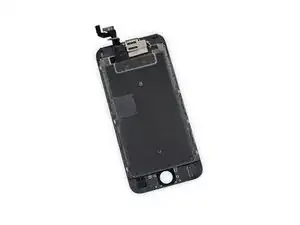
Learn how to replace your iPhone 6s screen. This part comes with the front-facing camera, sensor assembly, and EMI shield already installed, making for an easier repair.
All you need to do is remove the old screen and transfer the home button to the new screen, in order for Touch ID (fingerprint scanning) to function.
-
-
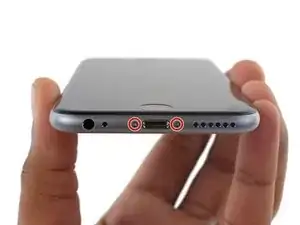
Remove the two 3.4 mm P2 Pentalobe screws on the bottom edge of the iPhone, on either side of the Lightning connector.
-
-
-
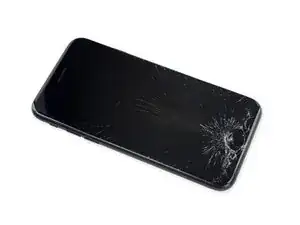
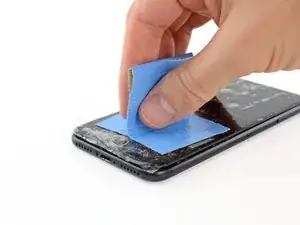
If your display glass is cracked, keep further breakage contained and prevent bodily harm during your repair by taping over the glass.
-
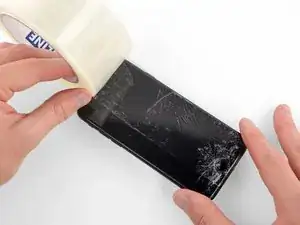
Lay overlapping strips of clear packing tape over the iPhone's display until the whole face is covered.
-
If the broken glass makes it difficult to get a suction cup to stick in the next few steps, try folding a strong piece of tape (such as duct tape) into a handle and lifting the display with that instead.
-
-
-
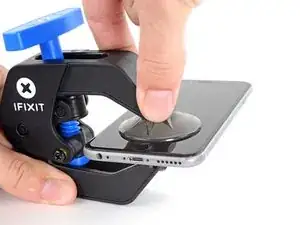
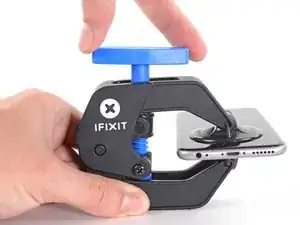
Pull the blue handle backwards to unlock the Anti-Clamp's arms.
-
Slide the arms over either the left or right edge of your iPhone.
-
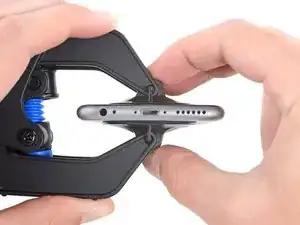
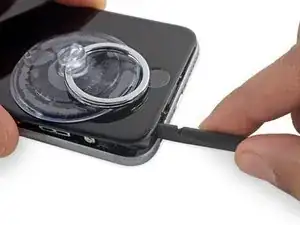
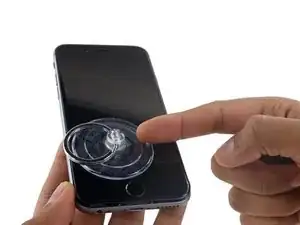
Position the suction cups near the bottom edge of the iPhone just above the home button—one on the front, and one on the back.
-
Squeeze the cups together to apply suction to the desired area.
-
-
-
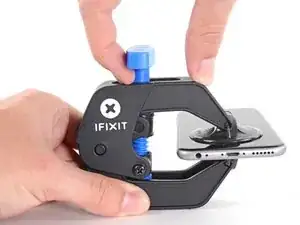
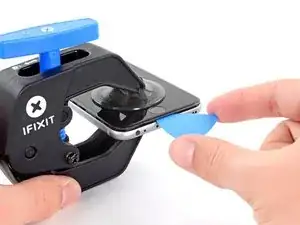
Pull the blue handle forwards to lock the arms.
-
Turn the handle clockwise 360 degrees or until the cups start to stretch.
-
Insert an opening pick under the screen when the Anti-Clamp creates a large enough gap.
-
Skip the next three steps.
-
-
-
If you don't have an Anti-Clamp, follow the next three steps to use a suction handle.
-
Apply mild heat to the lower edge of the iPhone using an iOpener or hair dryer for about a minute.
-
-
-
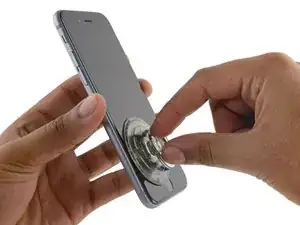
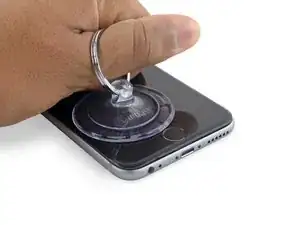
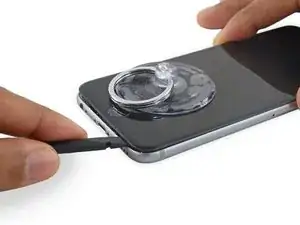
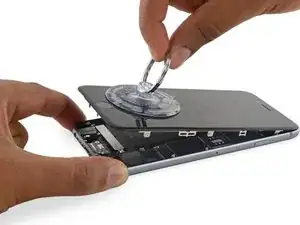
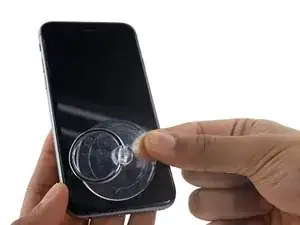
Apply a suction cup to the lower left corner of the display assembly.
-
Take care not to place the suction cup over the home button.
-
-
-
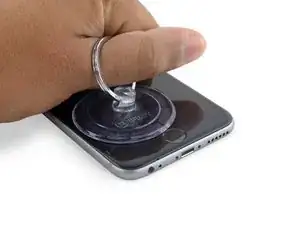
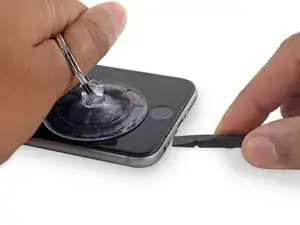
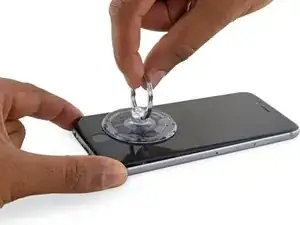
Pull up on the suction cup with firm, constant pressure to create a slight gap between the front panel and rear case.
-
-
-
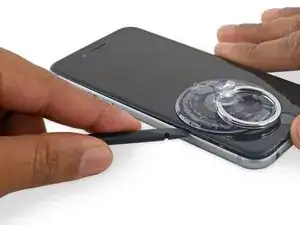
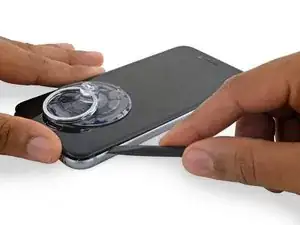
Place the flat edge of a spudger into the gap between the screen and rear case, directly above the headphone jack.
-
-
-
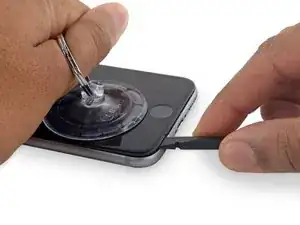
Twist the spudger to widen the gap between the front panel assembly and the rest of the phone.
-
-
-
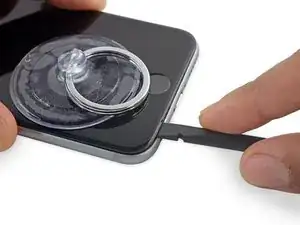
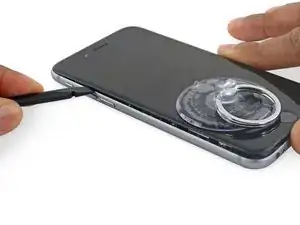
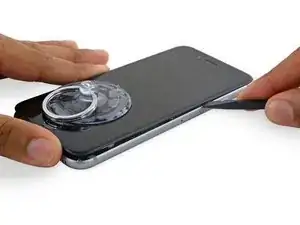
Insert the flat end of the spudger on the left side of the phone, between the display assembly and rear case.
-
Slide the spudger up the side of the phone to separate the adhesive and pop the clips free.
-
-
-
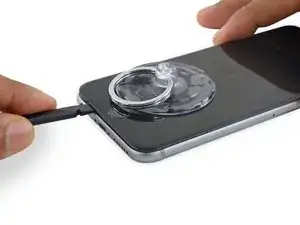
Remove the spudger and reinsert it on the bottom edge, where you pried the phone open.
-
Slide the spudger to the right, along the bottom edge of the phone.
-
-
-
Slide the spudger up the right side to continue separating the adhesive and popping the display clips free from the iPhone.
-
-
-
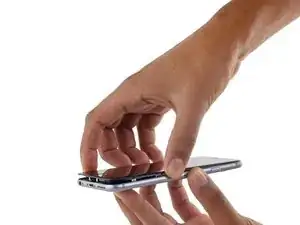
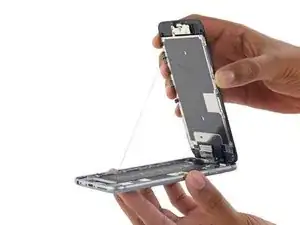
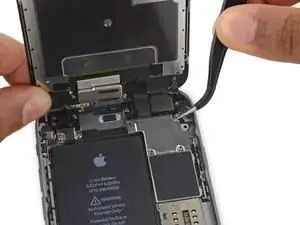
Gently grasp the display assembly and lift it up to open the phone, using the clips at the top of the front panel as a hinge.
-
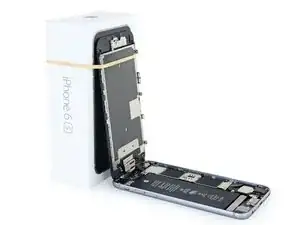
Open the display to about a 90º angle, and lean it against something to keep it propped up while you're working on the phone.
-
Add a rubber band to keep the display securely in place while you work. This prevents undue strain on the display cables.
-
-
-
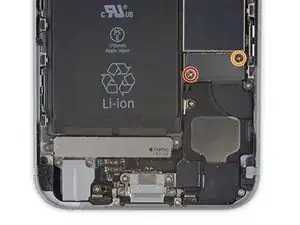
Remove two Phillips screws securing the battery connector bracket, of the following lengths:
-
One 2.9 mm screw
-
One 2.2 mm screw
-
-
-
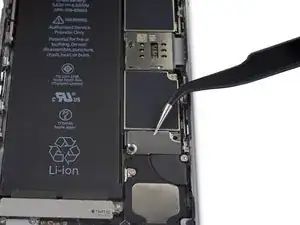
Use the point of a spudger to disconnect the battery connector by prying it straight up from the logic board.
-
-
-
Push the battery connector away from the logic board until it stays separated from its socket, so as to avoid any accidental connection to the battery while you work.
-
-
-
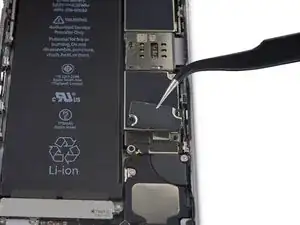
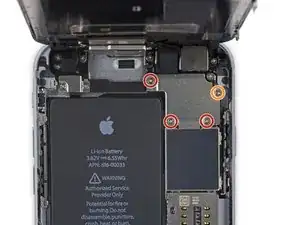
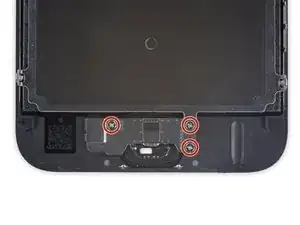
Remove the following four Phillips screws securing the display cable bracket:
-
Three 1.2 mm screws
-
One 2.8 mm screw
-
-
-
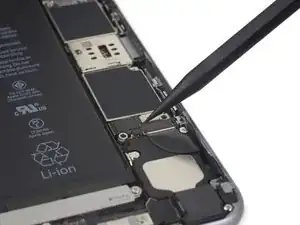
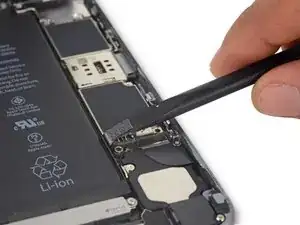
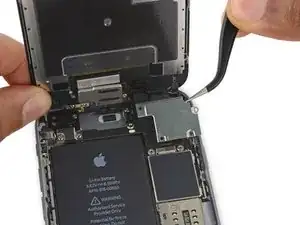
Use a spudger or a clean fingernail to disconnect the front camera flex cable by prying it straight up from its socket on the logic board.
-
-
-
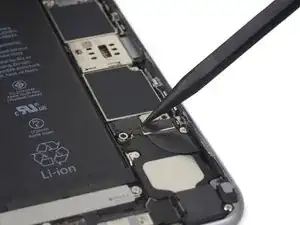
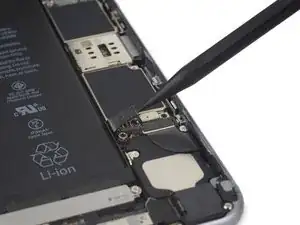
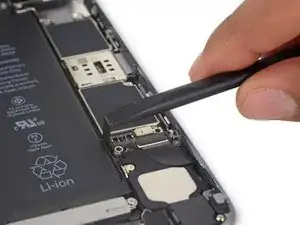
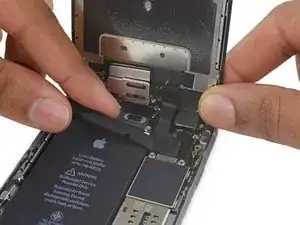
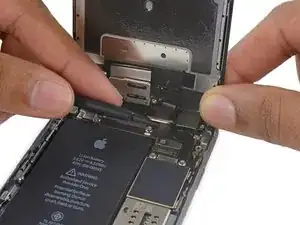
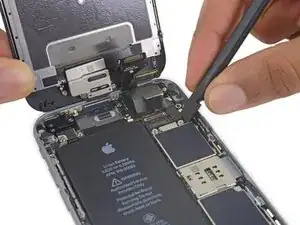
Lift the lower edge of the home button bracket until it clears the small peg on the right side.
-
Slide the bracket out from under the EMI shield to remove it.
-
-
-
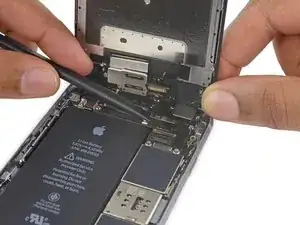
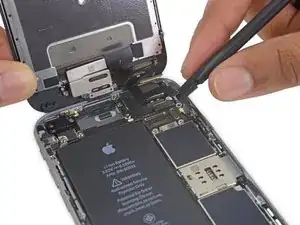
Use a spudger to disconnect the home button connector by popping it out of its socket on the back of the display panel.
-
-
-
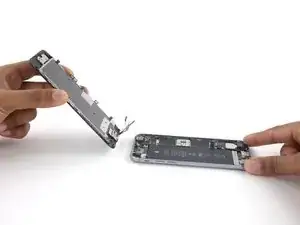
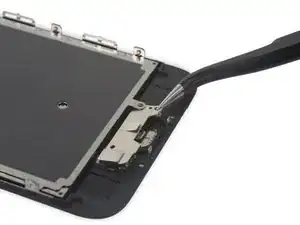
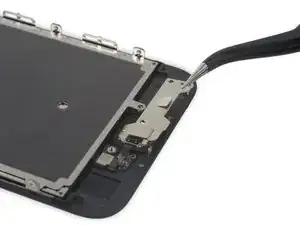
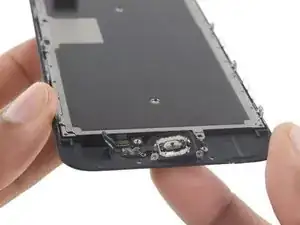
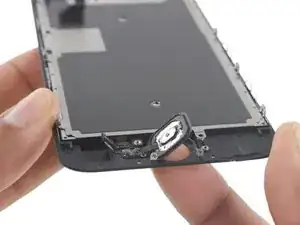
Apply mild heat (with an iOpener, heat gun, or hair dryer) to soften the adhesive securing the home button gasket.
-
Using your fingertip, gently press up on the home button from the front side of the display assembly. Use firm, constant pressure to slowly separate the home button's rubber gasket from the front panel.
-
-
-
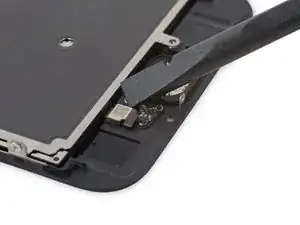
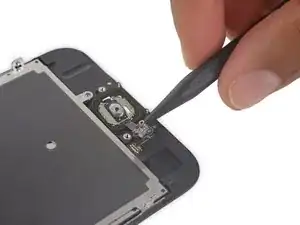
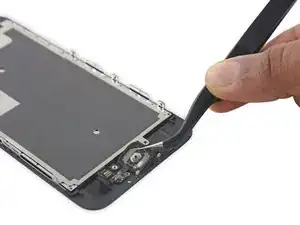
Use the pointed tip of a spudger to carefully separate the home button flex cable from the back of the display panel.
-


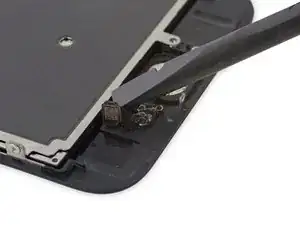

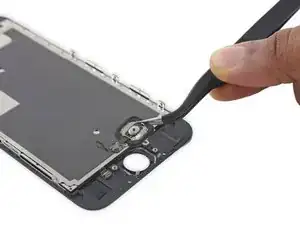
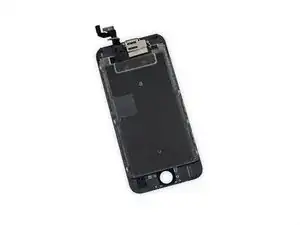
To reassemble your device, follow these instructions in reverse order.

138 comments
Muito bom. Já aprendi muito consultando os tutoriais da IFIXIT. Parabéns.
Solution worked very well - a couple of comments: 1. With a cracked screen the suction cup doesn't hold very well, I was nevertheless able to get the screen corner off with some heavy prying above the headphone jack as suggested in step 4. 2. In the replacement part I received, the order of the digitizer and camera cables was reversed, I had to tuck the digitizer cable back under the camera cable to get them down in the correct order. Great pictures and guide from ifixit.
Agree with both points. The guide is also missing steps (or mention of) moving the camera/sensor/etc to the new digitizer. I didn't think about it until I wondered why the old screen had 3 cables and the new one only had 2.
Thanks for the tip, I had the same issue with the suction cup not working on the cracked screen. Applying clear packaging tape over the screen helped but it still didn't come apart. Ended up using a blow dryer on the highest setting to help melt the adhesive around the bottom of the phone (being careful to not let it heat up too long) which eventually made it possible to wedge the spudge inside.
The guide and photos were great along with the replacement part from iFixit. Probably the easiest screen replacement I've done so far.
gotchay -
Try putting packing tape in the center of the screen. This will keep the glass chunks in and the suction cup will stick to it.
I jus replaced the display of my iPhone everything works correctly except for the light sensor, the auto brightness setting is now useless, everything else (camera, speaker, and such) works just fine. Any ideas why?
You may have not properly seated the proximity sensor, check to assure all plastic label stickers have been removed from the from and that it is properly seated. If it is damaged you will have to purchase a new flex.
Alec -
you may have bent the ribbon cable on accident, those parts are very inexpensive and easy to replace.
Hi, just got the repair kit that came with IPhone 6S battery. I felt that there’s no explanation on which tool to use to remove the two 3.4mm P2 Pentalobe screws. It’s not helpful just to say “Remove the two 3.4 mm P2 Pentalobe screws on the bottom edge of the iPhone, next to the Lightning connector. “. It’s more important to explain how and what tool to use. The repair tool kit tools were not marked at all and it’s not right to assume that people know which tool or part to use. Please kindly address this issue. Thanks. Janet
Janet Monaghen -
@beingchen For the P2 pentalobe screws you should use the driver bit marked P2. Might be a little hard to see but it’s there, etched into the side of the bit.
Jeff Suovanen -
It’s very clear which tool you need. As it says these are “3.4 mm P2 Pentalobe screws” - so you need a 3.4 mm P2 Pentalobe screwdriver…
alexanderbrix1987 -
Just a P2 driver—3.4 mm is the length of the screw.
Jeff Suovanen -
If you can’t identify which screwdriver in the kit to use, you probably shouldn’t be working on your phone. Just sayin’
Keith Hockenbeck -
This is very useful
https://www.jerryrigeverything.com/wp-co...
sam distefano -
Is it ok to replace the battery if the phone screen is broken?
Reem -
Of course! As long as the screen and battery are disconnected from the motherboard, you can replace anything!
Charles Bejarano -
is it possible to change my battery on my iphone 6s and use a battery that has been already used in another 6s
morgan durnford -
Yeah it would work, but if the battery heath on the 2nd battery is bad, just get a new one.
Charles Bejarano -
@moe6802 Removing the battery can damage it, and it shouldn’t be used afterward. It may seem fine, but even minor battery damage can lead to a fire hazard. Not worth it for such a cheap part. If you need a battery, just get a new one.
Jeff Suovanen -
How do you discharge a battery? Do you just let the battery drain or is there something less time consuming that you can do?
Matthew Petts -
There is no easy way to discharge the battery in “less time”. Perhaps the fastest way is to play a visually-complex modern game or otherwise make your phone do a lot of work.
Lance J -
So my phone screen is completely black causing me to see nothing that is on my screen. And the battery is above 25%, near 100%. What do I do??
Jessica I -
you should post a question on the answers forum
Seizure Salad -
you should post a question on the answers forum
Seizure Salad -
I can’t the screws with the P2, seems that the screws are stuck, what can i do?
Alberto Jabiles -
My kit came with 3 screws. Are those to replace these 2 P2 screws? And what’s the third one for?
Daniel Morse -
If it came with 3 screws, then it’s an extra one just in case if a replacement screw gets lost.
Charles Bejarano -
My display is cracked/broken and not functioning. The slide bar doesn’t work. How do I shut down my phone?
Timothy Huss -
i have replaced several ipod batteries and laptop work, but these screws seem to loose but do not come out. how am i to remove them.shake the iphone?it seems the ioen is not in my kit, is that how to remove them?
this seems idiotic but i remember some other system magnets that firt make your screws easier to keep, but this might be changed….any video? this seems 1st step blues!!!!
makinfilms -
never ind ishook it… is that in the guide?….iopener is not in the kit……never was before is this an upsell? do i skip it? i dont have it
makinfilms -
My screws aren’t coming out either. I’ve loosened them, but they aren’t coming out. I’ve shaken the phone, given it some slight bangs…nothing.
Jesse Fisher -
The following info is not given until step 21 in the instructions, and probably too late at that.
DO NOT disconnect or reconnect any of the cables in this device until the battery itself has been disconnected!
Don’t skip that step, intending to do it at the end, as you may damage the phone.
ffissk -
2 thoughts:
1) Really? Steps 14-17 are about disconnecting the battery first, and step 17 notes “so it doesn’t get reconnected while you work.” How’d you get to step 21 and miss 14-17?
2) These pages are user-editable. (Probably (hopefully) “curated” by iFixit staff.) You should add a warning to step 17 (or step 24).
Bass Clef -
NOW THAT YOU’VE REMOVED 2 SCREWS, and
BEFORE YOU SNEEZE them into oblivion, or under the refrigerator (which is the same in many houses)
MAY I suggest:
1) Obtain:
— a piece of paper, such as normal printer paper (not too much writing on one side)
— a piece of tape, not too sticky, like masking tape (duct tape would be bad)
——— 1-1.5 inches (2.5-4 cm) wide
——— 6-8 inches (15-20 cm) long
— a pencil (or pen)
2) Put the paper on the side of your work area
3) Lay the tape, sticky side up, on the paper
4) Fold each end of the tape (~1 inch/2.5cm) back under itself, so the folded part faces the paper. Press the folded-back tape onto the paper
You now have Sneeze & Wind Insurance for your tiny bits!
5) Put the 2 pentalobes end down on the top end of the tape, next to each other. Push them a little onto the tape so they stick
6) Use your pencil to note on the paper next to the screws: “1. Pentalobes”
Now you may proceed with dissassembly, without worrying about telling the 1.5mm from the 1.6mm screws.
or about sneezing!
Bass Clef -
My phone has a bad battery and a bad connector and I wasn’t able to get all of my photos before it died. Is there any chance I won’t lose them when I replace the battery? Or, is there any way to charge a 6s battery with a bad connector?
Liz R -
There is a great chance that photos, which are stored to flash memory, which is solid state memory, which is not affected when power is lost, will be there, right where you left them, once you restore power to your device. You could install a partially charged battery into your phone and then retrieve the important things, like your photos, if you don’t intend to continue using the phone. Else look at replacing the lightning connector assembly. Here: iPhone 6s Lightning Connector Assembly Replacement
TimD -
The P2 is not getting the screws loose at all. I have tried this several times and no budge on my iPhone 6s.
Cassandra Vigil -
To avoid to be screwed by lost or mixed screws:
- Use magnetic pad, wipeable
- Write the ifixit- steps next to the screws (maybe even with their sizes) and other bits removed
with a non-permanent marker
- When finished, simply wipe the pad, and it’s ready for the next repair
Hope that helps.
Ulrich Janßen -
I found a pentalobe 1 driver to work much better.
joelkevinjones -
The suction cup didn’t hold at all. I tried Windex and then hospital grade alcohol, but nothing worked. Finally had to use two exacto knife blades to begin lifting the screen. As soon as I got a little gap, used the spudger tool the rest of the way, The small philips driver didn’t fit the screws exactly, but with a little effort they came out. My battery adhesive strips snapped immediately and I had to remove the original battery the “hard way”. The kit came with replacement display adhesive but no explanation how to use it. I got some on - so better than nothing. Overall I’m happy with the results, and the new battery is charging now.
Daniel Wolf -
First step problem? Couldn’t get the screws out. I checked my other iPhone and realized the screws were missing!Just started prying it apart.
Hoyt Smith -
I went through the whole procedure, replaced the battery and got the screen back on. Then the 2 pentalope screws would not go into their sockets. They sink in all the way and spin, but it appears there are no threads to grab. The screen seems to be in position since I can insert a plug into the headphone jack without trouble. Did anyone else have this problem. Using the phone now with no screws. Yikes.
Walter Plante -
Hi Walter, in case you’re still dealing with this or anyone else has the same problem, check that the screw bosses on the bottom of the screen are straight and line up with the screw holes on the case. They should be at a 90° angle to the screen, but they’re easy to accidentally bend and could’ve gotten flattened against the screen.
Adam O'Camb -
I recommend a loop of tape attached to the table, and placing the screws on the tape in the order they were taken out. identifying the screws to put back is a simple matter of going the other way back up the tape.
David Taylor -
Did the repair for the second time, each time faster and easier. This steps by step is amazing and crystal clear no mistake possible.
Jean-Gabriel Duquesnoy -