Introduction

The ringer speaker is an essential component responsible for producing audible alerts such as incoming calls, notifications, and alarms. If you're experiencing issues like no sound or poor audio quality from your device's ringer, replacing the ringer speaker can resolve these problems and restore clear and audible alerts.

Guide Objective: This guide provides detailed step-by-step instructions on how to safely and effectively replace the ringer speaker in your Moto G Stylus 4G (2023).

Before You Begin:

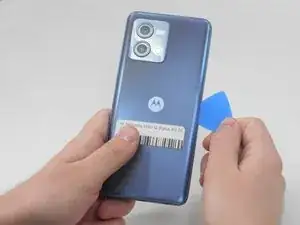
  1. Safety Precautions: Power off your device completely and disconnect any power sources before starting the replacement process. Work in a well-lit and clean environment to avoid losing small parts or causing accidental damage.
  2. Backup Data: Although this replacement does not involve data manipulation, it's a good practice to back up your device's data as a precautionary measure.

Device Symptoms: Common symptoms indicating the need for ringer speaker replacement include:

  • No sound or low volume from the ringer
  • Distorted or crackling audio during alerts
  • Inconsistent or intermittent ringer functionality
  1. wGjrLQWONZNuQRdN
    wGjrLQWONZNuQRdN
    hJqTpUrkD5LRMrIV
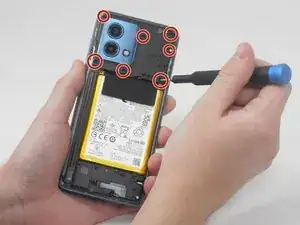
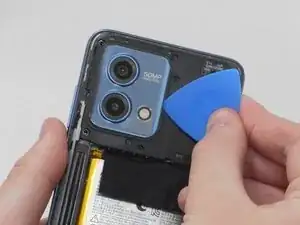
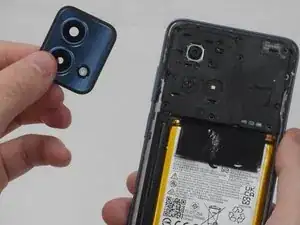
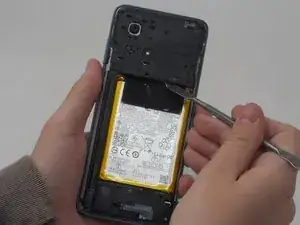
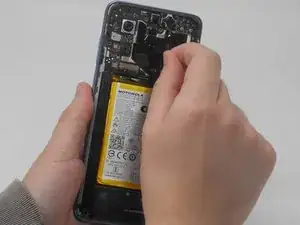
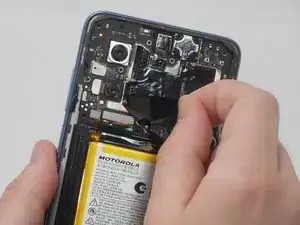
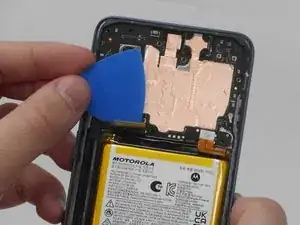
    • Insert an opening pick under the edge of the case and slide it around the edges.

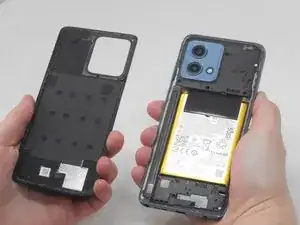
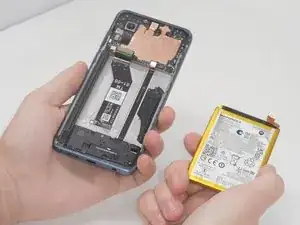
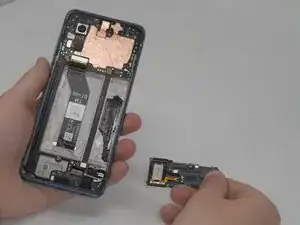
    • Separate the back panel from the rest of the phone.

    I recommend following the first 2 steps for the Moto G Stylus 2021 model FIRST before starting this guide: Motorola Moto G Stylus (2021) Battery Replacement - I left comments for those first 2 steps with some notes about removing, but you will need to use a focused heat tool (iOpener works great) and an opening tool (different from an opening pick) to get the back cover loose before you can insert an opening pick if you've never removed the back before/the adheasive is strong.

    M. F. Espinoza -

  2. 5AGtKRrh2ufqJcrT
    • Remove the seven 4 mm screws from the phone’s top with a Torx T5 screwdriver.

    I have a 5G, 2023 model, and that model actually has 8 phillips screws - 2 of which are partially blocked by the back camera. If you have the 5G, you'll need to do Step 3 here before you can get to those two screws.

    M. F. Espinoza -

    p.s. For the 5G 2023 model, once you remove the camera lense glass, you'll see 2 additional phillips screws that will aslo need to be removed to remove the midframe. Be very gentle when removing the camera lense glass with the opening pick to avoid breaking, especially for the thin portions around the lenses. I used the pick mostly for picking up the perimeter of the lense glass, then gently pulled up to get it all the way off of the rest of the adhesive. For the screws that were only partially blocked by the lense glass, my phone had some adhesive that was also slightly covering the screws. Rather than remove it, I just peeled it back enough to remove the screws so I wouldn't need to replace the adhesive.

    M. F. Espinoza -

    p.p.s. There are 10 phillips screws in total for the 5G 2023 model - 6 that you can access once the back cover/top portion of the yellow battery adhesive is removed and 4 more that you can access once you remove the camera lense glass.

    M. F. Espinoza -

  3. CHsNKlxDLZvaZ4ri
    CHsNKlxDLZvaZ4ri
    WRSLKVRUbekaCMpW
    • Use the opening pick along the edges to separate the camera lens glass from the board.

  4. se5OKYxII61smP5C
    • Remove three 4 mm screws with a Torx T5 screwdriver.

  5. yNxbuAfPL36VNhS3
    • Pry off the top perimeter with an ESD-safe spudger and set it aside.

    For the 5G 2023 model, when replacing this piece, there are three very tiny male parts that 'click' into respective tiny female slots in the body of the phone. One is on the left side of the camera lenses, another is at the top in the middle, and the last one is on the far right side. This makes it a bit tricky to replace/you can't just pop it back on. I found it best to align/click in the left side part first and then, carefully, do the same with the top middle one in order to press down on the rest of it and settle it into place for screwing back down. For the 5G model, remember to replace the 4 screws for the camera lense area as well before replacing the camera lense glass!

    M. F. Espinoza -

  6. CWgIdYJMs2RnEcAu
    CWgIdYJMs2RnEcAu
    VqjKuydEapBJhJBT
    • Pull the black tab off of the battery gently with your hand.

    For the 5G 2023 model, these black tabs may run down the length of the battery (my phone had two seperate ones) and there is also a tab at the very bottom of the battery. You can lift the top tab(s) from the bottom, just enough to expose the battery. My phone had one of the tabs slightly obscured by the stylus flap guard (long, thin plastic piece to the left of the battery). I used my finger nails to gently lift the guard up a bit, just enough to pull up the tab, but I was careful not to fully remove the stylus guard. Once the battery tab was pulled up, I pressed the stylus guard back into place & did not need to do anything else to it to install the new battery.

    M. F. Espinoza -

  7. hCb4TPyHNVhZRZcH
    hCb4TPyHNVhZRZcH
    cu5ngxQTgRFkHgq6
    • Disconnect the four cables by inserting the opening pick beneath the edge of each.

    Important: only 1 of the 4 cables is actually connected to the battery! It should be the cable furthest to the right. Be careful when prying up the battery to avoid damaging the other 3 cables, especially the tiny one on the far left - it's not attached to the battery, although it does look alot like the one that is.

    M. F. Espinoza -

    Notes about using ifixit's double-sided adhesive: I don't think it's necessary to use much additional adhesive to secure the battery, unless the adhesive was significantly damaged upon removal/does not keep the battery in place if you turn it over with the back off. That said, I chose to remove the adhesive that was below the old battery & replace it with the fresh set that came with my ifixit replacement battery. For the back cover, which is the most important as it needs adhesive to remain in place, I would recommend not removing any residual adhesive that remains after intially removing the cover. The battery replacement I ordered from ifixit came with a pretty good back cover adhesive, however, it's very easy to mess up the application. The clear blue sheild should be placed on the inside of the back cover with the the sticky side down in order to properly remove the shield once it's in place. Be careful not to let it stick to any other surface, like plastic, before applying or it could get stuck!

    M. F. Espinoza -

  8. Ji6BKN2TR3kSOGDK
    Ji6BKN2TR3kSOGDK
    4AfwLCHmGNqvkW5X
    • Together with the opening pick and an ESD-safe spudger, remove the old battery.

    Okay, this was definitely the most tedious part. For the 5G 2023 model, if you've never had the battery replaced/the adhesive is strong go very slowly here.

    It's a bit tough to get the spudger under the battery, but once it's about 1/4 inch under you should have enough leverage to wiggle the battery up enough to wedge the opening pick in along the side of the battery to use both tools and get the battery all the way out. I used the spudger mostly along the very top of the battery (careful to not damage the cables) and then a bit further toward the center since there was a lot of adhesive in the middle.

    M. F. Espinoza -

  9. ZaeTrhMkQ3XDk5XF
    • Remove seven 4 mm screws with the T5 Torx screwdriver.

  10. jFfyxFwbJF5mXWt5
    jFfyxFwbJF5mXWt5
    HMURHFFStURQUlDj
    • Remove the speaker using an ESD-safe spudger.

Conclusion

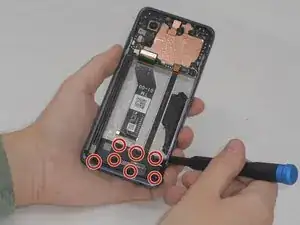
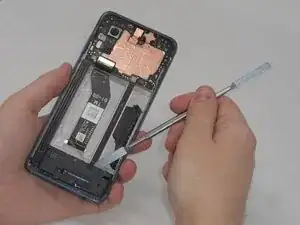
To reassemble your device, follow these instructions in reverse order.

Camille Holley

Member since: 14/02/24

609 Reputation

0 comments