Introduction

Follow this guide to replace the battery in your Samsung Galaxy S22.

This guide is for the battery itself. If you're replacing the OEM screen and battery assembly (the frame, screen, and battery as one piece), follow this guide.

  1. vNyZTvpxmtsuoSpd
    • Let your phone's battery to drain below 25% before starting this repair. A charged lithium-ion battery may catch fire if damaged.

    • Heat an iOpener and apply it to the bottom edge of the back cover for two minutes.

    • A hair dryer, heat gun, or hot plate may also be used, but be careful not to overheat the phone—the display and internal battery are susceptible to heat damage.

  2. YON54aNhBiS4PrTH
    YON54aNhBiS4PrTH
    seCjL4ClIyjmKX6D
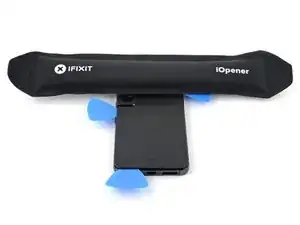
    • While you wait for the adhesive to soften, note the following:

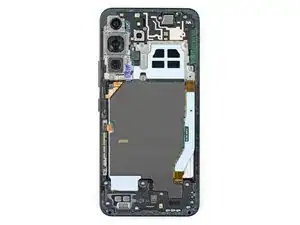
    • There's adhesive securing the back cover around the perimeter of the frame.

    • The adhesive is strongest in the bottom right and top left corners.

  3. YxFOVARobQPP1QR4
    YxFOVARobQPP1QR4
    2srRAIFDtwIFXaO3
    tVPUbDOpBhoqH4V5
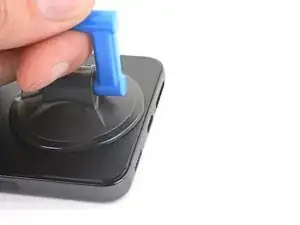
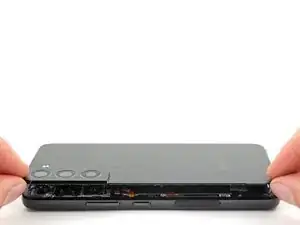
    • Apply a suction handle to the back cover, as close to the bottom edge as possible.

    • Pull up on the suction handle with strong, steady force to create a gap between the cover and the frame.

    • If you have trouble creating a gap, apply more heat to further soften the adhesive. Follow the iOpener instructions to avoid overheating.

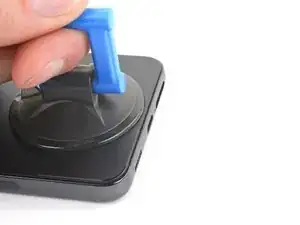
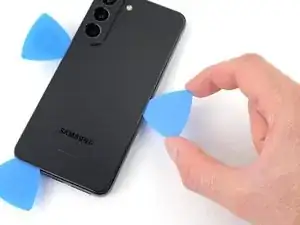
    • Insert an opening pick into the gap.

  4. WLnbDwXlhG4MOJl2
    WLnbDwXlhG4MOJl2
    uHMLOEhtaImqfiIE
    uQ5RQDuVxTILKBGW
    • Slide the pick back and forth along the bottom edge to slice through the adhesive.

    • Leave the pick inserted in the bottom left corner to prevent the adhesive from resealing.

  5. gKXKJKeQYjBbsHfU
    • Apply a heated iOpener to the left edge of the back cover for two minutes.

  6. 62VpFTVYJRAIXEJt
    62VpFTVYJRAIXEJt
    kBKqJWGYyCGEQfPy
    IyiMLqKuUYELf1nb
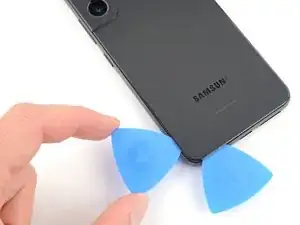
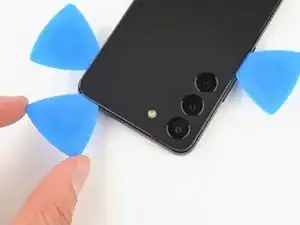
    • Insert a second opening pick at the bottom left corner.

    • Slide the pick to the bottom of the camera bezel to slice the left adhesive.

    • Only insert the pick up to 5 mm, as you may damage the antenna flex cable or the power button cable.

    • Leave the pick in to prevent the adhesive from resealing.

  7. FhTaFqcQ1vxSsa6L
    • Heat an iOpener and apply it to the right edge of the back cover for two minutes.

  8. ZDWRbYhC1c1jpAhH
    ZDWRbYhC1c1jpAhH
    5DbSUfYTkyoVd1qv
    xMcAMI4LpNRWJEDs
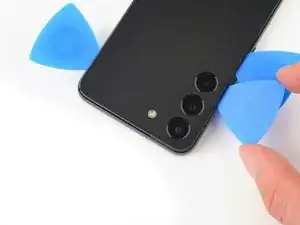
    • Insert a third opening pick at the bottom right corner.

    • If the adhesive has resealed, insert the pick closer to the bottom edge.

    • Slide the pick to the top right corner to slice the adhesive.

    • Leave the pick in the top right corner to prevent the adhesive from resealing.

  9. DFokNwiJlo2s4SVS
    • Heat an iOpener and apply it to the top edge of the back cover for two minutes.

  10. AUBZZFcbTkMlUJhi
    AUBZZFcbTkMlUJhi
    NyjDcgePKJWlgDPP
    AfoogBYpba2mrHZ2
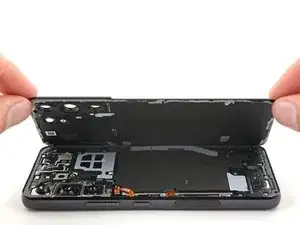
    • Insert an opening pick in the gap at the top right edge.

    • Slide the pick across the top edge and around the top left corner to slice the remaining adhesive.

    • Only insert the pick up to 4 mm, as you may damage the rear cameras or flash.

  11. kLwKvCruLUwnP6ub
    kLwKvCruLUwnP6ub
    2qckA2vYZ2lSYya1
    O6I4YVbwWwyFvN1q
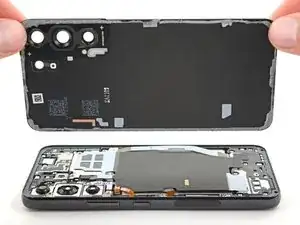
    • Grab and remove the back cover.

    • If your cover is still sticking to the frame, slide an opening pick around the perimeter until the cover completely separates.

    • During reassembly:

    • This is a good point to power on your phone and test all functions before sealing it up. Be sure to power your phone back down completely before you continue working.

    • Remove any adhesive chunks with a pair of tweezers or your fingers. Apply heat if you're having trouble separating the adhesive.

    • To apply new adhesive, follow this guide.

  12. aKCJXduIcwPEN2rh
    aKCJXduIcwPEN2rh
    HpFDyFeSynreDYVt
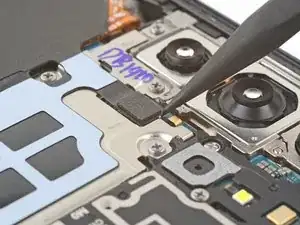
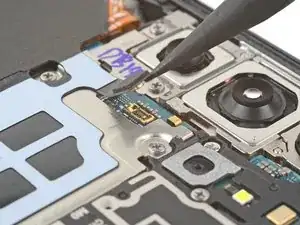
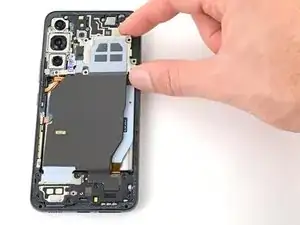
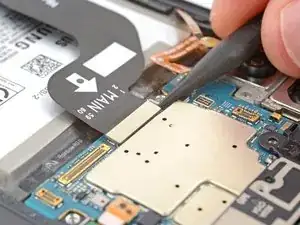
    • Use the pointed end of a spudger to pry and disconnect the wireless charging coil from the motherboard.

    • To re-attach press connectors, carefully align and press down on one side until it clicks into place, then repeat on the other side. Don't press down on the middle. If the connector is misaligned, the pins can bend and cause permanent damage.

  13. AE4QbvOGd1mGn4eS
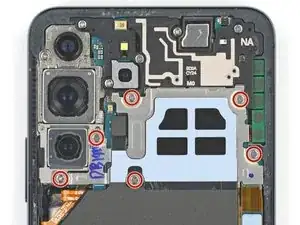
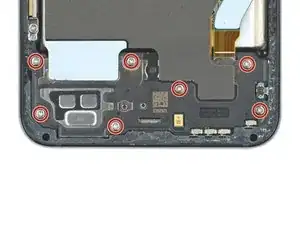
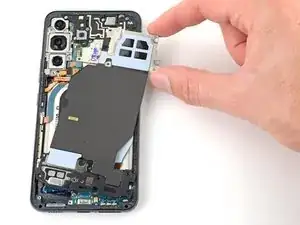
    • Use your Phillips screwdriver to remove the six 3.5 mm-long screws securing the wireless charging coil.

  14. bptEIHWSoIvHnV6T
    • Use your Phillips screwdriver to remove the seven 3.5 mm screws securing the loudspeaker.

  15. KgkxN4rnWYOOYCCj
    KgkxN4rnWYOOYCCj
    kRCZtqZR2txYyVMX
    Ds1WRYnZOKhxMiDw
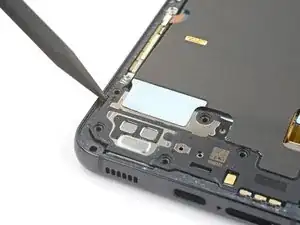
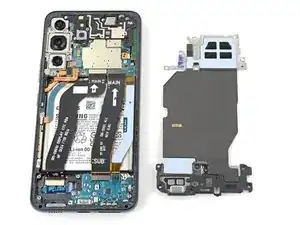
    • Insert the pointed end of your spudger between the upper left corner of the loudspeaker and the frame.

    • Pry up to unclip the loudspeaker from the frame.

    • During reassembly, press around the perimeter of the loudspeaker to engage the clips.

  16. FrNwOCsmhWXXSeMe
    FrNwOCsmhWXXSeMe
    A3JyQGRrPFeXkWAo
    RDWAUlIpGiCdlPMc
    • Grab and remove the wireless charging coil and loudspeaker from the frame.

    • Do not separate the charging coil from the loudspeaker.

  17. BmMXmHSqjwHBE3co
    BmMXmHSqjwHBE3co
    oZsI1A3jWoECYYvB
    • Use the pointed end of your spudger to pry up and disconnect the battery press connector.

  18. DnLI6tsgLB6AZBnA
    DnLI6tsgLB6AZBnA
    LpJUeoLITW4s2Dal
    5gZEnYUSQ3bEQayB
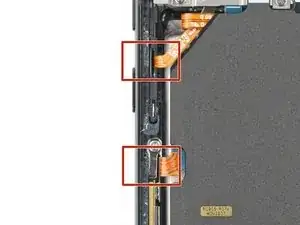
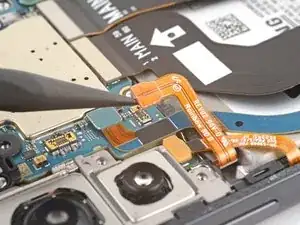
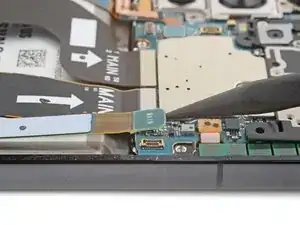
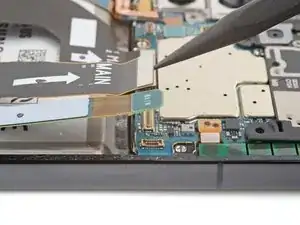
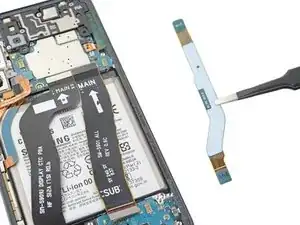
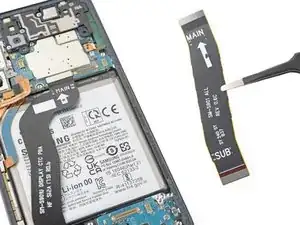
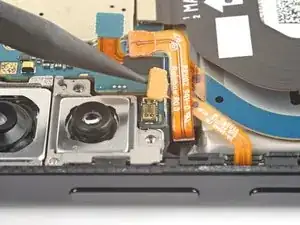
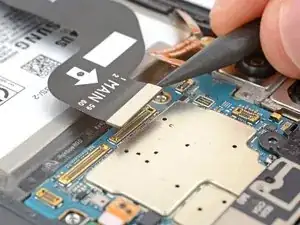
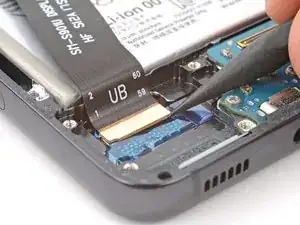
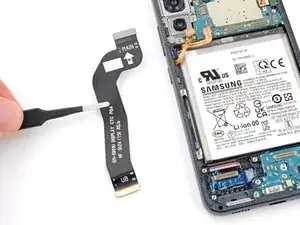
    • Use the pointed end of your spudger to pry up and disconnect both interconnect cables from the motherboard.

  19. I5voYwmLb5NGpdKV
    I5voYwmLb5NGpdKV
    RrsijEGy1guqimNF
    HTv3TL1VJGoVeBGw
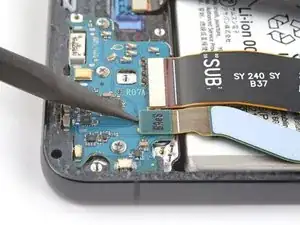
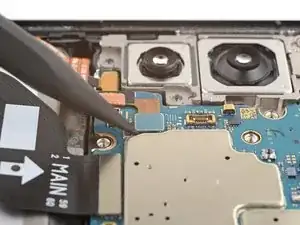
    • Use the pointed end of your spudger to pry up and disconnect both interconnect cables from the charging board.

  20. EdgKJGCEC3Zqeccd
    EdgKJGCEC3Zqeccd
    uoS1dojO3WOvZOlr
    vr4MCULBK3wlkq2D
    • Grab and remove the two interconnect cables from the frame.

    • During reassembly, orient the cables so the "main" ends are toward the top of the phone and the "sub" ends are toward the bottom.

  21. oRY4xgGMShCaKgog
    oRY4xgGMShCaKgog
    uSZTPGo55ZcyFsbv
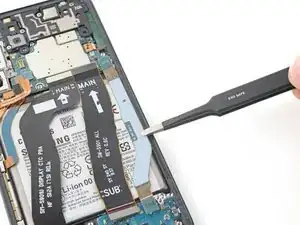
    • Use the pointed end of your spudger to pry up and disconnect the power and volume button press connector.

  22. fOXUELRmqDRIeuD4
    fOXUELRmqDRIeuD4
    3FM4e2NT4lLLXHy4
    • Use the pointed end of your spudger to pry up and disconnect the left 5G mmWave antenna press connector.

    • During reassembly, make sure this cable and the power and volume button cable are under the battery cable.

  23. xOClpYXDDHfSmLt6
    • Use your Phillips screwdriver to remove the two 3.5 mm‑long screws securing the left 5G mmWave antenna.

  24. JXTEaHGf4YSrxrIM
    JXTEaHGf4YSrxrIM
    puqhAdNkkShfRw2V
    KbYHYA3ClnLZNIRw
    • Insert the pointed end of your spudger between the lower screw mount of the antenna bracket and the frame.

    • Pry up on the bracket until you can grab it with blunt nose tweezers or your fingers.

    • Remove the left 5G mmWave antenna.

  25. OXbFpF6nZE2P1DDC
    OXbFpF6nZE2P1DDC
    wn4WqHuSZEbDAtYm
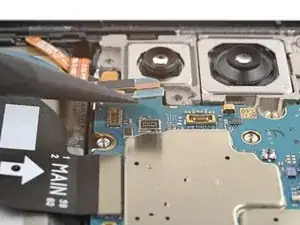
    • Use the pointed end of your spudger to pry up and disconnect the screen press connector from the motherboard.

  26. AF4SUBmFUhIDxhWo
    AF4SUBmFUhIDxhWo
    qMMTBseYAUFyIv2G
    • Use the pointed end of your spudger to pry up and disconnect the screen press connector from the bottom left corner of the phone.

  27. 13nMP1lotoU2mnCQ
    • Remove the screen cable.

  28. b5XpdY3D14RMNGHJ
    b5XpdY3D14RMNGHJ
    ciWQB1EfAoIDbO3o
    AiNJZCxS6WFwWNfT
    • Strong adhesive secures the battery to the frame.

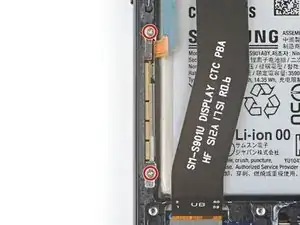
    • Use a pipette or syringe to apply 1-2 drops of high-concentration isopropyl alcohol (greater than 90%) between the right edge of the battery and frame.

    • Using too much alcohol can damage the display.

    • Elevate the right edge of the phone for one minute to allow the isopropyl alcohol to flow under the battery and soften the adhesive.

  29. BqvvLwrNHATZyMDS
    BqvvLwrNHATZyMDS
    YOHsXnOHvx3Xo2QD
    HjJMA6dkqJ6OXLut
    • Take care not to puncture the battery—it can leak dangerous chemicals and/or catch fire.

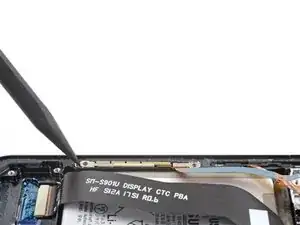
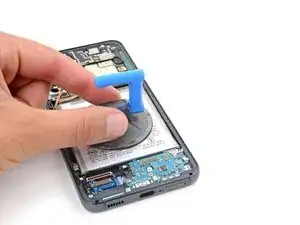
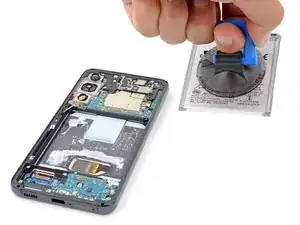
    • Apply a suction cup to the battery, as close to the center of the right edge as possible.

    • Insert the tip of an opening pick between the right edge of the battery and frame.

    • Push the opening pick down and rotate it so the long end is between the battery and frame.

  30. KsSBMCyEmAnmXPKn
    KsSBMCyEmAnmXPKn
    mLeby3vNXOMvRZJ5
    NDLMjdj2OQMnMpMa
    • Take care not to crease or bend the battery—it can leak dangerous chemicals and/or catch fire.

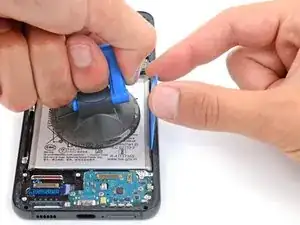
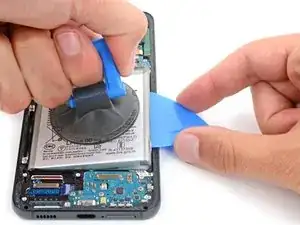
    • Pull up on the suction cup with strong, steady force while prying the battery up with the opening pick.

    • Maintain constant pressure on the pick and suction cup until the battery separates from the frame.
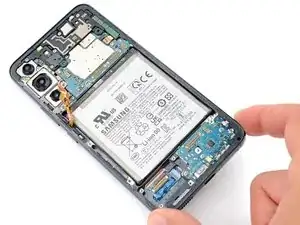
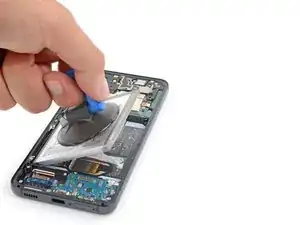
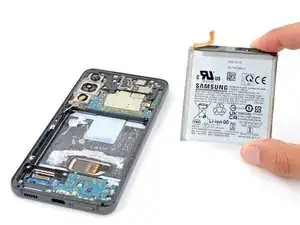
    • Be patient and allow time for the adhesive to separate. If the battery doesn't budge, apply a few more drops of isopropyl alcohol and try again.

    The battery in my S22 had swollen enough to pop the side edges of the back cover. On disassembly, the front face of the battery was bloated to a point where a suction cup was of no use. I used the isopropyl alcohol as directed. With picks, then spudger, the bottom right corner was lifted to where the right edge could be accessed and raised. Excellent Guide!

    Jeffry Long -

  31. MrExFYOpqeq4lmjA
    MrExFYOpqeq4lmjA
    CVYFpO2eUAdq2VxD
    QnPUd1COCgApcMol
    • Remove the battery.

    • If you used isopropyl alcohol, wait ten minutes before installing the new battery to allow the alcohol to completely evaporate.

    • Follow this guide to install your new battery.

Conclusion

To reassemble your device, follow these instructions in reverse order.

For optimal performance, calibrate your newly installed battery after completing this guide.

Take your e-waste to an R2 or e-Stewards certified recycler.

Repair didn’t go as planned? Try some basic troubleshooting, or ask our Answers community for help.

Spencer Day

Member since: 14/09/22

88286 Reputation

5 comments

Very good article, but could not print out which would have been useful.

Dennis Stenstrom -

Hi Dennis! At the top of the page next to the Edit button there is a down arrow (⌄). If you click it, you should see an option that says Download as PDF. This should give you a version that's printable.

Spencer Day -

If one were to open the back panel using a hot air station, how much temperature for how long will do the job without damaging the phone?

Eligio Budde -

did you try?

Lupša David -

The guide was very useful, the only problem was opening the phone. It took me two days, but it's just a matter of applying plenty of heat around the edges without exceeding 2 minutes. Once you open one side, the rest is easy. Now, removing the battery can be very challenging. It was very stressful. Apply isopropyl alcohol both to the sides and underneath, but you have to move the battery aside so that it can reach underneath it. I couldn't remove the battery with those plastic things from the iOpener, luckily I had a thin metal tool that I bought from AliExpress a long time ago in a kit, and that helped me a lot. It looks like the thing JerryRig uses (or used to use) when he does a teardown. I just inserted it on the sides and started prying. Even though it bent, I could hear the glue coming off, so I took advantage and added more 99% isopropyl alcohol until it finally came out. The rest is just putting in the new battery and reconnecting everything.

Norman Garcia -