Introduction

Use this guide to replace the battery in your Razer Blade 15" (2019).

If your laptop dies quickly or doesn't hold a charge, it might be time to replace the battery.

Note: This laptop supports expandable storage with an HDD (hard disk drive). This guide requires that you remove the hard drive from your laptop, if it has one. If your model doesn't have a hard drive, skip the steps showing how to remove it.

  1. U3WCBShbaLvURkIn
    U3WCBShbaLvURkIn
    DLKeF3nRAqw6JZHV
    • Allow your laptop's battery to drain below 25% before starting this repair—a charged battery may catch fire if damaged.

    • Unplug all cables, fully shut down your laptop, and close the lid.

  2. mwpZH3qBEQhGfMsZ
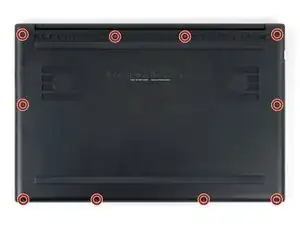
    • Rotate your laptop so the screen hinge is farthest from you.

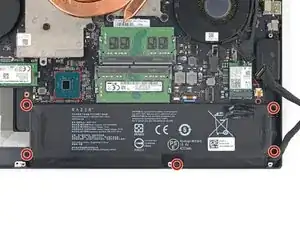
    • Use a Torx T5 driver to remove the ten 3.8 mm-long screws securing the back cover.

  3. UyswDlrMoOuPxypO
    UyswDlrMoOuPxypO
    ZCQLS6SmYFD16roT
    AKZCEEwppCqshwfw
    • Depending on the age and condition of your laptop, the back cover may come off sooner than this guide instructs. If the cover feels loose, remove it at any time.

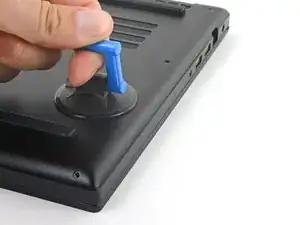
    • Apply a suction handle to the right edge of the back cover, between the middle screws and the screws closest to you.

    • Pull up on the suction handle to create a small gap between the back cover and the frame.

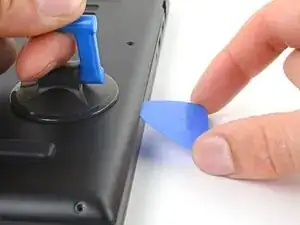
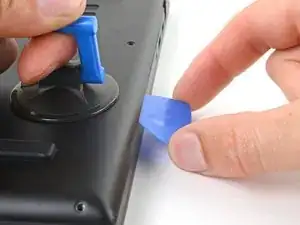
    • Insert an opening pick into the gap.

  4. 5ZeHhQqyGyPNtQ2Z
    5ZeHhQqyGyPNtQ2Z
    65pDl33yTCvLjvtV
    6GNJkCfOsbUZWFQE
    • Angle your opening pick upward, away from the frame. Keep it angled upward as long as it's between the back cover and the frame.

    • Insert your pick up to 10 mm (0.4 in) deep.

  5. aoYEQ1ZuOohURDBV
    aoYEQ1ZuOohURDBV
    3wZjhrAbjWVHpYDE
    QaiFOX5uygSIVlEo
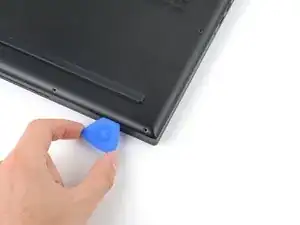
    • Slide your opening pick around the bottom right corner of the back cover to free it from the frame.

  6. aoJKrYRFNEwNCsgQ
    aoJKrYRFNEwNCsgQ
    WU5LeqALfrufkyDR
    1ig13qvemkhwD3TF
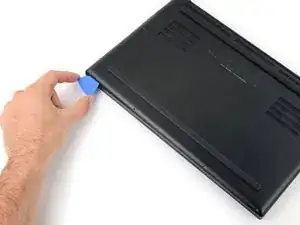
    • Slide your opening pick along the front edge and around the front left corner of the back cover to free it from the frame.

  7. I5kaOpbIqhSTcGUi
    I5kaOpbIqhSTcGUi
    jVDlxYULoPWxIQZK
    sopitFR2e4OLx1Fn
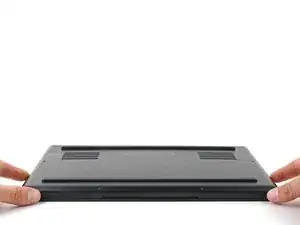
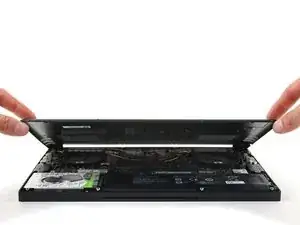
    • Remove the back cover.

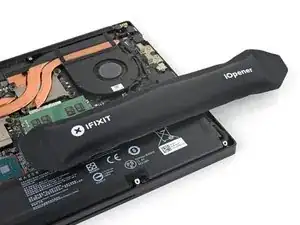
    • Lay the back cover down on its rubber feet to avoid damaging the gray thermal pads on its underside.

  8. tl4ggcyTcEFHBtcx
    tl4ggcyTcEFHBtcx
    QPDdmGyfDxdgdhNN
    • Apply a heated iOpener to the battery cable tape for one minute.

    • You can also use a hair dryer—but be careful, as overheating the battery may damage it or create a fire hazard.

  9. ERiRULpYZEt5i1me
    ERiRULpYZEt5i1me
    LJcIXWnnRRFw4dPm
    hWjBHE1olSZCQguG
    • Be careful not to damage the battery with your tool.

    • Use blunt nose tweezers or your fingers to peel the battery cable tape away from the cable.

  10. OtNVUtIl2ECSCjeK
    OtNVUtIl2ECSCjeK
    DFBDFRBp2HppeMkb
    Fgs2I1YL5fbhjokZ
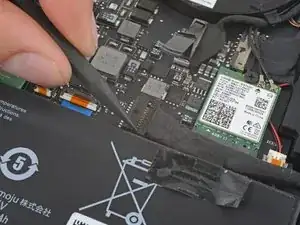
    • Use the point of a spudger to press on alternating sides of the battery connector and walk it out of its socket.

  11. 1hEwhhAafoTL5RAQ
    1hEwhhAafoTL5RAQ
    c6tUsi3qbas3bbhm
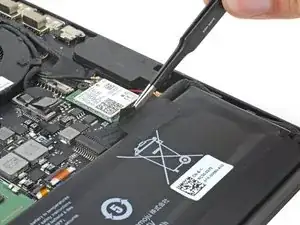
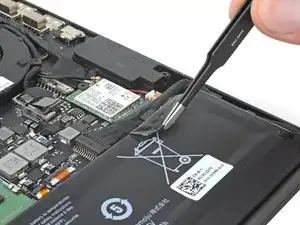
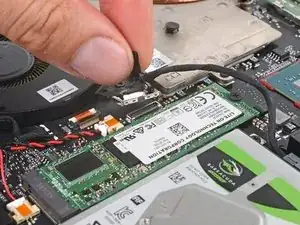
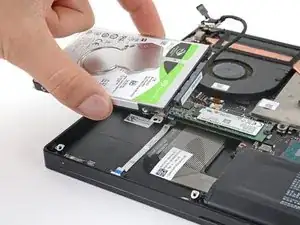
    • Grab the pull tab on the hard drive press connector, just below the right fan.

    • Pull up and disconnect the connector from its socket.

    • During reassembly, align the press connector over its socket and press down until it clicks into place. If it doesn't connect, re-align it and try again.

  12. WRoYpxnuqZAMiCAB
    WRoYpxnuqZAMiCAB
    h6ZNASpM4UpLp5if
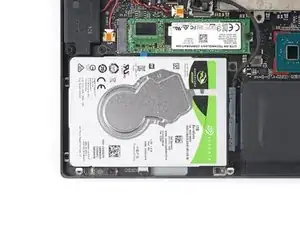
    • Use your Phillips screwdriver to remove the four screws securing the hard drive mounts:

    • Three 3.2 mm screws

    • One 5.2 mm screw

  13. MDjpKWiWc1ZIKNvY
    MDjpKWiWc1ZIKNvY
    U6jTsOYBP4cTdIOu
    • Lift the hard drive straight up to remove it.

  14. SDrKsYeLjGId6wIM
    SDrKsYeLjGId6wIM
    NEJfLkhPOCpBNrni
    DPKYvMADb16juyDs
    • If your laptop doesn't have a hard drive, you need to remove the adapter to access the battery. If you just removed your hard drive, skip this step.

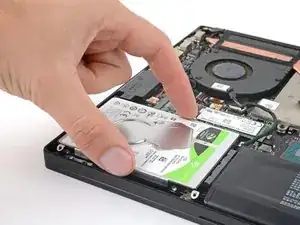
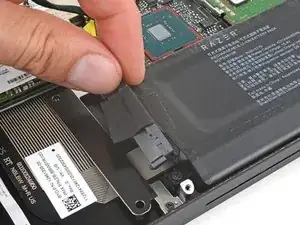
    • Grab the hard drive adapter on the left edge of the battery.

    • Peel the adapter and its tape from the battery and set it aside.

  15. XIEIs6ZXGnC2bSKf
    XIEIs6ZXGnC2bSKf
    QvT2aTWiywxLFBXD
    gE2GWOqEy6WANNLi
    • Unclip the battery cable from the top and right tabs of the battery.

  16. gY1DXrtURcLFjdfl
    • Use your Phillips screwdriver to remove the five 5.2 mm screws securing the battery.

  17. QkMI2HUM5MLkUbNy
    QkMI2HUM5MLkUbNy
    5MLUrDmekTb2rZ5e
    ZMxEX2uUcwCykqEW
    • Lift the top edge of the battery from its recess in the frame and remove it.

Conclusion

To reassemble your device, follow these instructions in reverse order.

Take your e-waste to an R2 or e-Stewards certified recycler.

Repair didn’t go as planned? Try some basic troubleshooting, or ask our Answers community for help.

Clay Eickemeyer

Member since: 19/09/22

77552 Reputation

One comment

I just completed the battery replacement. The guide was helpful, even though I must say that I do not really agree with the moderate rating, as it really is super easy! I definitely recommend the essential toolkit, as T4 bits can be hard to find and the one that is included is sturdier than the other ones that I have used so far.

Bogos -