| 1968 London-Sydney Marathon Daily Express-Daily Telegraph London-Sydney Marathon | |
|---|---|
 | |
| Host country | |
| Rally base | London Sydney |
| Dates run | 24 November – 17 December 1968 |
| Stages | 31 |
| Stage surface | Tarmac and Gravel |
| Overall distance | 16,694 km (10,373 miles) |
| Statistics | |
| Crews | 98 at start, 56 at finish |
| Overall results | |
| Overall winner | |
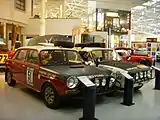
The 1968 London–Sydney Marathon, officially Daily Express-Daily Telegraph London-Sydney Marathon was the first running of the London-Sydney Marathon. The rally took place between the 24th of November and the 17th of December 1968. The event covered 10,373 miles (16,694 km) through Europe, Asia and Australia. It was won by Andrew Cowan, Colin Malkin and Brian Coyle, driving a Hillman Hunter.
Background
The original Marathon was the result of a lunch in late 1967, during a period of despondency in Britain caused by the devaluation of the British pound.[1][2] Sir Max Aitken, proprietor of the Daily Express, and two of his editorial executives, Jocelyn Stevens and Tommy Sopwith, decided to create an event which their newspaper could sponsor, and which would serve to raise the country's spirits. Such an event would, it was felt, act as a showcase for British engineering and would boost export sales in the countries through which it passed.
The initial UK£10,000 winner's prize offered by the Daily Express was soon joined by a £3,000 runners-up award and two £2,000 prizes for the third-placed team and for the highest-placed Australians, all of which were underwritten by the Daily Telegraph newspaper and its proprietor Sir Frank Packer, who was eager to promote the Antipodean leg of the rally.[1]
The route
An eight-man organising committee was established to create a suitably challenging but navigable route. Jack Sears, organising secretary and himself a former racing driver, plotted a 7,000-mile course covering eleven countries in as many days, and arranged that the P&O liner SS Chusan would ferry the first 72 cars and their crews on the nine-day voyage from India, before the final 2,900 miles across Australia:[3][4]
| Europe and Asia | |||||
|---|---|---|---|---|---|
| Leg | Date | Start | Finish | Allowed time | Description |
| 1 | 24–25 November | London | Paris | 12h 32m | 2300hrs depart Crystal Palace, London; 0400hrs depart England at Dover on the cross-channel ferry to France; 1132hrs arrive Le Bourget Airport, Paris. |
| 2 | 25–26 November | Paris | Turin | 13h 32m | To Italy via the Mont Blanc Tunnel; 0052hrs arrive Turin. |
| 3 | 26 November | Turin | Belgrade | 21h 12m | Autostrada towards Venice before crossing into Yugoslavia; 2204hrs arrive Belgrade. |
| 4 | 26–27 November | Belgrade | Istanbul | 15h 31m | Through Bulgaria by night into Turkey; 1335hrs arrive Istanbul. |
| 5 | 27–28 November | Istanbul | Sivas | 12h 25m | Crossing the Bosphorus by ferry, through Ankara and the Bolu Pass; 0300hrs arrive Sivas. |
| 6 | 28 November | Sivas | Erzincan | 2h 45m | Heading east across unsurfaced roads; 0445hrs Erzincan. |
| 7 | 28–29 November | Erzincan | Tehran | 22h 01m | Cross border into Iran; 0246hrs arrive Tehran. |
| 8 | 29–30 November | Tehran | Kabul | 23h 33m | Follow one of two routes to Islam Qala in Afghanistan, either the northerly route across the Alburz Mountains skirting the southern shores of the Caspian Sea, or the shorter but more treacherous route along the north edge of the Great Salt Desert;[5] 0219hrs arrive Kabul, where timeous crews can enjoy a 6.5 hour rest before the Khyber pass opens. |
| 9 | 30 November | Kabul | Sarobi | 1h 00m | 0842hrs depart Kabul across an obsolete, loose-surfaced road through the Lataband Pass; 0942hrs arrive Sarobi. |
| 10 | 30 November – 1 December | Sarobi | Delhi | 17h 55m | Cross Pakistan in a day into India; 0337hrs arrive Delhi. |
| 11 | 1–2 December | Delhi | Bombay | 22h 51m | Pass through Agra and Indore; 0228hrs arrive Bombay. |
The remaining crews departed Bombay at 3 am on Thursday 5 December, arriving in Fremantle at 10 am on Friday 13 December before they restarted in Perth the following evening. Any repairs attempted on the car during the voyage would lead to the crew's exclusion.[6]
| Australia | |||||
|---|---|---|---|---|---|
| Leg | Date | Start | Finish | Allowed time | Description |
| 12 | 14–15 December | Perth | Youanmi | 7h 00m | Depart 1800hrs from Gloucester Park, traversing smooth but unsurfaced road; 0100hrs arrive deserted mining town of Youanmi. |
| 13 | 15 December | Youanmi | Marvel Loch | 4h 03m | Through semi-desert via Diemal to asphalt road at Bullfinch; 0503hrs arrive Marvel Loch. |
| 14 | 15 December | Marvel Loch | Lake King | 1h 59m | Into the Nullarbor Desert; 0702hrs arrive Lake King (crossroads). |
| 15 | 15 December | Lake King | Ceduna | 14h 52m | 2154hrs arrive Ceduna. |
| 16 | 15–16 December | Ceduna | Quorn | 6h 18m | 0412hrs arrive Quorn. |
| 17 | 16 December | Quorn | Moralana Creek | 1h 17m | 0529hrs arrive Moralana Creek. |
| 18 | 16 December | Moralana Creek | Brachina | 1h 30m | 0659hrs arrive Brachina. |
| 19 | 16 December | Brachina | Mingary | 4h 10m | 1109hrs arrive Mingary. |
| 20 | 16 December | Mingary | Menindee | 2h 12m | 1329hrs arrive Menindee. |
| 21 | 16 December | Menindee | Gunbar | 5h 18m | 1839hrs arrive Gunbar. |
| 22 | 16 December | Gunbar | Edi | 4h 26m | 2305hrs arrive Edi. |
| 23 | 16–17 December | Edi | Brookside | 1h 00m | 0005hrs arrive Brookside. |
| 24 | 17 December | Brookside | Omeo | 1h 55m | 0200hrs arrive Omeo. |
| 25 | 17 December | Omeo | Murrindal | 2h 06m | 0406hrs arrive Murrindal. |
| 26 | 17 December | Murrindal | Ingebyra | 1h 31m | 0537hrs arrive Ingebyra. |
| 27 | 17 December | Ingebyra | Numeralla | 1h 29m | 0706hrs arrive Numeralla. |
| 28 | 17 December | Numeralla | Hindmarsh Station | 0h 42m | 0748hrs arrive Hindmarsh Station. |
| 29 | 17 December | Hindmarsh Station | Nowra | 2h 01m | 0949hrs arrive Nowra. |
| 30 | 17 December | Nowra | Warwick Farm | 3h 30m | 1319hrs arrive Warwick Farm. |
| 31 | 18 December | Warwick Farm | Sydney | Arrive in procession, Sydney. | |
Rally summary
_(21310731842).jpg.webp)

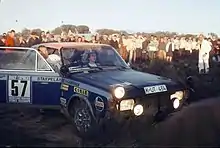
Roger Clark established an early lead through the first genuinely treacherous leg, from Sivas to Erzincan in Turkey, averaging almost 60 mph in his Lotus Cortina for the 170-mile stage. Despite losing time in Pakistan and India, he maintained his lead to the end of the Asian section in Bombay, with Simo Lampinen's Ford Taunus second and Lucien Bianchi's DS21 in third.[2]
However, once into Australia, Clark suffered several setbacks. A piston failure dropped him to third, and would have cost him a finish had he not been able to cannibalise fellow Ford Motor Company driver Eric Jackson's car for parts. After repairs were effected, he suffered what should have been a terminal rear differential failure. Encountering a Cortina by the roadside, he persuaded the initially reluctant owner to sell his rear axle and resumed once more, although at the cost of 80 minutes' delay while it was replaced.[2]
This left Lucien Bianchi and co-driver Jean-Claude Ogier in the Citroën DS in the lead ahead of Gilbert Staepelaere/Simo Lampinen in the German Ford Taunus, with Andrew Cowan in the Hillman Hunter 3rd. Then Staepelaere's Taunus hit a gate post, breaking a track rod.[7] This left Cowan in second position and Paddy Hopkirk's Austin 1800 in third place.[8][9]
Approaching the Nowra checkpoint at the end of the penultimate stage with only 98 mi (158 km) to Sydney, the leading Frenchmen were involved in a head-on collision with a motorist who mistakenly entered a closed course, wrecking their Citroën DS and hospitalising the pair.[10]
Hopkirk, the first driver on the scene (ahead of Cowan on the road, but behind on penalties) stopped to tend to the injured and extinguish the flames in the burning cars. Andrew Cowan, next on the scene, also slowed but was waved through with the message that everything was under control. Hopkirk rejoined the rally, and neither he nor Cowan lost penalties in this stage.[11] So Andrew Cowan, who had requested "a car to come last" from the Chrysler factory on the assumption that only half a dozen drivers would even reach Sydney,[12] took victory in his Hillman Hunter and claimed the £10,000 prize. Hopkirk finished second, while Australian Ian Vaughan was third in a factory-entered Ford XT Falcon GT. Ford Australia won the Teams' Prize with their three Falcons GTs,[13] placing 3rd, 6th and 8th.[14]
Results
| Pos | No | Entrant | Drivers | Car | Penalties (Points) |
|---|---|---|---|---|---|
| 1 | 75 | Hillman Hunter | 50 | ||
| 2 | 51 | BMC Austin 1800 | 56 | ||
| 3 | 24 | Ford Falcon XT GT | 62 | ||
| 4 | 58 | Porsche 911S | 63 | ||
| 5 | 61 | BMC Austin 1800 | 68 | ||
| 6 | 29 | Ford Falcon XT GT | 70 | ||
| 7 | 92 | Ford Taunus 20M RS | 91 | ||
| 8 | 2 | Ford Falcon XT GT | 114 | ||
| 9 | 74 | Citroën DS 21 | 123 | ||
| 10 | 48 | Ford Cortina Lotus Mark II | 144 | ||
| 11 | 12 | Volvo 144S | 146 | ||
| 12 | 76 | Holden Monaro HK GTS 327 | 169 | ||
| 13 | 43 | Volvo 144S | 171 | ||
| 14 | 68 | Holden Monaro HK GTS 327 | 173 | ||
| 15 | 55 | Porsche 911T | 195 | ||
| 16 | 57 | Ford Taunus 20M RS | 206 | ||
| 17 | 30 | DAF 55 | 208 | ||
| 18 | 32 | Mercedes-Benz 280S | 264 | ||
| 19 | 64 | BMC Austin 1800 | 266 | ||
| 20 | 19 | Moskvitch 408 | 269 | ||
| 21 | 31 | BMC Austin 1800 | 332 | ||
| 22 | 98 | Moskvitch 408 | 358 | ||
| 23 | 1 | Ford Cortina GT Mark II | 360 | ||
| 24 | 4 | BMC Austin 1800 | 430 | ||
| 25 | 56 | Saab 95 V4 Estate | 438 | ||
| 26 | 62 | Mercedes-Benz 200D | 455 | ||
| 27 | 83 | Peugeot 404 | 470 | ||
| 28 | 71 | BMC Austin 1800 | 570 | ||
| 29 | 72 | Ford Cortina Lotus Mark II | 587 | ||
| 30 | 90 | Ford Cortina Lotus Mark II | 623 | ||
| 31 | 17 | BMC Austin 1800 | 656 | ||
| 32 | 45 | Hillman Hunter | 715 | ||
| 33 | 7 | Moskvitch 408 | 776 | ||
| 34 | 70 | BMC Austin 1800 | 816 | ||
| 35 | 60 | Ford Cortina 1600E Mark II | 873 | ||
| 36 | 77 | BMC Austin 1800 | 873 | ||
| 37 | 54 | Rover 2000 TC | 894 | ||
| 38 | 20 | Moskvitch 408 | 942 | ||
| 39 | 18 | Ford Cortina Mark I | 1,075 | ||
| 40 | 46 | Simca 1100 | 1,658 | ||
| 41 | 33 | Volvo 145S Estate | 2,399 | ||
| 42 | 47 | MG MGB | 2,408 | ||
| 43 | 11 | Renault 16 TS | 2,491 | ||
| 44 | 44 | Rover 2000 TC | 2,848 | ||
| 45 | 78 | Ford Escort GT | 3,665 | ||
| 46 | 53 | Rambler American | 3,746 | ||
| 47 | 42 | Ford Cortina Savage V6 | 5,925 | ||
| 48 | 93 | Ford Cortina Lotus Mark II | 6,139 | ||
| 49 | 99 | Land Rover 2WD | 6,787 | ||
| 50 | 41 | Morris 1100 S | 8,111 | ||
| 51 | 79 | Volkswagen 1200 | 9,603 | ||
| 52 | 40 | Vauxhall Ventora | 9,775 | ||
| 53 | 82 | Ford Cortina Lotus Mark II | 11,465 | ||
| 54 | 91 | Holden HK Belmont Automatic | 11,646 | ||
| 55 | 8 | Volvo 144S | 13,350 | ||
| 56 | 69 | DAF 55 | 13,790 | ||
| DNF | 87 | Citroën DS 21 | Retired-TC29 Nowra | ||
| DNF | 89 | Ford Cortina Mark II | Retired-TC28 Hindmarsh | ||
| DNF | 52 | MG Midget | Retired-TC21 Gunbar | ||
| DNF | 36 | Holden Monaro HK GTS 327 | Retired-TC20 Menindee | ||
| DNF | 94 | Citroën DS 21 | Retired-TC19 Mingary | ||
| DNF | 10 | Porsche 911T | Retired-TC19 Mingary | ||
| DNF | 3 | Ford Cortina GT Mark II | Retired-TC19 Mingary | ||
| DNF | 95 | Vauxhall Viva GT | Retired-TC18 Brachina | ||
| DNF | 28 | Mercedes-Benz 280SL | Retired-TC18 Brachina | ||
| DNF | 100 | Simca 1100 | Retired-TC17 Moralana | ||
| DNF | 27 | Triumph 2000 Mark I | Retired-TC17 Moralana | ||
| DNF | 73 | Ford Cortina Lotus Mark II | Retired-TC16 Quorn | ||
| DNF | 26 | Mercedes-Benz 280SE | Retired-TC16 Quorn | ||
| DNF | 13 | Volvo 123GT | Retired-TC14 Lake King | ||
| DNF | 25 | Volvo 122S | Retired-TC14 Lake King | ||
| DNF | 6 | Ford Fairmont XP | Retired-TC14 Lake King | ||
| DNF | 88 | Simca 1100 | Retired-TC11 Bombay | ||
| DNF | 9 | Ford Cortina Lotus Mark II | Retired-TC11 Bombay | ||
| DNF | 34 | Ford Cortina Lotus Mark II | Retired-TC11 Bombay | ||
| DNF | 63 | Volvo 142S | Retired-TC10 Delhi | ||
| DNF | 96 | Ford Cortina 1600E Mark II | Retired-TC10 Delhi | ||
| DNF | 66 | Ford Cortina GT Mark II | Retired-TC9 Sarobi | ||
| DNF | 14 | Ford Taunus 20M RS | Retired-TC8 Kabul | ||
| DNF | 39 | Alfa Romeo 1750 Berlina | Retired-TC8 Kabul | ||
| DNF | 59 | Porsche 911S | Retired-TC8 Kabul | ||
| DNF | 22 | Lancia Fulvia Rallye 1.3 HF | Retired-TC8 Kabul | ||
| DNF | 21 | BMC Austin 1800 | Retired-TC8 Kabul | ||
| DNF | 86 | BMW 2000 | Retired-TC8 Kabul | ||
| DNF | 23 | Ford Corsair 2000E | Retired-TC8 Kabul | ||
| DNF | 35 | Mercedes-Benz 280SE | Retired-TC8 Kabul | ||
| DNF | 81 | Ford Cortina GT Mark II | Retired-TC8 Kabul | ||
| DNF | 50 | Ford Cortina Lotus Mark II | Retired-TC8 Kabul | ||
| DNF | 97 | Ford Falcon XT GT | Retired-TC7 Tehran | ||
| DNF | 15 | Ford Cortina GT Mark I | Retired-TC7 Tehran | ||
| DNF | 65 | BMC Austin 1800 | Retired-TC7 Tehran | ||
| DNF | 84 | Bentley 1930 Sports Tourer | Retired-TC6 Erzincan | ||
| DNF | 5 | Chrysler Valiant VE Safari Estate | Retired-TC5 Sivas | ||
| DNF | 37 | BMC Austin 1300 Countryman | Retired-TC5 Sivas | ||
| DNF | 38 | Ford Cortina Lotus Mark II | Retired-TC5 Sivas | ||
| DNF | 85 | Ford Cortina Lotus Mark II | Retired-TC5 Sivas | ||
| DNF | 16 | BMC Austin 1800 | Retired-TC3 Belgrade | ||
| DNF | 67 | Vauxhall Ventora | Retired-TC3 Belgrade | ||
| Source:[15][16] | |||||
References
Notes
- 1 2 "How It All Began", transcript of contemporary Daily Telegraph report, marathon68.homestead.com
- 1 2 3 "The great adventure of the decade" Archived 7 December 2006 at the Wayback Machine, Julian Marsh, Citroënët, 1996
- ↑ "Timetable of the Marathon", marathon68.homestead.com
- ↑ "The Route", Alan Sawyer, marathon68.homestead.com
- ↑ "10,000 Miles of Road Hazards", Jack Sears, marathon68.homestead.com
- ↑ "Rules that give everyone a chance to win", marathon68.homestead.com
- ↑ Connor 2016, p. 219.
- ↑ Daily Express London-Sydney Marathon report, 1969, pp. 43–45, (David Benson, Beaverbrook Press)
- ↑ YouTube
- ↑ "1968 London - Sydney Marathon". Archived from the original on 2008-07-21.
- ↑ Connor 2016, p. 237.
- ↑ "Evan Green's Story", marathon68.homestead.com
- ↑ Ford Falcon XT GT at www.uniquecarsandparts.com.au Retrieved on 24 May 2012
- ↑ Ford Falcon XT at www.uniquecarsandparts.com.au Retrieved on 24 May 2012
- ↑ Connor 2016, pp. 283–290.
- ↑ Smailes 2019, pp. 327–339.
Bibliography
- Brittan, Nick (1969). Marathon: Around the World in a Cloud of Dust. London: Motor Racing Publications. OCLC 155832111.
- Connor, Robert (2016). The 1968 London to Sydney Marathon: A History of the 10,000 Mile Endurance Rally. Jefferson, North Carolina: McFarland Publishing. ISBN 978-0-7864-9586-3.
- Cowan, Andrew (1969). Why Finish Last? The story behind the London-Sydney Marathon. London: Queen Anne Press. ISBN 0362000522.
- Hopkirk, Paddy (1969). The Longest Drive of All: Paddy Hopkirk's story of the London - Sydney motor rally. London: G. Chapman. ISBN 0225488604.
- Ireland, Innes (1970). Marathon in the Dust. London: Kimber. ISBN 0718300726.
- McKay, David H; Smailes, John (1970). The Bright Eyes of Danger: London-Sydney Marathon, 1968. Sydney: Shakespeare Head Press. ISBN 0855580011.
- Smailes, John (2019). Race Across the World: The Incredible Story of the World's Greatest Road Race - the 1968 London to Sydney Marathon. Sydney: Allen & Unwin. ISBN 9781760876951.
- Smith, E Alan (1968). Daily Express London-Sydney Marathon. London: Beaverbrook Newspapers. OCLC 220674331.
- Van Geffem, Wim; Meurikken, Peter (1968). London-Sydney Marathon. Bussum, Netherlands: Teleboek. OCLC 39531781.
- Vandersyde, Rhys (4 January 2020). "London to Sydney Marathon: Race of Ages". Auto Action. Retrieved 12 September 2021.
- Daily Express, Daily Telegraph, London-Sydney Marathon: official souvenir. Sydney: Australian Consolidated Press. 1968. OCLC 223374469.