Introduction

The Shark Clean Sense Air Purifier has a hard protective shell that keeps its components safe. This is a prerequisite guide for disassembling the device to get to certain parts and can be used as a guide to replace the shell.

  1. T3ULUiIqgj5wGsbj
    T3ULUiIqgj5wGsbj
    BXqQkkVCrrb1emWN
    NUm4aqhD1oS6mPOn
    • Turn off and unplug the air purifier before beginning.

    • Unscrew the one 1.2 cm screw holding the grate at the top with a TR10 Torx screwdriver.

    • Use a prying tool to carefully pry along the outer edges to disengage the inner retaining clips.

    • These retaining clips can be difficult to disengage, but releasing two clips on the same side should allow you to easily remove the grate.

    • Remove the grate.

  2. DiZZSPsNQPtUNhNn
    • Remove the two 1.2 cm screws with a TR10 Torx screwdriver.

    • Almost all screws are the same length (around 1 cm). The main difference is the bit that's used to remove them.

  3. vP2eDfodOCAnxpu1
    • Use a Phillips #1 screwdriver to remove the four 1 cm screws.

    • This will make the fan holder slightly loose, but this will not be a problem until you open the case completely.

  4. 4OIAKJRn52pONfYE
    4OIAKJRn52pONfYE
    wGVJIGUng3wSCWyP
    eSncBQPmPDerdQCD
    • Flip the device over and unscrew the bottom by turning it clockwise.

    • Remove the filter.

  5. 1MEEgKDX2UBj3yEj
    1MEEgKDX2UBj3yEj
    V4tAlL4sLCBpmhxx
    • Remove the five 1 cm a Phillips screwdriver.

    • Unscrew the four 1.2 cm screws with a TR10 Torx screwdriver.

    • The ring will not be hard to remove, but be careful on reassembly. Make sure that the power connector is properly seated when putting the ring back on.

    I just took my model apart (purchased in 2023) and for this step mine only had T10 1.2cm screws on the shell seams (I have 5 total — 4 for the seams and 1 that holds down the top grate). The rest of mine are Phillips 1cm screws. Just in case anyone with my model follows these steps to put everything back together!

    Maddie D -

  6. gIc3ZslOk2FRIuSY
    gIc3ZslOk2FRIuSY
    kKBHwOQAqqML2lhv
    • Remove the four 1 cm screws that secure the fan housing.

  7. CRlnOMtE1MqXlXIM
    CRlnOMtE1MqXlXIM
    Ias56EKpKsaBWNIv
    lyGTqNNPrAessRF3
    • Make sure that you are pulling up on the side that allows, as pictured in the red box.

    • Gently slide the cases up and down, or hold one and gently pull up on the opposite side (Down on the left, up on the right for this picture).

    • The whole case will start to separate and the black disc will come loose. This is normal.

  8. YntYZiUCKrjLmGHH
    YntYZiUCKrjLmGHH
    EKrVNl4jICsdcZSZ
    4NZnNoWUOeJWMhxb
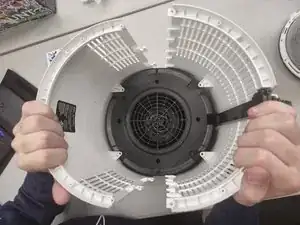
    • Gently open the case outwards as there are fragile electronics inside.

    • Remove the fan housing.

Conclusion

To reassemble your device, follow these instructions in reverse order.

KyreseAguilar

Member since: 28/08/24

727 Reputation

One comment

Thank you for this! My air purifier was making noise and I couldn’t find any guides to take it apart. This helped me clean it out and get rid of the noise! :-)

Maddie D -