Introduction
This guide shows how to remove and replace worn out brake pads and brake rotors on a 2018–2024 Jeep Wrangler (JL).
Worn front pads or warped rotors reduce stopping power, create vibration, and can damage other brake components on your Wrangler JL. Replacing the pads, rotors, and slide clips restores factory braking performance and prevents costly repairs.
Follow this guide to swap in new Mopar‑style components with basic hand tools in your driveway or garage.
Tools
-
-
Break loose the wheel lug nuts for the brake you need to work on.
-
Raise the Jeep using a floor jack and support it securely on jack stands.
-
Remove the lug nuts and the wheel.
-
Position an oil pan beneath the hubs to catch brake cleaner and debris.
-
-
-
Spray the caliper, rotor and surrounding hardware with brake cleaner to remove built‑up dust.
-
Scrub remaining grime with a wire brush until the metal surfaces are clean.
-
-
-
Unscrew the master cylinder reservoir cap and set it aside.
-
Place a large c‑clamp over the caliper and old pads and tighten until both pistons fully retract.
-
-
-
Pull the inner and outer brake pads straight out of the mounting bracket.
-
Pry out and discard the four pad slide clips.
-
-
-
Break loose the two caliper bracket bolts with a 21 mm socket and long handle wrench or impact gun.
-
Remove the bolts and slide the bracket off the knuckle.
-
-
-
Insert a T30 Torx bit into the rotor retaining screw and break it free with a socket wrench.
-
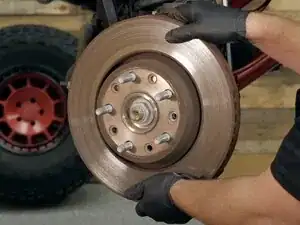
Remove the screw and pull the rotor off the hub, using a pry tool for leverage if needed.
-
Brush any rust off the hub face with a wire brush.
-
-
-
Slide the new rotor onto the hub and align the screw hole.
-
Coat the retaining screw threads with anti‑seize and torque the T30 screw to 15 ft‑lbs.
-
Spray both rotor faces with brake clean and wipe them with a shop towel to remove the factory coating.
-
-
-
Position the caliper mounting bracket over the rotor and hand‑thread the two 21 mm bolts.
-
Torque each bracket bolt to 148 ft‑lbs.
-
-
-
Press the four new slide clips into the bracket so their return springs face away from the rotor.
-
-
-
Spread a thin layer of caliper lubricant on both metal ears of each brake pad.
-
Slide the inner and outer pads into the bracket until the return springs pull them slightly away from the rotor.
-
-
-
Pull each slide pin from the caliper, remove the boot, and wipe off any old grease.
-
Apply fresh caliper lubricant to the pin and reinstall the boot.
-
Spread a light coat of lubricant on the inner caliper surface and piston face.
-
-
-
Lower the caliper over the new pads and align the slide pins with their holes.
-
Install the two 13 mm bolts and torque them to 27 ft‑lbs.
-
-
-
Reinstall the master cylinder reservoir cap securely.
-
Pump the brake pedal several times until it feels firm to seat the pistons.
-
With both front corners finished and the brake pedal pumped firm, reinstall the wheels, lower the Jeep, and enjoy restored, confident braking on your Wrangler JL.
Replacements didn't go as planned? Ask our Jeep Wrangler JL Answers Community for help.