Introduction
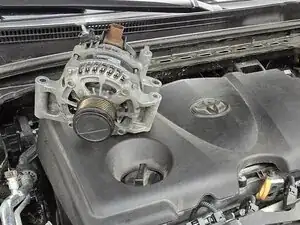
This guide shows how to replace the alternator in your 2018‑2024 Toyota Camry equipped with the 2.5 L 4-cylinder.
Common symptoms of a failing alternator include a constantly dead battery, dim lights, or charging warning lights.
Replacing the alternator yourself restores reliable charging and avoids expensive shop labor.
Note: This guide requires keeping track of several fasteners, and noting the proper path of the serpentine belt. Having a camera available to snap pictures is helpful.
Tools
Parts
-
-
Use a 10 mm socket and ratchet to loosen the clamp bolt on the negative battery post.
-
Lift the cable straight up and move it aside so it cannot contact the terminal.
-
-
-
Pull the two side clips outward on the plastic cover over the alternator positive stud and lift the cover away.
-
Remove the 10 mm nut from the stud and pull the positive cable off the stud.
-
Press the lock tab on the alternator connector and slide the plug straight off to disconnect it.
-
-
-
Use a 14 mm wrench on the tensioner hex and rotate the tensioner counter‑clockwise to relieve tension.
-
Slip the belt off the alternator pulley while holding the tensioner, then slowly return the tensioner to its rest position.
-
-
-
Remove the 10 mm bolt securing the engine wire harness bracket to the alternator.
-
Pull the bracket away from the alternator to clear the mounting area.
-
-
-
Use a 12 mm socket with an extension to remove the upper mounting bolt from the alternator.
-
The presenter says 14 mm but the socket wrench shown is a 12 mm
-
Remove the first 12 mm nut from the lower mounting stud.
-
Remove the second 12 mm nut from the remaining stud to free the alternator.
-
Depress the lock tab on the nearby connector and unplug it to prevent interference during removal.
-
-
-
Pull the alternator straight rearward off the studs and lift it upward out of the engine compartment.
-
-
-
Guide the replacement alternator onto the two mounting studs and seat it against the bracket.
-
Hand‑thread the two 12 mm nuts and the single 12 mm bolt to avoid cross‑threading.
-
Use a 12 mm socket and a torque wrench to torque the nuts and bolt evenly to 18 ft‑lb using a torque wrench.
-
-
-
Set the harness bracket onto its locating boss on the alternator and reinstall the 10 mm bolt.
-
Snug the bolt; it only needs to hold the harness in position.
-
-
-
Place the positive cable eyelet onto the alternator stud.
-
Thread on the 10 mm nut and tighten it until snug.
-
Swing the plastic protective cap down over the stud to cover the connection.
-
-
-
Route the serpentine belt around all pulleys according to your reference photo.
-
Rotate the tensioner counter‑clockwise with the 14 mm wrench and hold it.
-
Slip the belt over the alternator pulley and check that the belt sits fully in every pulley groove.
-
-
-
Slide the negative cable onto the battery post.
-
Tighten the 10 mm clamp bolt until the terminal is secure and cannot be rotated by hand.
-
Start the engine and confirm the charging system voltage is normal, warning lights are off, and the belt tracks smoothly on all pulleys.
Return your old alternator for a refund of the core charge.
Repair didn't go as planned? Ask our Answers Community for help.

