Introduction

If you are experiencing trouble with your touchpad, use this guide to replace your HP Chromebook 15a-nb001dx's touchpad.

The touchpad is the laptop's built-in interface for navigating the device. Problems could crop up if the touchpad surface develops surface scratches or is not maintained properly via cleaning. This could develop into the touchpad becoming unresponsive.

When replacing the speakers, make sure the device is powered off to ensure the safety of you and the internal components.

  1. aPrPUuaLUSnd2fVH
    aPrPUuaLUSnd2fVH
    MdnpfsJJpxmLfneY
    • For your safety, unplug all peripheries, discharge the battery below 25%, and power down your device before beginning disassembly.

    • Lay the device down so the lower case is facing up.

  2. h23XgMhsGBoZChwM
    h23XgMhsGBoZChwM
    mpkBW6JBpce5ySww
    45ydgLME6DvnYkEq
    • Use a Phillips screwdriver to remove four 6.6 mm screws that secure the lower case.

  3. h5EqGGIaEmOZrR2p
    h5EqGGIaEmOZrR2p
    YJfKlgYQOXodTNBZ
    yBdZ35cshFLFg3bh
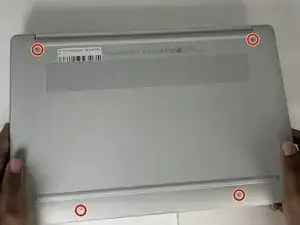
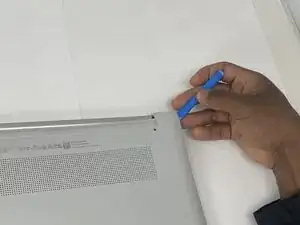
    • Insert an opening tool into the seam between the lower case and the chassis, near the hinge.

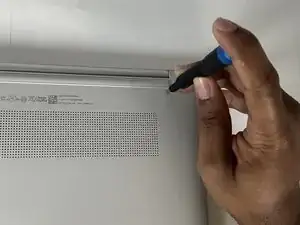
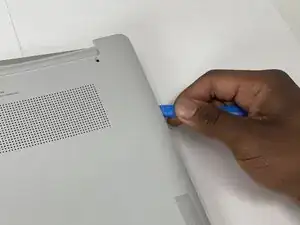
    • Pry around the entire perimeter of the lower case until it fully releases.

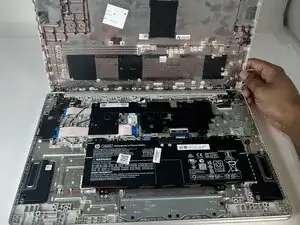
    • Remove the lower case.

  4. dclGv2UxACieOmae
    dclGv2UxACieOmae
    VBtBIYsIPMnYDVnC
    iMKPsXTdJY1Qj2WI
    • Use a Phillips screwdriver to remove four 4.1 mm screws that secure the battery.

    • Take care not to puncture or bend the battery.

  5. EyQfopHP5S6YoUgC
    EyQfopHP5S6YoUgC
    neAYGh2NBUP2OQGk
    nUwZTLoDNRLxCAxQ
    • Unseat the speaker cable on the lower edge of the battery from their retaining hooks.

  6. cJOYc6oGGo5Pjb3u
    • Lift the battery up and out of the chassis.

  7. rUFYRU2UZZdnBJZ3
    rUFYRU2UZZdnBJZ3
    y342GKmSnR3m42US
    gIBhwXriyKvDKFLv
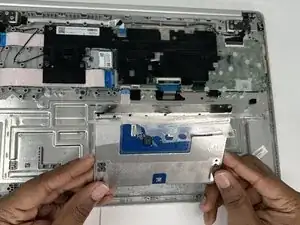
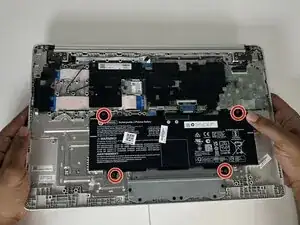
    • Use a Phillips screwdriver to remove six 2.9 mm screws securing the metal bracket that supports the trackpad.

  8. m4XaYkRSlSQhCquw
    m4XaYkRSlSQhCquw
    MMUwq3ZOaSRrQQpr
    • Remove the metal bracket.

  9. Qt4dUPUWMI3TcEXl
    Qt4dUPUWMI3TcEXl
    Wx1FDL3AtG6OytNd
    • Use a spudger to flip up the black ZIF locking flap on the touchpad ribbon cable.

  10. NrfrJTnYuxH4q2RJ
    NrfrJTnYuxH4q2RJ
    xoK1HEYhOFBjZGa6
    • Use tweezers to grasp the ribbon cable and pull it away from its socket.

    • Take care not to damage the ribbon cable.

  11. RQlgZVFayWj1mouI
    RQlgZVFayWj1mouI
    GbBm4jVIgmkwEkKV
    • Gently lift the trackpad ribbon cable away from the trackpad.

    • The trackpad ribbon cable is secured with a mild adhesive. Pull it away carefully to avoid damage.

  12. P2FloHrtGirpsyb4
    P2FloHrtGirpsyb4
    yXDyYFllybvr6PQj
    vq1IrMqZanNIBAtW
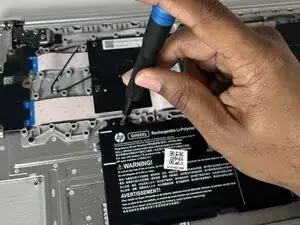
    • From the top of the touchpad, grasp the clear tape and pull it back enough to expose the three 2.2 mm screws.

  13. hKu2Ev2AgENXYiFa
    hKu2Ev2AgENXYiFa
    viQHgLMpnHj5ciNp
    YUoOgyqJlQOL2SYk
    • Use a Phillips #00 screwdriver to remove three 2.2 mm screws that secure the trackpad.

  14. WHY3qFIjKvkYZ3UH
    WHY3qFIjKvkYZ3UH
    Tbjkh2wBC3MXLIgv
    1X5JUBdaZG4VjWZh
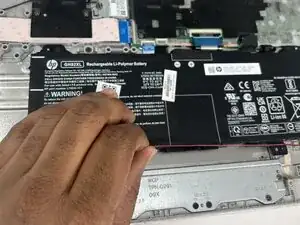
    • Grasp the trackpad from the bottom edge and pull it up and away from the laptop to remove it.

Conclusion

To reassemble your device, follow the above steps in reverse order.
Take your e-waste to an R2 or e-Stewards certified recycler.
Repair didn’t go as planned? Try some basic troubleshooting or ask our Answers community for help.

Sahid

Member since: 19/02/25

957 Reputation

0 comments