Introduction

This guide will demonstrate the process of replacing a faulty touchpad for the Acer Chromebook CB0311-1H-C1MX. The touchpad is touch-sensitive and acts as the mouse or cursor for the laptop. If the touchpad is unresponsive or broken, replacement might be necessary.

Be sure to check for any driver updates, as well as any device sensitivity settings that need to be adjusted before resorting to touchpad replacement.

Before beginning this guide, make sure the power is off and the laptop is disconnected from any power source.

  1. IT6RuSYiEUCQg6wf
    • Using a JIS #1 screwdriver, remove eleven 6.6 mm screws from the back cover.

  2. Awg2WNgf5FeQrTJu
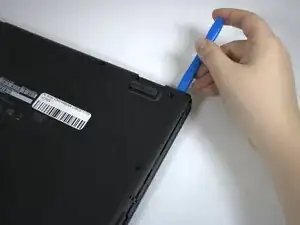
    • Beginning at the hinges, use an iFixit Opening Tool to pry open the back case.

    • Continue using the iFixit Opening Tool around the entire edge of the case.

  3. 4ckROTbSmODbi5Hn
    • Using a JIS #1 screwdriver, remove all four 4.8 mm screws holding the battery in place.

  4. m3kVTBjjUOOVjGEI
    m3kVTBjjUOOVjGEI
    GhVoeDkBkOeoSPsf
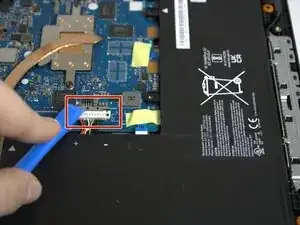
    • Gently push on either side of the silver connector so that it no longer covers the battery cable.

    • Disconnect the battery cable by pulling it straight out.

    • This component is called the Flat Topped Connector.

  5. uCUht6gvUPTbOurh
    uCUht6gvUPTbOurh
    dt1MXZGffyUpSdxP
    • Lift and remove the battery from the laptop.

  6. mSrJqrWDbvZZoIcV
    mSrJqrWDbvZZoIcV
    FlttNNHEMLBIHNwu
    • Remove the black electrical tape over the cable connecting the touchpad to the motherboard.

  7. GiUgpyLFoEcYQg1U
    GiUgpyLFoEcYQg1U
    m2Rw3SFAt3Reu6Dt
    UXkU2nxL6XnQpFyx
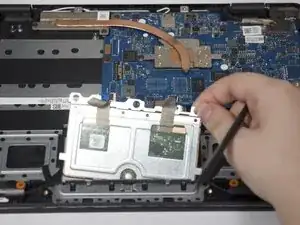
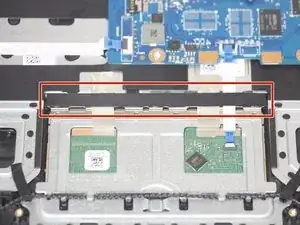
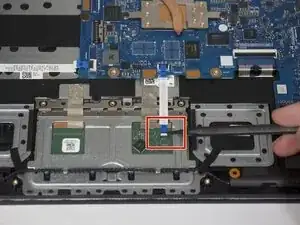
    • Using a spudger, lift the hinged white tab holding the cable to the touchpad.

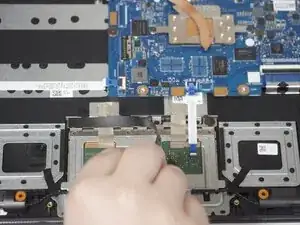
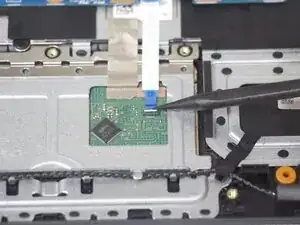
    • Using your fingers or the spudger, disconnect the cable from the touchpad.

  8. PwINAoPQ2SKSxR3h
    PwINAoPQ2SKSxR3h
    JVJY3nu2ARekcbTy
    • Remove all three 2.3mm screws with a JIS #00 screwdriver.

    • The screws may be covered by tape. Remove the tape to reveal the screws.

  9. VXuXZrDwMXG2xKOY
    VXuXZrDwMXG2xKOY
    qGU2EhaFZfCx6KED
    HTKf2OSmhI5FfLUs
    • Peel back or remove the two pieces of grey tape holding the touchpad in place.

  10. tDT4ZldUjGSP5lFD
    tDT4ZldUjGSP5lFD
    xHRPyyj6YJuL2HXM
    • Gently lift the touchpad up and out.

Conclusion

To reassemble your device, follow these instructions in reverse order.

Sami Suplizio

Member since: 24/01/25

609 Reputation

0 comments