Introduction
Battery not lasting long? Swap it out.
Tools
Parts
-
-
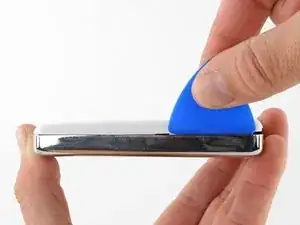
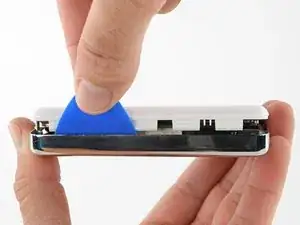
Insert an opening pick as far as possible into the seam between the plastic front and the metal rear panel, on the right edge of the iPod.
-
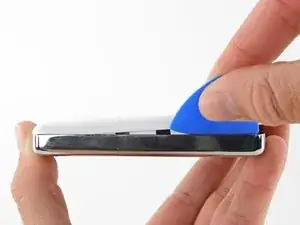
Use the opening pick to pry up against the plastic front panel and release five retaining tabs (seen in the third photo).
-
Slide the pick along the edge of the iPod and continue prying to release the rest of the retaining tabs.
-
After all five tabs along the right side are free, the case should easily open.
-
-
-
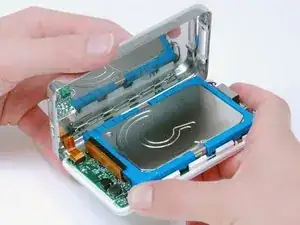
Open the case like a book with the dock connector edge at the top, and lay the rear panel next to the front half of the iPod.
-
-
-
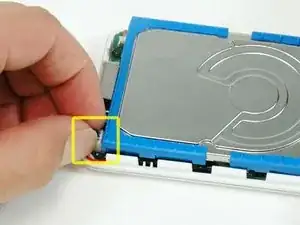
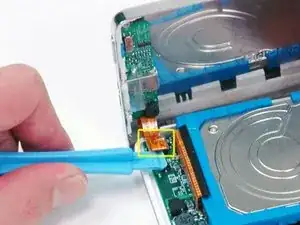
Use a plastic tool or your fingernails to carefully disconnect the orange headphone jack cable. Be sure to pull straight up on the connector, not the cable itself.
-
-
-
Carefully disconnect the white battery connector from the logic board. Be sure to pull only on the connector itself and not on the cables.
-
-
-
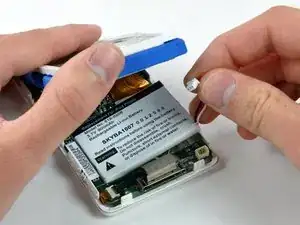
Use one hand to lift the hard drive up in order to access the battery beneath.
-
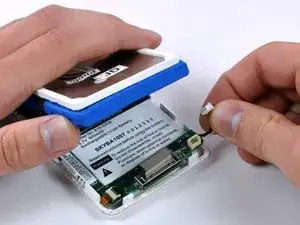
Carefully thread the battery cable around the end of the logic board. Be careful not to pull up on the logic board too much while freeing the battery cable.
-
-
-
Lift the battery out of the front case by pulling it up by the battery leads.
-
If necessary, grab the battery to pull it off the adhesive securing it to the front case.
-
Lift the battery up and out of the front case.
-
To reassemble your device, follow these instructions in reverse order.
63 comments
Biggest trouble I had was step one. I actually broke the edge off the large tool. A note somewhere else on this site recommended using a razor which work far more easily then the large blue tool. Common sense, your using a sharp razor, be careful!
As previously noted the screws are TINY, very easy to lose of you drop one.
I jockeyed the battery to get just a crack of space and then used the spluger tool to pry the battery free from the adhesive, very strong.
My IPOD is currently recharging for the first time in years. :o)
msdaly59 -
I have a 4thG original ipod. This was a simple process and it was successfully completed. The ipod was able to be synced after 6 months of sitting in a drawer. The only issue so far is that the entire ipod gets warm to the touch while it's charging. Hopefully that will lessen after subsequent charges. The only bit of confusion in the instructions is the beginning step of inserting the ipod tool at the top. I thought I was trying to unlatch a tab there but there is none on top. Otherwise everything else was clear and exactly as described and pictured.
Nando -
Broke the cute blue soft plastic tools that came with it. Used a credit card to open it up - worked miraculously well!!! Started up great!! Ooops - forgot the torque screws - opened it again.....closed it again. My iPod works again after years of hibernation!
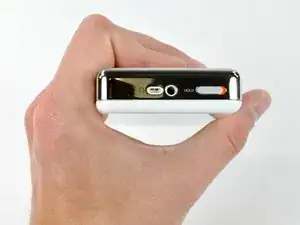


How necessary is it to have the HOLD switch in the locked position? On my iPod the switch is stuck in the unlocked position and I can't force it into locked.
Is locking the iPod for a mechanical reason or an electrical/software reason?
gabeshaikh -
It is for an electrical reason. If the iPod hold switch is kept on, the device will not turn on, thus ensuring the device stays powered off while performing service.
trusty -
I have a 60 GB iPod photo that needs a new Logic Board. I bought a 30 GB used iPod on eBay and replaced the Logic Board. Now the iPod thinks the hard drive is only 30 GB, when it is really 60 GB. It works, but the hard drive is not recognized for its full size. Sites like this offer a 20 GB and 40 GB logic board...I apparently need 60 GB. Can I bypass this somehow, or do I really need a logic board that is specifically made for 60 GB???
Mark -
My 30gig drive shows up as a 16.4gig. I can not for the life of me, figure out why this is doing this. Can anyone help? Thanks!
Stephan -
Hello,
First thank you for this tuto and help.
I did follow your instructions and every step was ok but when I closed my i'Pod, it kept staying on the lock position even with moving the lock button.
Now it has charged but I could not make it run.
So I did a complete reboot by connecting it to my Mac with i'Tunes to restore.
It's still locked.
What can I do?
Than You for your answer
Thomas
Voisin -
Much quicker and far easier opening from the right side instead of from the top using the blue plastic spudger. Opened in under 10sec. Do not know why this guide asks you to start from the top and work it to the left corner. Perhaps it was meant as a challenge.
Edwin Seah -
Well, I did it! I am pretty mechanically inclined, but I don't work well with small stuff. Anyway, as others mentioned, this step was the hardest for me, the included tools, worthless (to start to separate the case) As another person mentioned, I used a razor blade on the side on the upper left corner pushing down toward the metal clips, 'pop' once the first came off, then I used the blue tools to release the remaining clips. I didn't want to remove the connector in step 8, but had literally no room to work, the connector is a square push in type that is attached to the ribbon cable, I pryed with the blue tool carefully at the connector base, it popped right off! (getting is back on was more challenging, but managed with a small pair of needle nose pliers.) Had to pry the old battery out carefully - it was really in there. Got it all back together, works like a champ! Thanks ifixit!
mikesnyder -
Promptly broke both blue plastic tools. I used a putty knife to pop the case. Opening was the only hard part. I didn't disconnect the headphone cable. No problems and the battery has enough charge that I listening to Bare Naked Ladies now. Last week I installed a new hard drive in my Mac mini. IFixit is the greatest!
heldon -
If you are lucky, your battery may swell up like mind did, short of blowing up it opened the case for me. That being done really made it easy and encouraged me to do the repair myself. I still needed the proper screw driver (T6 Torx Screwdriver) to remove the two black torx screws that are found at step 10 of this repair guide. I purchased the iFixit 64bit driver kit, simply because I intend to work on several other iPods and phones, the kit is of good quality, well worth the purchase. If you have some mechanical ability, and follow the instructions, I was done in about 20 minutes, placed it back on my Bose player. I couldn't wait for it to charge, just wanted it to start playing, and after a minute or so my iPod 4th gen 20 gb was playing the music which I hadn't heard in about 3 to 4 years, as a result of a enlarged battery. As I write these comments down, I'm listening to my sweet tunes with a big smile on my mug, the sign of a satisfied customer. Thanks to iFIXIT.!!!
Alex DeLeon -