Introduction
Parts
-
-
These are the DIY instructions HOW TO Install iPhone 5 Housing
-
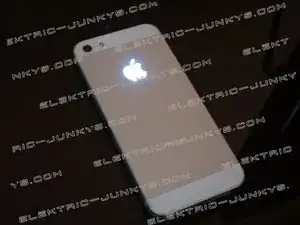
The Iphone Housing could be offered in all kind of Colors and styles even High Grade Polished
-
Needed Tools
-
IPHONE 5 MIRRORED CHROM LCD LCD DISASSEMBLING watch it ....
-
-
Let´s start the DIY Instruction
-
Step 1 - Remove your simcard (simtrey)
-
Use a SIM card eject tool to remove your simcard
-
-
-
Take the included plastic opening tool to disconnect the three LCD Display connector cables
-
camera & sensor - Digitizer cable - LCD cable
-
-
-
Remove the three screws holding the battery connector shield on the Motherboard :
-
1 -- 1.8 mm Phillips screw
-
2 -- 1.6 mm Phillips screw
-
3 -- 1.2 mm Phillips screw (Lightning Connector)
-
>Then Remove the 2 small Metall shields
-
-
-
Insert the plastic opening tool between the battery and the housing near the bottom .
-
Cross the opening tool along the right edge of the battery and pull up at several points to completely loose it from the adhesive paste.
-
Do not PULL or PUSH too hard, as this may permanently deform or puncture the battery or your Motherboard or other important Parts of your phone .
-
Finally, use the clear plastic pull tab to peel the battery off the adhesive paste, Remove the Battery
-
-
-
Use the small plastic tool to pull up the cellular data antenna cable connector from the socket on the logic board, directly above the speaker enclosure.
-
-
-
Remove the following two screws holding the top logic board bracket to the housing :
-
1 -- 1.5 mm Phillips screw
-
2 -- 2.3 mm Phillips screw
-
Remove the shield from the top of the Motherboard.
-
Be sure that you dont harm the tiny tab that sticks up off of the bracket beside the rear facing camera.
-
-
-
Use the flat end of the plastic tweezer to disconnect the following three cables from the PCBA.:
-
upper interconnect cable
-
Buttons assembly cable (volume - silent - power button)
-
Lower interconnect cable antenna
-
-
-
Use the plastic tweezer to Pop up the Lightning cable connector from his socket on the logic board.
-
Carefully peel the cable back and seperate it of the logic board.
-
-
-
Remove the following screws holding the logic board to the housing:
-
Two 2.3 mm Phillips screws
-
Three 2.7 mm standoff screws
-
These screws have a Phillips bit pattern, but as our Expierence the best method is to use a 2.5 mm flathead screwdriver.
-
-
-
Rotate the logic board assembly toward the battery side of the rear case
-
Do not remove the Motherboard completely yet; there is still one cable connected on the dowside of the Motherboard you could not see yet.
-
The Flash part is glued to the flash unit and the rear case. If it stays on the rear case remove with tweezers and mount it back on the flash unit.
-
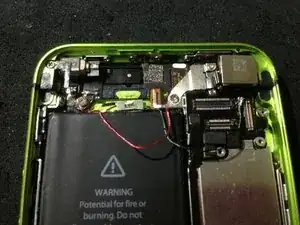
Use your Plastic tool to Pop up the WIFI cable connector connected on the downside of the Motherboard >>> Picture downside
-
Then you can Remove the Motherboard Totally (store your Motherboard Safely "antistatic mat or place to prevent any harmful Demages")
-
-
-
Remove the following screws holding the Lightning connector and Speaker assembly in place on the housing:
-
One pcs 2.5 mm Phillips screw
-
Two pcs 3.3 mm Phillips screws
-
One pcs 2.9 mm Phillips screw
-
Two pcs 1.5 mm Phillips screws
-
One pcs 2.8 mm Phillips screw
-
-
-
Use the flat end of your Plastic tool and pull up gently the Lightning connector and Speaker cables up from the rear case.
-
Make sure you get out all the Assembly togheter gently slide it to the left and to the right, also take care of the 4 smal washers you have to collect and later add it to the NEW Case.
-
So remove the Whole assembly and store it save, dont Forget the small washers ...
-
-
-
Remove the 3 screws Holding the Vibrateing Motor in place as seen in the Video :
-
1pcs 2.3 mm Phillips screw
-
1pcs 1.7 mm Phillips screw
-
1pcs 1.6 mm Phillips screw in the top of the housing
-
then you can remove the protection shield and the Vibrate Motor
-
-
-
Remove 8pcs 1.3 mm Phillips screws holding the LCD Display clips to the interior sides of the rear case, theese Clips are there to Position and FIX the LCD Display Later Tightly.
-
So for First you remove all those Clips and Transfer them (add them to your new case) expecially to the right downside of the housing first "before you add the SPEAKERS ASSEMBLY later you can not add that Clip if you add the assembly"
-
if something unclear recheck in our Video ....
-
-
-
Remove the described screws from the metal power Switch connector between the back facing flash and camera Windows
-
-
-
Remove the single 1.9 mm Phillips screw holding the power button shield to the inside top of the rear case.
-
Use the tip of a Tweezer to rotate the power button cover down on its hinge.
-
Remove the power button from behind, its cover in the housing.
-
Use the tip of the tweezer to press the power button cover in and lift it off, of its hinge in the housing.
-
-
-
Remove the screws holding the volume and silence buttons to the side of the housing:
-
1pcs 1.3 mm Phillips screw
-
2pcs 1.8 mm Phillips screws
-
pull the button cable away from the the housing to expose the silence and volume buttons.
-
Remove the silence and volume buttons from the housing.
-
-
-
Use the flat end of the tweezer to peel up the button flexcable from the housing.
-
Remove the button cable from the housing.
-
-
-
Remove the single 2.0 mm Phillips screw holding the SIM card eject lever to the housing.
-
Remove the SIM card eject lever.
-
Thats it now please go on in the inverse order to reassemble your NEW Iphone colored Case or Housing or Iphone Glowing Apple logo Mod Housing or whatever .
-
If you use the glowing Housing please connect the cables of the LED Panel as here shown in the Picture or Follow the Video instructions.
-
Hope you doing well with your iphone like our Video Subscribe and give a comment our also like our DIY Instruction Here, we offer all Kind of IPHONE AND SAMSUNG Spare & Repair parts so just send us a inquire with your needed Products we will get back to you immediately with the best Market Wholesale Price
-
To reassemble your device, follow these instructions in reverse order.