Introduction

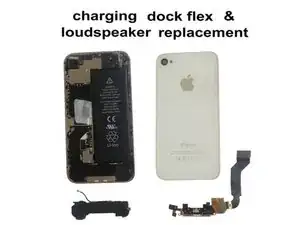
If you have a problem with charging, connecting with iTunes, don't hear you in a phone call, connecting with WiFi, ringing.

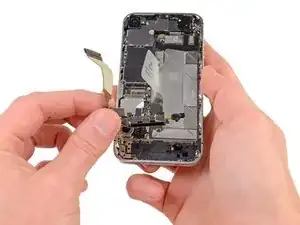
In this video manual we will show you how to change / replace the iPhone 4S USB Charging Port Dock Connector Flex Cable with Mic and inner Ringer / Loud Speaker & WiFi Antenna flex.


Please SUBSCRIBE to my channel ツ

  1. esvtYNplQXAr5RXW
    • If present, remove the small strip of tape covering one of the dock connector screws.

  2. W2QRpOfXLDD6eVJH
    W2QRpOfXLDD6eVJH
    eFuxorAbdSxy5RUm
    • Use a plastic opening tool to flip up the retaining flap on the home button ribbon cable ZIF socket.

    • Be sure you are prying up on the hinged retaining flap, not the socket itself.

    be gentle! flap is delicate.

    Sean Lin -

    The flap is basically a squared off U shape. In these pictures the hinge is at the bottom and the closed end of the U is at the top. You want to hinge it up so it's vertical. The cable connector will pull out towards the bottom of these pictures. It seemed to help to angle it towards the bottom of the phone a little to get it out of the socket. Same in reverse to put it back in.

    DMcG -

    I forgot to fully press this home on reinstallation but it was probably at a less than 30 degree angle as when I later pressed the speaker fully home, there was a little "click" as the hinged retaining flap went back into place. This was checked later as OK while chasing a speaker NOP problem that was caused by the chassis earth near power connector being 180 degrees the wrong way thereby grounding the power amplifier of the speaker.

    Michael Scollay -

  3. 45ewZHVaRUxEMWuK
    • Use a pair of tweezers to pull the home button ribbon cable out of its socket.

    • There are tiny components on the back side of the ribbon, so be careful not to damage them upon ribbon removal.

    This is tricky to put back in the socket when reassembling. Take care not to damage the cable as you try to line it up with the socket.

    rob -

    With no effort at all, I tore the home button ribbon cable. Now I'll be doing FAR more complicated repair... once the part arrives. (Grumble).

    marc -

    I must have damages the transistor looking things on the flip side of the ribbon. Maybe show a pic of the flip side?

    I put on a virtual home button on your screen in Settings/General/Accessibility/AssistiveTouch.

    BLEHH!!!

    blsht411 -

    I think a better breakdown of this step is required. I have just blown out 2 home buttons because I couldn't see how it reassembled properly.

    Kieran -

    You do need tweezers to replace the home button ribbon. I did it by hand and at first my home button was not working. Re did it after buying tweezers ( I am a bloke, so don't own them) and now all good. Thanks ifixit

    Steve -

    I can't stress enough how important it is to take your time and be extremely careful with this cable. My 15 minute dock replacement turned into 1.5 hour phone disassemble because I presumably screwed up the transistors on the back of this cable when trying to re-seat it. Do not PUSH this cable in! Just fit it into the slot gently and lock the tab down.

    becherd10 -

    Home button ribbon is EXTREMELY fragile. Mine tore taking it out and this turned into a way bigger project.

    wolfperson1 -

    My two cents: Pulling with tweezers is very risky. I pushed with the tip of a wooden toothpick and gently eased the way of this little connector out of its *drawer*. Yes, this little strip slides out horizontally like a drawer. The dangerous moment comes when trying to put it back in, since you have to angle the little piece to make it slide in. Again avoid tweezers.

    Pupi -

    Pupi, I found your toothpick suggestion perfect for this step. Toothpick(s) ended up being a better, more delicate, tool than tweezers for removing the ribbon cable from its socket. Thank you!

    annazadent -

    When the instructions say there are tiny components on the underside of the cable, look under the cable once you've removed it to understand where/what they are. They are tiny resistor like components, where you'd probably grip with your tweezers trying to get this thing back in. Don't grip further in than the width of the cable that connects perpendicular to the plug. Otherwise you can try gripping (very very gently) on the U shape of this cable safely when removing/reinserting the cable.

    nikbrauer -

    I messed this up while reassembling. Didn't tear the ribbon like a number of unfortunate souls here (got lucky, I guess), but inserted underneath the slot instead of inside it. My heart sank when I tried using the phone and the Home button didn't work. Reopened through Step 17, then tried again and put it in the right slot. Duh. That thing is so tiny - I could have used a magnifying glass or something.

    Curtis -

    As I am currently in reinstalling mode so following the steps in reverse and just completed reinserting the ribbon cable with difficulty so i'm not certain it is broken. Since I have it in now I'm not going to try again with my suggestion. But looking at it it seems that it would be easier to install the ribbon before screwing the dock connector back because it seems that it would slide in straight rather than trying to steer it in with tweezers, toothpicks, etc. By the way I used one of the dental floss things with the pick on the end but you probably don't have those in England (HAHA).

    Ed V -

  4. rQCDNuiUrsRUIRjP
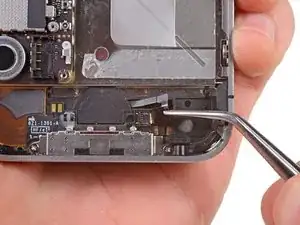
    • Carefully pull the rubber microphone holder out of its tube in the bottom edge of the iPhone.

  5. EDUgD4N5JlL3QBWg
    • Remove the two 1.3 mm Phillips screws securing the dock connector to the case of the iPhone.

  6. SsQPpYhrQEEgPxcD
    • Remove the tiny rubber spacer near the dock connector.

    not sure if this step is necessary. the rubber spacer was included in my new dock connector assembly.

    Sean Lin -

  7. AiOoMgN1kaUyRMCK
    AiOoMgN1kaUyRMCK
    ERubTyMVgwSNxgMj
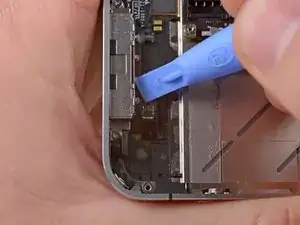
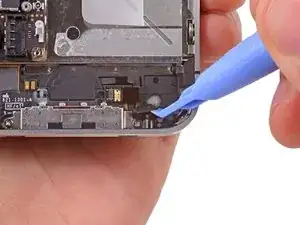
    • Use the edge of a plastic opening tool to peel the dock connector and its cable off the black plastic case of the iPhone.

    • If you are replacing the dock connector with a new part, make sure to transfer the rubber casing around the microphone. You can do this using a spudger.

    a spudger probably would of made the rubber casing removal easier. they probably should of included a spudger on the list of recommended tools.

    Sean Lin -

    The mic on my replacement had a thin strip of plastic over it. Didn't realize it until I put it all back together and had no mic for calls. Take a look before putting it back together.

    samtruslow -

    Attention. The mic on the replacement part has a very small, round (ca. 1mm) plastic covering. It is only on the mic hole, not the entire mic body. You can peel it of with the plastic tool.

    eivanov -

    I also have problem, callers could barely hear me on the lower microphone. I didn't noticed the plastic connector until iFixIt kindly sent me a replacement for free (these guys are way nice and cool!)

    chrismallen -

    If you are replacing the dock connector, be sure to also transfer the tiny shield braid that was attached (adhesive) to the dock connector's leftmost cable part where there is a free metal gold area that is supposed to be in electrical contact with the metal case's corner.

    In addition, my replacement dock connector had no less than 4 plastic film covers over sticky parts that protected the adhesives. Remove these plastic films before you mount the connector.

    Harald Brandt -

    Are you referring to that gold colored stuff on the bottom of the connector itself? Like on the ribbon cable that connects the thing to the logic board

    Matthew Hirmiz -

  8. DTjSuUmSYL1TOXva
    DTjSuUmSYL1TOXva
    2XmglPSWNrPQ15ZX
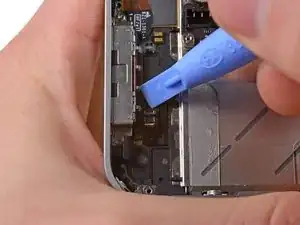
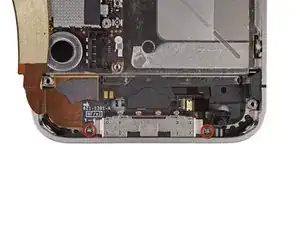
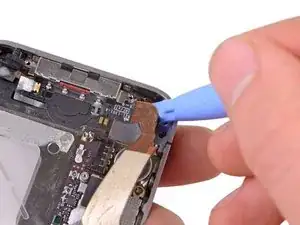
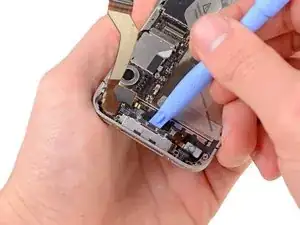
    • Pry the dock connector away from its opening at the bottom of the iPhone.

    • Remove the dock connector.

    Caution, I broke the home button ribbon cable when the dock connector went out...

    guillaumemunch -

    I broke the home button ribbon cable on the last step too. It was out, but got caught on something and easily broke off. Now I need a new part, and to take apart the whooole thing.

    Smothers -

    One piece of advice, unless your eyes are really good make sure to use one of those bench mounted illuminated magnifying glasses or some other visual add. Personally, I could not have done it otherwise as the parts are just too small. This should also help greatly to avoid breaking additional parts while in the phone and to insure proper assembly. As mentioned in my earlier post, I also purchased an inexpensive set of phone tools and used a small bowl to keep from loosing any parts. Happy repairing and thank again.

    Mike McManus -

    Easy enough a granny could do it … might want to add to your instructions about the new adhesives that must be removed … especially little one on the piece that goes back into microphone rubber square thingy ma gig !

    its charging … i’m stoked !!

    Teresa Marsano -

  9. rVoJOK1LTqUK6RSi
    • Speaker enclosure remains.

    If your new speaker doesn't work after putting back reassembly, be sure to clean the contact pads where the speaker ears contact. That might solve your problem if your dock isn't totally trashed.

    After tearing my phone down twice, and rechecking connections I decided to track down why my new speaker wasn't working. Many of the comments said that after replacing the speaker, the next problem would be the dock. My phone had a little bit of water damage because of a faulty lifeproof, not a soaking but some liquid in the dock area.

    I had cleaned the outside of the 30 pins, but was still not getting sound. Turns out their was a little bit of crudge on the two pads which I removed by using a bit of DeoxIT®(which I didn't have last night) and a cotton swab. I then checked to make sure the pads were working by using jumper wires to connect to my new speaker. Nice and loud, and much clearer than my old speaker. I then assembled the speaker enclosure, and now I can hear my phone ring again.

    ahicktiger -

Conclusion

To reassemble your device, follow these instructions in reverse order.

ZFix

Member since: 09/12/13

193538 Reputation

0 comments