Introduction

Use this guide to replace the screen in your Samsung Galaxy S24 Ultra.

This guide shows how to replace the screen only. If your replacement part is a screen that's pre-installed on a frame, follow this guide instead.

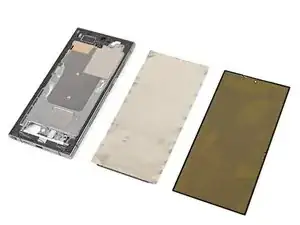
The screen includes the front glass and the display panel. If your glass is cracked, you will need to replace both the glass and the display panel.

This process will destroy your old screen. Don't use this guide if you're trying to harvest a screen.

  1. PX6ZWXUGv6lqHVlB
    PX6ZWXUGv6lqHVlB
    nbHuWH42sGPdRPRW
    • Allow your phone's battery to drain below 25%, as a charged lithium-ion battery is a potential safety hazard. If your battery is swollen, take appropriate precautions.

    • Unplug any cables from your phone.

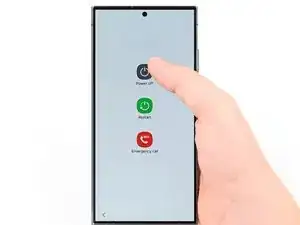
    • Hold the side key and the volume down button, then select "Power off" to turn off your phone.

  2. eoeLhYvZHFWVyJLP
    • Heat an iOpener and apply it to the right edge of the back cover for two minutes.

    • You may use a hair dryer, heat gun, or hot plate instead, but be careful not to overheat the phone—the display and internal battery are susceptible to heat damage.

  3. dXqkmHBZeVPyOuSU
    dXqkmHBZeVPyOuSU
    PyHHYrood3VP4x5t
    OPLd1nubMoJcYqbs
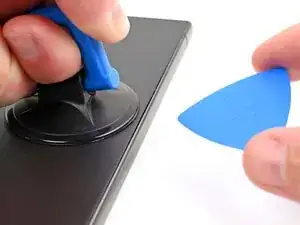
    • Apply a suction handle to the back cover, as close to the center of the right edge as possible.

    • Pull up on the suction handle with strong, steady force to create a gap between the cover and the frame.

    • If you have trouble creating a gap, apply more heat to further soften the adhesive. Follow the iOpener instructions to avoid overheating.

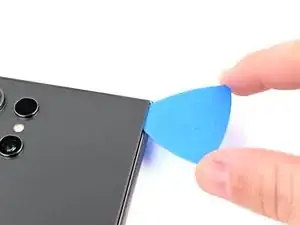
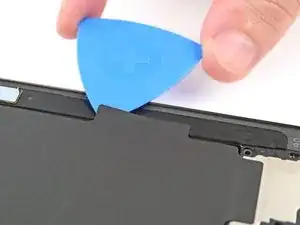
    • Insert an opening pick into the gap.

  4. IfaaLTVGCcCZuQSl
    IfaaLTVGCcCZuQSl
    o6FRoEyVIyCBSW3Z
    Yhi2KOKeADjkfGvV
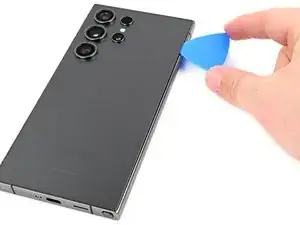
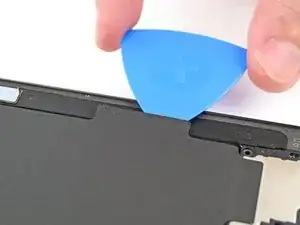
    • Slide the pick back and forth along the right edge to separate the adhesive.

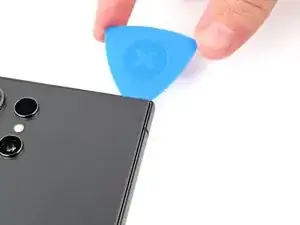
    • Leave the pick inserted near the bottom right corner to prevent the adhesive from resealing.

  5. SEwAHBisYqJBLM1L
    • Apply a heated iOpener to the bottom edge of the back cover for two minutes.

  6. 2SFSHTRLeqgrH4lu
    2SFSHTRLeqgrH4lu
    lmjEhsscFoSvtbhw
    RUoTEYoG5xUyEKHH
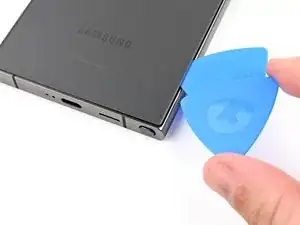
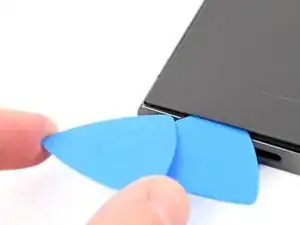
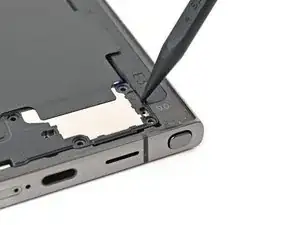
    • Insert a second opening pick next to the first one, near the bottom of the right edge.

    • Rotate the opening pick around the bottom right corner to separate the adhesive.

  7. FM4W5gn6uQHHxwnR
    FM4W5gn6uQHHxwnR
    auiMelVFREHofWYU
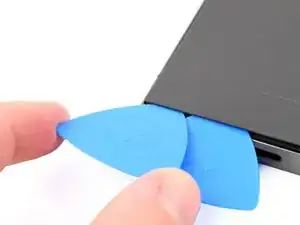
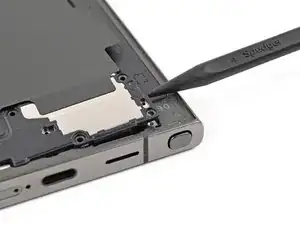
    • Slide the opening pick along the bottom edge to separate the adhesive.

    • Leave the pick inserted near the bottom left corner to prevent the adhesive from resealing.

  8. ExIixemEEXUokOHE
    • Apply a heated iOpener to the left edge of the back cover for two minutes.

  9. FuCZKH5aQQHvxdso
    FuCZKH5aQQHvxdso
    LiDDeZedXlnBuWki
    N2wPNcgBAHtYHMXn
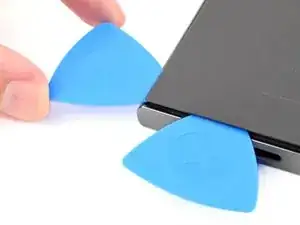
    • Insert a third opening pick next to the second one, near the left side of the bottom edge.

    • Rotate the opening pick around the bottom left corner to separate the adhesive.

  10. vXnjCO2niySjhyTs
    vXnjCO2niySjhyTs
    ApxDAlLyLaKnpfgL
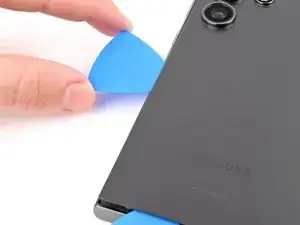
    • Slide your opening pick along the left edge to separate the adhesive, stopping before you reach the power button.

    • Do not insert the pick more than 4 mm to avoid damaging the antenna cable.

    • Leave the pick inserted near the power button to prevent the adhesive from resealing.

  11. 1LrEv6ISBgcMgXdN
    • Apply a heated iOpener to the top edge of the back cover for two minutes.

  12. DPCEkMKoq2qIbnmT
    DPCEkMKoq2qIbnmT
    kWEemRVuZTjhTggP
    DiLaNuXprfMWfc3y
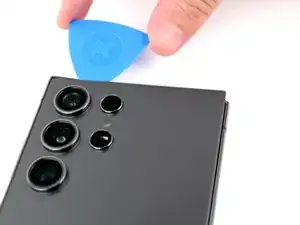
    • Insert an opening pick in the gap at the top of the right edge.

    • Rotate the opening pick around the top right corner to separate the adhesive.

  13. ENLFTt4XUhPmlCZG
    ENLFTt4XUhPmlCZG
    VZZl32bJLVfyMCEt
    • Slide the pick along the top edge to separate the adhesive.

    • Do not insert the pick more than 4 mm to avoid damaging the sensor or camera near the top edge.

  14. PA1yL4WNMeEOFCwH
    PA1yL4WNMeEOFCwH
    RrUJrPgfbqJoRHPv
    IpCVfVtDmpglsbBw
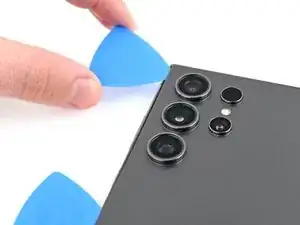
    • Slide the pick around the top left corner and down the left edge to separate the remaining adhesive.

    • Do not insert the pick more than 4 mm to avoid damaging the cameras.

  15. Mned3U6WyfkSqJ2D
    Mned3U6WyfkSqJ2D
    qowbZ1J2jsGr2X1V
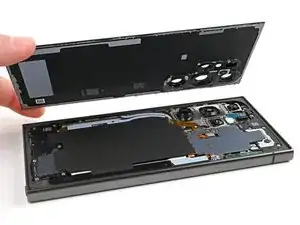
    • Grab and remove the back cover.

    • If your cover is still sticking to the frame, slide an opening pick around the edges to separate any adhesive that may have resealed.

    • During reassembly:

    • This is a good point to power on your phone and test all functions before sealing it up. Be sure to power your phone back down completely before you continue working.

    • Remove any adhesive chunks with a pair of tweezers or your fingers. Apply heat if you're having trouble separating the adhesive.

    • If you're using custom-cut adhesives, follow this guide.

    • If you're using double-sided tape, follow this guide.

  16. 6Gdo6baXGIgKyQn3
    6Gdo6baXGIgKyQn3
    qAoOduqeJkAYStTy
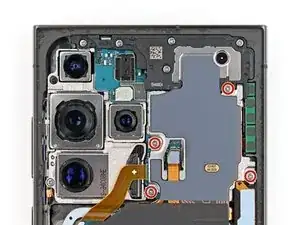
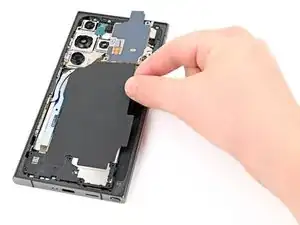
    • Use a spudger to pry up and disconnect the wireless charging coil press connector from the motherboard.

    • There's an arrow printed on the board near each press connector that indicates the recommended prying location. Only pry in this location for each press connector to avoid dislodging surface-mounted components.

    • To reconnect press connectors, align the connector carefully over its socket and press down with your fingertip—first on one side, then the other—until it clicks into place. Don't try to force the connector into place. If you're having trouble, reposition it and try again.

  17. xOh32PnjlcQDuVwh
    xOh32PnjlcQDuVwh
    Ei2KY1XSZYgWKaSj
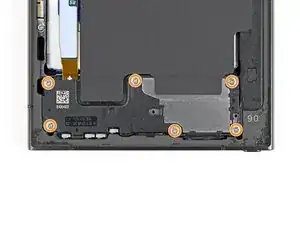
    • Use a Phillips screwdriver to remove the ten 3.5 mm‑long screws securing the wireless charging coil and the loudspeaker:

    • Four screws securing the wireless charging coil

    • Six screws securing the loudspeaker

  18. tx3BFlxOEkbcGPgC
    tx3BFlxOEkbcGPgC
    XPkfTokIUWAAnOUL
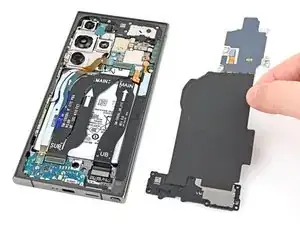
    • Use a spudger to gently pry up a corner of the tab of the wireless charging coil that's adhered to the right edge of the frame.

  19. NGfES2PJeYo6kfix
    NGfES2PJeYo6kfix
    NSoWwhPwYHE62SAl
    • Use an opening pick to separate the tab from the frame.

  20. RW4Ji4US1wId1WxY
    RW4Ji4US1wId1WxY
    mNqaevQetSRGTufX
    • Insert the point of a spudger into the gap between the right edge of the loudspeaker and the frame.

    • There's an arrow engraved in the loudspeaker to indicate the recommended prying location.

    • Pry up to unclip the loudspeaker from the frame.

  21. EdZYP1UouACBDKu5
    EdZYP1UouACBDKu5
    wA3afATrKUA3Qyoh
    • Remove the wireless charging coil and loudspeaker from the frame.

    • During reassembly, press around the edges of the loudspeaker to clip it to the frame before reinserting the screws.

  22. PYAuejnXKhUuPiOn
    PYAuejnXKhUuPiOn
    C6gaVs1ISYGlZrZh
    WKNUyAF4fPdHrEGC
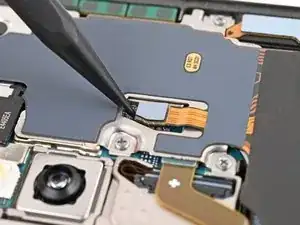
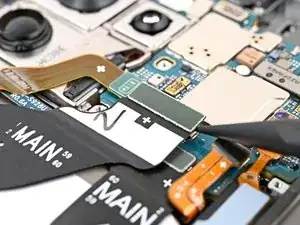
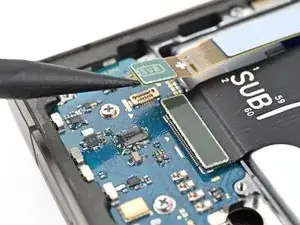
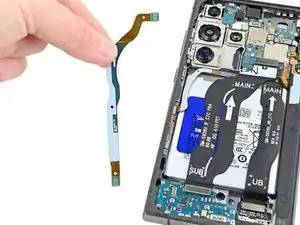
    • Use a spudger to pry up and disconnect both interconnect cable press connectors from the motherboard.

  23. rGCfv1pPJyyJHekM
    rGCfv1pPJyyJHekM
    lL425B5JMOfa2AMb
    rLFiX11UjFhuCuat
    • Use a spudger to pry up and disconnect both interconnect cable press connectors from the daughterboard.

  24. IB1VJbJMSFqPhXyF
    IB1VJbJMSFqPhXyF
    Ro2yxOcinGJSvVGc
    • Grab and remove the interconnect cables from the phone.

  25. nG6iCfZ3DdaJU1kF
    nG6iCfZ3DdaJU1kF
    M5BjNnCwVZAhFpcM
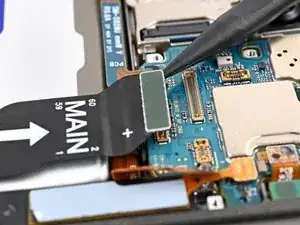
    • Use a spudger to pry up and disconnect the display cable press connector from the motherboard.

  26. rwBtHUgXRnLjNJ2m
    rwBtHUgXRnLjNJ2m
    1I2ALyUWZIOXURB2
    3tNTnOSVqBElSXNV
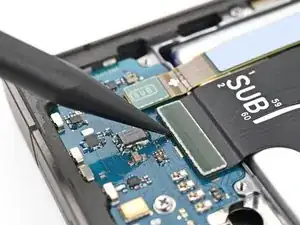
    • Use a spudger to pry up and disconnect the display cable press connector from the daughterboard.

  27. ZgenoBcjW2gorqw4
    ZgenoBcjW2gorqw4
    VdQAE4QMYYAdYpHo
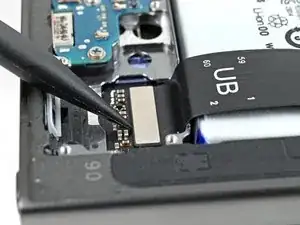
    • Use a spudger to pry up and disconnect the fingerprint reader cable press connector from the motherboard.

  28. 4nXb2DVKO5qZxqDY
    4nXb2DVKO5qZxqDY
    sXQ5GjoBuSrZNdvT
    • Put the back cover on the frame to protect the battery and your phone's internals from damage.

    • Don't apply new adhesive at this step, as you'll need to remove the back cover again to finish reassembly. The old adhesive will be enough to keep the back cover in place while you replace the screen.

    • Flip your phone over so the screen is facing up.

  29. DSZ6ETLZE1AdWhEy
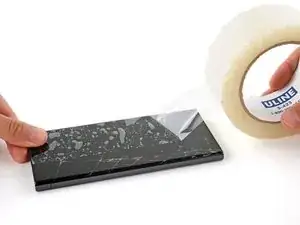
    • If your screen is badly cracked, lay overlapping strips of packing tape over the glass to protect yourself and make disassembly easier.

    • Make sure there's a smooth area near the top edge big enough for a suction cup to stick to.

  30. hSKVeAfTIYZQ4xn1
    • Be careful not to heat the phone more than recommended below—the battery is susceptible to heat damage.

    • Use a hair dryer or heat gun to heat the top edge of the screen until it's almost too hot to touch.

  31. OWZZaJbF3ImUv4eL
    OWZZaJbF3ImUv4eL
    EMMCUK4FwLBAR4ZQ
    FW6PlGP3GZRml4eP
    • The gap between the front glass and frame is very small. You'll need a thin, rigid tool such as an iFlex to create an initial gap.

    • Take the following safety precautions while removing the front glass during the next steps:

    • Don't grip the iFlex or similar metal tools by the edges with bare hands—they're very sharp.

    • The front glass may shatter and spread shards of glass around your workspace. Consider wearing gloves and safety glasses to protect yourself.

  32. EY5TtWcdwWLAWxLk
    EY5TtWcdwWLAWxLk
    N2IkDKkHHXB3LCoH
    ETxoCPMZSGThZXiM
    • The iFlex or similar tool only needs to be inserted just enough to create a small gap between the glass and the display panel. If inserted too far, it may damage the front-facing camera.

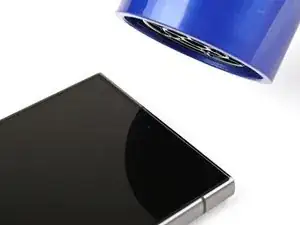
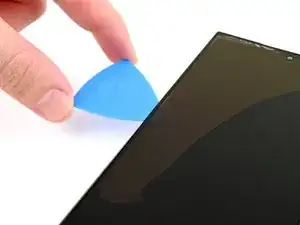
    • Apply a suction handle to the center of the screen's top edge, as close to the edge as possible.

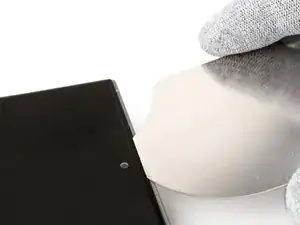
    • Insert the iFlex or similar tool at a downward angle in the notch between the top edge of the front glass and frame.

    • Use strong, steady force to pry up the glass with the suction handle while gently pushing the iFlex between the glass and the display panel.

    • The front glass will peel away from the display panel, causing it to appear discolored. This is normal. You will remove the display panel in a later step.

  33. Don6dmlHUCkDr1rF
    Don6dmlHUCkDr1rF
    s5lAZCUHHhQVw3uO
    NI6DpTNsGsCaEeHs
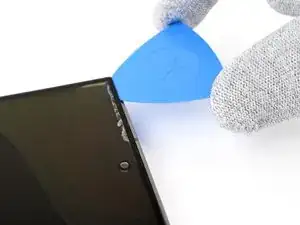
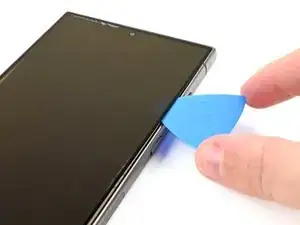
    • Slide the iFlex or similar tool to one of the top corners of the front glass until the gap is large enough to insert an opening pick.

    • Insert an opening pick into the gap and remove the iFlex.

    • Though you can use an iFlex for the next step, a plastic tool like an opening pick reduces the risk of shattering the glass.

  34. WHcgNnNOZpti24xI
    WHcgNnNOZpti24xI
    r1G4ZUxoLpLJNq31
    XK5DuuNNHfjUpQXl
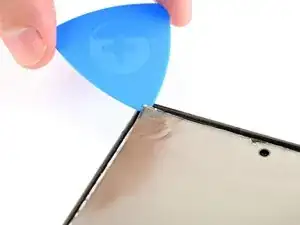
    • Slide the opening pick around the edges of the front glass to separate the adhesive securing it to the frame.

    • If the adhesive is difficult to separate, use a hair dryer or heat gun to heat the sides of the phone until they're warm to the touch.

  35. TYIMVyoWAYDj1gP2
    TYIMVyoWAYDj1gP2
    s1b1xbpHchYAXPBM
    • Lift the front glass off the frame and remove it.

  36. ZZMInbKerGyMLvac
    ZZMInbKerGyMLvac
    5PUSSgRpLUGZlUqb
    • Insert an opening pick under the display panel.

    • If you're having trouble separating the adhesive, use a hair dryer or heat gun to heat the display panel and soften its adhesive.

    • The display panel has two layers. Make sure the pick is completely underneath the display panel and not between two layers.

  37. 5UTO6LIfYxCSATNs
    5UTO6LIfYxCSATNs
    RNTCm3x1yflBwtLR
    PL6AXPFxgN2NGgEs
    • Slide the opening pick around the edges of the display panel to separate the adhesive securing it to the frame.
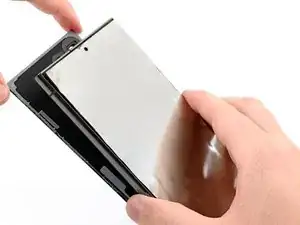
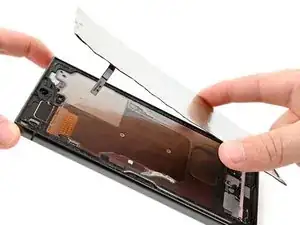
    • The fingerprint reader attaches to the display near the top left corner. Be careful not to pull on the cable with the opening pick to avoid damaging the motherboard.

    • There are components attached to the back of the bottom edge of the display panel, and gaskets under these components. Slide the opening pick under these components, but don't peel up the gaskets.

  38. kFRWwOB6XlpLvEGR
    kFRWwOB6XlpLvEGR
    LQFKo15V1fYErFAS
    NAiYyYHTaZTHWeVW
  39. xdchyKPsHKcLyLH4
    xdchyKPsHKcLyLH4
    oFNpC4y3iTRPuUHv
    • Remove the display panel.

    • You can use an opening pick to separate the adhesive underneath the display panel to make it easier to remove, being careful not to damage the front camera.

    This is probably the best how to article I've ever read in my life

    Nice website -

Conclusion

To reassemble your device, follow these instructions in reverse order.

Repair didn’t go as planned? Try some basic troubleshooting, or ask our Answers community for help.

Take your e-waste to an R2 or e-Stewards certified recycler.

Spencer Pennington

Member since: 09/09/23

13296 Reputation

0 comments