
Introduction
Tools
Parts
-
-
ATTENTION: 230V are processed in the monitor. So take the necessary care. And a little experience with electronics and soldering should be available.
-
-
-
The main focus here is on troubleshooting. First disconnect all plugs and then loosen the housing screws.
-
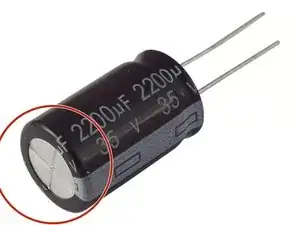
Now check whether an electrolytic capacitor has "blown up". Most electrolytic capacitors have a notched cross at the top and are flat there. If this surface is curved upwards, the electrolytic capacitor is defective.
-
When this top has burst open or liquid has leaked out of the electrolytic capacitor at the bottom, it is defective.
-
The liquid can also cause damage to the circuit board. In this case, the circuit board should be cleaned with isopropanol and any damaged lines must be repaired before installing a new electrolytic capacitor.
-
-
-
Now remove the circuit board. To do this, loosen all connections and remove the corresponding screws.
-
Next, the defective electrolytic capacitor must be desoldered (desoldering pump or desoldering wire help).
-
Now replace the defective electrolytic capacitor. The new electrolytic capacitor must have the same capacitance and voltage. The connection wires and height should also be the same.
-
Work through the steps in reverse order to reassemble your device.
Um sicher zu gehen, dass im Gerät keine Restladung in verschiedenen Elkos vorhanden ist, sollten diese per Multimeter gemessen und bei Bedarf entladen werden.
Elkos zum Entladen nicht kurzschließen, sondern einen Widerstand benutzen.
MACGYVER7400 -
@macgyver7400 absolutely correct. How big of a resistor should be used to discharge a capacitor?
oldturkey03 -
Ich benutze einen 5 Watt-Keramik Lastwiderstand mit 1 Kiloohm, den ich mit entsprechenden Kabeln versehen habe.
MACGYVER7400 -