Introduction
Before you start: Krups is said to be accommodating. Perhaps the easiest solution is to contact them.
If you want to tinker yourself, first remove the cover before you order the closing latch, if too many of the pins break off (see instructions) - then you can also order the new cover at the same time. The postage costs as much as the spare part.
Parts
-
-
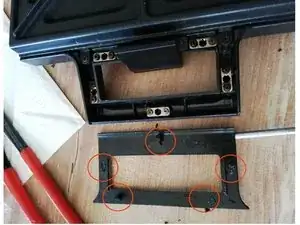
Using a screwdriver, carefully pry off the underside of the handle. The cover is held on the handle with five pins in clips, see photo. The pins can tear off during this action. Luckily for me it was only 2 out of 5 and the cover held up afterwards.
-
-
-
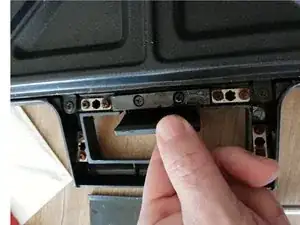
Under the cover is a tab with two screws. The screws and tab must be removed to insert the new fastener. Please don't forget to remove the spring from the old closing latch and attach it to the new one! Then screw the tab back in place and put the cover back on.
-
Finished!
-
Follow the steps in reverse order to reassemble your device.
12 comments
Hi Mirco!
Es ist in der Tat unmöglich das Unterteil im Ganzen zu demontieren. Meines war inzwischen knusprig und ist in Stücke gebrochen :D
Du schreibst vom "gleich Mitbestellen der Unterseite" - hast du vielleicht eine Referenznummer oder einen Link zu der Abdeckung ?
Es gibt überall nur den Clipper selbst, die Griffabdeckung ist leider nirgends zu finden. Die Nummer BI30-061 auf dem Teil bringt einen auch nicht weiter...
rokost -
Hallo,
Nein, tut mir leid, ich habe keine Nummer dafür. Das Handy, mit dem ich die Fotos machte ist irreparabel und die Fotos weg. Da kann ich nicht weiter helfen.
Mirco -
ging mir auch so: Abdeckung war nach Demontage 3-teilig ;-)
Da das aber „nur“ eine Abdeckung ist klebe ich die mit 2 Komponenten Kleber.
Moin, mir ist die griff-Unterseite auch zerbröselt...ohne weitere Lösung für mein Problem ausser wegwerfen...wie bist du weitergekommen?? LG Birgit
Bevor du ihn wegwirfst, melde dich nochmal bei Krups. Es heißt, dass Krups sich da immer wieder kulant zeigt und doch noch ein Teil schickt. Und natürlich: Je mehr Menschen sich bei Krups melden, desto höher die Chance, dass sie das Teil verfügbar machen: https://www.krups.de/contact
Hallo
Ich habe leider die Feder nicht (mehr) kann jemand diese ausmessen?
TylonHH -
Die feder ist bei mir 12mm lang und 5,3mm im Durchmesser außen und 4,1mm innen und hat einen Drahtdurchmesser von 0.6mm. Ich vermute, dass dies nicht zwangsläufig so exakt sein muss, schließlich ist sie ja auch dehnbar. Viel Erfolg mit den Daten
Simon -

