Introduction
This is a cut and paste from a post by dodo105, available on the following web site : http://www.fixyourownprinter.com/forums/....
I did this fix and it works fine ! This is a pure example of how manufacturers implement planned obsolescence in their products. Capacitors are widely used in order to make a device fail after a given amount of time, due to their limited lifetime.
Parts
One comment
Thanks! That was it!
In order to reach the board you only need to remove a total of 3 black torx screws:
- back plastic panel near power input
- ground trimming on the right of paper tray
- top of the memory card slots frame
remove gently the 3 plastic pieces starting from the ground-trimming, then to the memory card frame and finally the big plastic panel that covers most of the right side of the printer.
That last panel exposes 4 silver torx screws that hold the PCB in place.
Remove those 4 screws and unplug all connectors (there's a bunch of those..)
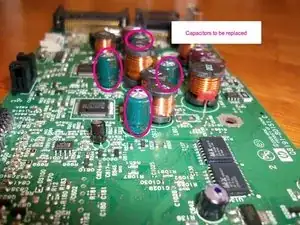
Since I only had a spare capacitor in my inventory I just replaced the first 330uF that seemed the most "damaged". By damaged I mean with the top of the capacitor more swollen.
That single capacitor was enough. The printer turned on and is now fully configured after an hard reset.
Thank you very much for the useful information!