Introduction

Follow this guide to replace the fan on your Sony Playstation 4.

Unplug your PS4 before beginning any repairs.

  1. XODFiLajUW1pXiQT
    XODFiLajUW1pXiQT
    Z15kif4HQcDYPxVU
    ujUlbGSNrlqRlycV
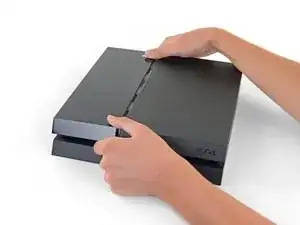
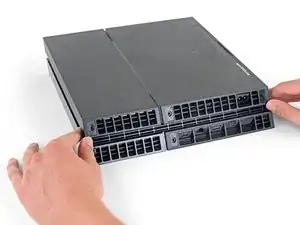
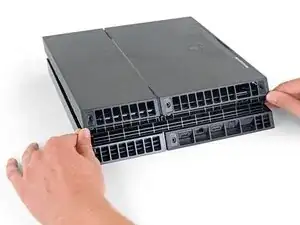
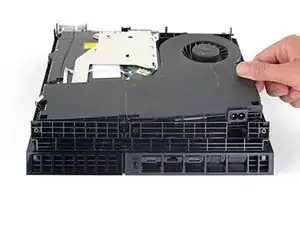
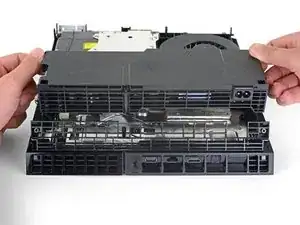
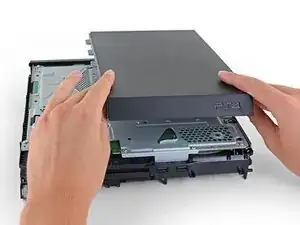
    • Grip the PS4 with both hands along the gap in the top cover.

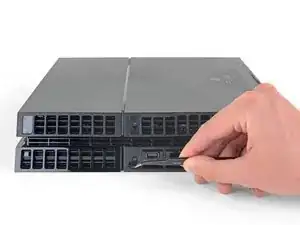
    • Push the glossy side of the top cover with your thumbs until it pops to the side.

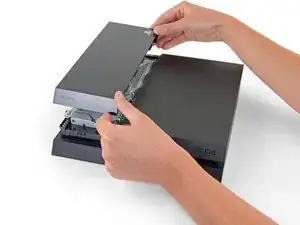
    • Lift the glossy top cover up and back to remove it from the PS4.

    I have a CUH-1102A version of this PS4.

    Would this teardown work for it?

    Cary B -

  2. 4jG4MsFWDV6TOc4K
    4jG4MsFWDV6TOc4K
    RTxxNkPWMlPqEFCE
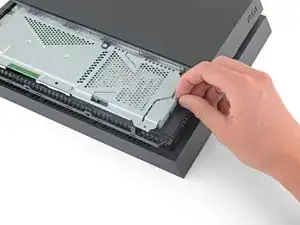
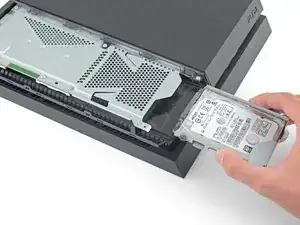
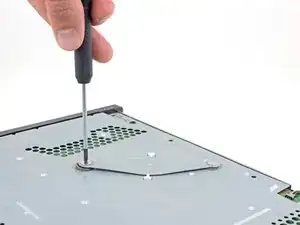
    • Use a Phillips screwdriver to remove the 6.5 mm screw securing the hard drive bracket to the enclosure.

  3. cVNDJIs1PHwFiv1K
    cVNDJIs1PHwFiv1K
    bZq6BRMigBrWhATA
    p3SAR2gJw22qmID5
    • Pull the hard drive bracket out of the enclosure.

    • Be careful not to drop the hard drive. The internal components are fragile and are susceptible to damage by sudden shock.

    Can these take an SSD?

    Cary B -

    Yes they can

    Jonathan Gibson -

  4. 21LJYnUT534diPkY
    • Flip the PS4 upside-down with the back side facing towards you.

  5. kywHHmkOcswPFDjm
    kywHHmkOcswPFDjm
    g3p1nmGqDLvNYlwD
    HVJTWJOoL6cUcoBS
    • Use tweezers to remove the two stickers in the center of the back of the PS4 exposing two case screws.

  6. QGDNpTn4LrZHSr2F
    QGDNpTn4LrZHSr2F
    MLVk3bQRWjJpjhKh
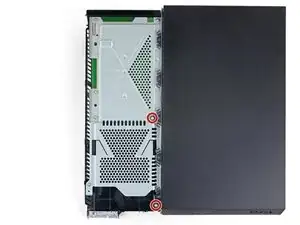
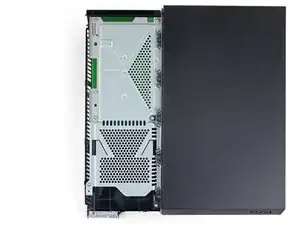
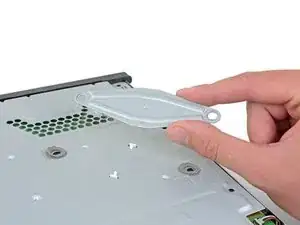
    • Use tweezers to carefully remove the plastic screw covers in each corner, exposing two more case screws.

    What If my PS4 doesn't have the two screws on the side

    Michael Jimenez -

    I should imagine that plastic cover will come off?

    How did you go?

    Cary B -

  7. EoWfJjtMRGNijIDA
    EoWfJjtMRGNijIDA
    kPwQlcOBVwv2PxuA
    • Remove the four 7.2 mm Torx security screws on the back of the PS4.

    I only have two screws, those in the middle of the console.

    Oscar Martinez -

    Have you removed the plastic covers mentioned in the previous step? That will expose the other two screws.

    Sam Omiotek -

    same, here. there are only the middle screws, no covers or screws on the sides. and it sits pretty tight

    Johannes Müller -

    turns out 12XX models are different. Look at this for reference: https://www.youtube.com/watch?v=Hpr0z0ve...

    Johannes Müller -

    This video guide is very useful, thank you. The disc drive itself is different than this ifixit guide too

    UnitedShoes -

    Yes there is slight variations between the first models, and the second gen and on models. I have an original and only has the two screws in the middle, removal of the cover remains the same.

    Mary Westphal -

  8. kbpHqgpXdtdVifwo
    kbpHqgpXdtdVifwo
    gtKNupdgQ44yDPVf
    • Use your thumbs to lift the lower case up and off the PS4.

    • The lower case is held into place by plastic clips. You may need to use significant force to release the lower case.

    sur la version 2 de l ps4 fat il n'y a que les 2 vis du milieu. Comment défaire le boîtier ?

    nlvolle -

    Joyeux dodjf ps4

    Jordan Carlos Monteiro Semedo -

  9. coGRVtdMr6vYQIWw
    coGRVtdMr6vYQIWw
    BGP5HaSrJNavVLaN
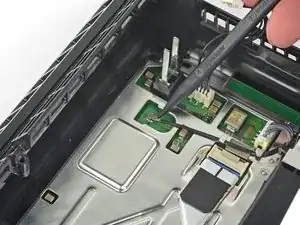
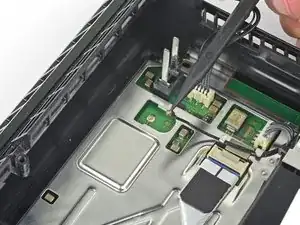
    • Use a pair of tweezers to pull the power supply cable straight out and disconnect the power supply unit from the motherboard.

    • If your connector feels stuck, use a spudger to gently pry the connector out.

    This part looks dangerous. There should be a flag/warning not to destroy that cable yes?

    Shawn -

    I second Shawn's comment. That cable seems to be very fragile, and one of the wires snapped on mine while removing the cable. It wouldn't have bothered me so much, if it wasn't a pain to find a replacement for it.

    Matt Gaia -

    The tweezers used here, do not cut it. Not enough grip.

    I had to use a set of needle nose pliers to remove this.

    Cary B -

    Power supply connection stuck. I don't want to damage it

    Nick Alex -

    What you need to do here is be patient. Do not pull the wires. Get some fine nosed pliers, wiggle the white connector from left to right in small movements and edge it out slowly. You can also use your nails one finger at each edge of the white connector to do this.

    David Harkness -

    Its really hard but i managed it with both of the tweezers/pincers at the same time


    1. Keep in mind to pull not too hard on the wires and make step 2 and 3 simultaneously!

    2. the straigt and wider tweezer to pull the white connector itself
    (top and bottom grip)
    3. the small and angled tweezer to pull the wires carefully
    (as shown on the picture above)

    dinkelberg01 -

    Another option, is to remove the screws holding it down, leave the cable in place and lift it out carefully, revealing the other end of the connection. The hidden side of the connection wire is easier to get a handle on.

    Mary Westphal -

    I concur with David, some patience and a lot of wiggling did it for me despite the stubbornness of the connection. Does seem like this one varies a lot in how difficult it is to remove.

    hazelrat -

    My connector wouldn't budge no matter how much I wiggled it. I solved it by lifting the power supply out and disconnect the connector at the other end (mainboard end)

    _I_ -

  10. QuWBy6PULou5kCNl
    QuWBy6PULou5kCNl
    hgyBH31OKmXWCda6
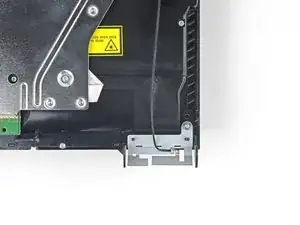
    • Remove three 9.7 mm-long TR8 Torx security screws.

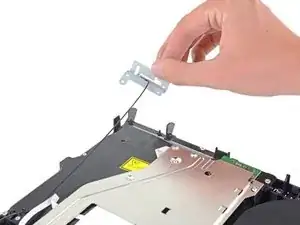
    • Remove two 41 mm-long Phillips screws and brackets.

  11. SpnmPM4gMehIdDX3
    SpnmPM4gMehIdDX3
    RarAwfBCLQdtutfe
    jVDy11JFDXQsv43q
    • Lift the power supply straight up and out of the PS4.

    • The power supply is held firmly in place by prongs on the left side. It may take multiple attempts to remove it.

    • During reassembly, ensure the prongs are aligned, then press the power supply into place.

    How do you remove the battery wires? I’ve personally been wiggling it to no effect, is there a certain way i have to pull it out, and should i pull it out of the power supply or the console?

    Tubby -

    Retirar en vertical, derecho hacia arriba. Sino puedes doblar uno de los tornillos largos

    FabianCampos -

    Just got done with this part. It was a struggle for me to disconnect the cable from the PSupply side. It was easier for me to carefully remove the power supply first, using the HDD cover to lift the Power Supply in place and removing the l cable from the Motherboard side. Go slow with your fingers to wiggle it out slowly, when you have enough plastic from the cable casing expose, gently use pliers to wiggle it free. Try hard not to deform the plastic wire casing.

    Justin Tang -

  12. EcgmyieGDdcMElOU
    EcgmyieGDdcMElOU
    oES1wXquYuIymPTQ
    • Use the tip of a spudger to disconnect the antenna cable from the motherboard.

    dumb question but I’m very new to this. when reconnecting the wifi antenna, does it just click back on? I'm hesitant to try this procedure if I need to solder anything since I have zero experience.

    cliodhna -

    Yup! Hold it in place and press straight down on top of it with your finger or a spudger. If you have any other cable/connector questions see this guide.

    Sam Omiotek -

    Heads up, you might have a black philips screw above the power connector. It fixes the motherboard and EMI shield on if you're dealing with an 1100 model.

    Dzmitry -

  13. MCxbfUY6UaKrmKCQ
    MCxbfUY6UaKrmKCQ
    TVMGZOKQUI53asHY
    62BX2LGhKLgvIJmY
    • Use a pair of tweezers or your fingers to grab the antenna cable and move it out from the cable guides.

  14. UPXA4VifbGFrvlIj
    UPXA4VifbGFrvlIj
    nXPq5UZ6AQwMh4aU
    M33e21yyIJ6ZAGlc
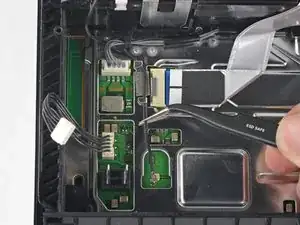
    • Use a pair of tweezers or your fingers to thread the antenna cable out from underneath the optical drive cable.

  15. MIQAcQeKr1eTTVwf
    MIQAcQeKr1eTTVwf
    NxEPgJZruCIGLEhI
    • Remove the 9.7 mm Torx security screw securing the antenna.

    This does not work on the newer 12 series

    raseemhassan123 -

    Thank you! I thought I was insane. I've been trying to figure out where the hell this thing goes and the seat for it is like an inch from the corner. It's driving me mental trying to figure out how to put this back on

    Leo Halliwell -

  16. GUboTTDfFRGvEiF1
    GUboTTDfFRGvEiF1
    LiMR2mf1HehdEOsR
    • Remove the Wi-Fi antenna.

    When I’m connected to wifi it does good for awhile then it disconnects from the wifi and I can’t use the controller. I have to turn the game off and disconnect power source. Do you think the wifi antenna could be the problem or doin have another situation.

    Jay Pax -

    I would check the antenna connection to the motherboard, if it's properly seated I don't think it's the problem.

    hazelrat -

  17. UtJl22epDDxnDmXK
    UtJl22epDDxnDmXK
    EApjrGivEtJ2BSL2
    BdKvel4uAd3DTKJf
    • Use your fingernail to press down on the metal release lever of the ribbon cable on top of the optical drive.

    • Use your fingers or a pair of tweezers to disconnect the ribbon cable by pulling on the black tab.

    • You do not need to press the metal lever when inserting the ribbon cable back in. You will hear a click once it is fully inserted.

    Please note that the younger generations of PS4 have a different setup of connectors to the driver, its sometimes 3 of these as presented but with different sizes and no pad to press down. However, dont be alarmed, just use the pair of tweezers and gently pull them off the connectors of the motherboard. Grab on tight on the blue area of the ribbon cable and pull gently! They tend to sit tight so take some time and patience on this.

    Mathias Kopp -

    Thank you!!!

    Nick Bymolt -

  18. 1LvBVqmqpBYstDEE
    1LvBVqmqpBYstDEE
    iTpPFQ2FtODogYS2
    GpRFwcaYGWPInGpL
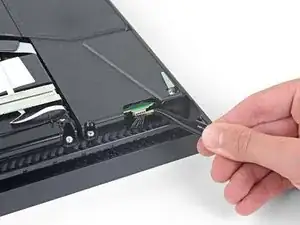
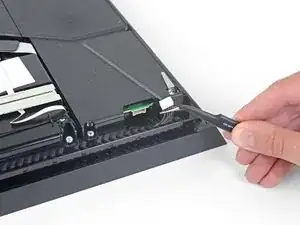
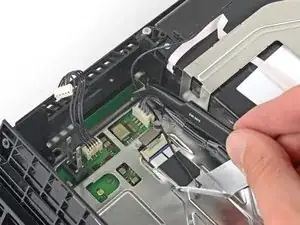
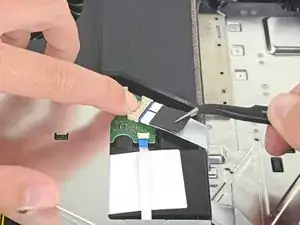
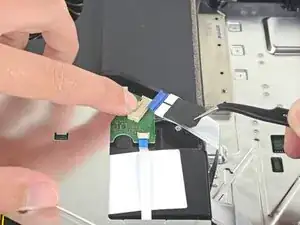
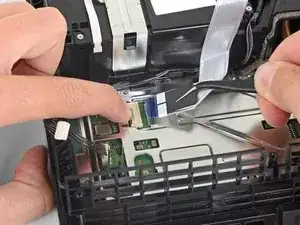
    • Use your fingernail to press down the metal release lever for the ribbon cable connected to the motherboard.

    • Use your fingers or a pair of tweezers to disconnect the ribbon cable by pulling on the black tab.

    • Set the ribbon cable aside for reassembly.

    • You do not need to press the metal lever when inserting the ribbon cable back in. You will hear a click once it is fully inserted.

    bei mir ist das leider defekt Plastikteil abgebrochen wie kann ich das ersetzen

    kevin pospiech -

    Is it possible to buy the white port for ps4? My one seems to be damaged so won't hold the ribbon cable.

    dorszes -

    This may be a difficult fix, as the white port seems to be integrated into the motherboard. You could try simply holding the ribbon cable down with electrical tape, if it's just a fitting issue?

    hazelrat -

    The issue I found is the connector for the ribbon cable, the one soldered to the motherboard, is cracked.

    I wonder if there is a replacement to re solder? And what should search for when looking to buy

    Vega84 -

  19. TeTMAoimw4tWu3an
    TeTMAoimw4tWu3an
    Z4EVnPGtququsxGP
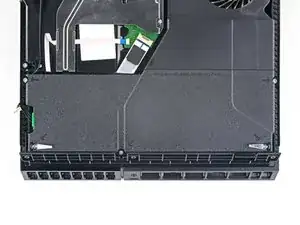
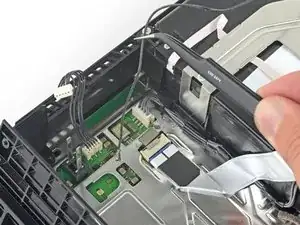
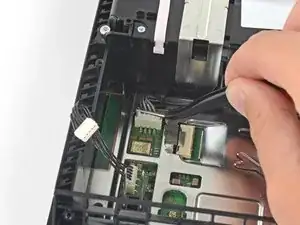
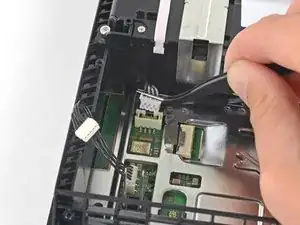
    • Use your fingers or a pair of tweezers to disconnect the optical drive cable from the motherboard.

  20. VHP4L4gyrtPc5nC1
    VHP4L4gyrtPc5nC1
    1B43RCFxNHTSVdLf
    bLYmLS4WOufOyEwM
    • Use your fingers or a pair of tweezers to remove the optical drive cable from the cable guides that hold it in place.

  21. roUPxyMotoTmVYpU
    roUPxyMotoTmVYpU
    JbWvkobm2uRPxtZQ
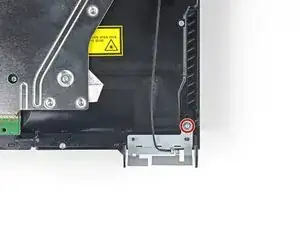
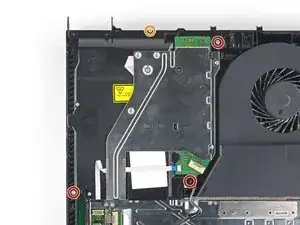
    • Remove the four screws securing the optical drive.

    • Three 9.7 mm Torx screws

    • One 6.2 mm Phillips screw

  22. 6O3MEDhAAGCqpqRa
    6O3MEDhAAGCqpqRa
    GxXAvyXwtYHZISCU
    • Lift the optical drive straight up and out of the PS4.

  23. kPI1VHvEPfPPBORI
    kPI1VHvEPfPPBORI
    m4kAwQ1mj2a3NCyY
    • Remove the two 9.7 mm Torx screws securing the upper case.

  24. GL32Tp1yyqTGWPe2
    GL32Tp1yyqTGWPe2
    1W3k5Y1O3SiJFIoY
    16H6rMkNPl2j5QOS
    • Lift the upper case up and back to remove it from the PS4.

    • The upper case in held in place by plastic tabs on the front side. It will take significant force to separate them.

    “Significant force” is a bit of an understatement. It’s like it’s superglued together..

    Wouter Rietberg -

    You absolutely should not need a lot of force for this. In the picture above, press upward using the left thumb from under the outer lip of the cover. You may need to pull it slightly toward you as well. Once that half is lifted, the right-hand side is still firmly attached. Keeping the left-hand side of the top separated, flip the unit over. Along the right-hand side, press the outside lip with your thumb about 2 thumb-widths down from the corner. There is a tab here and once released, the cover comes off easily and off in the back. Otherwise, you’ll be placing stress vertically (and rotationally) on the first tab on the side.

    Donovan Ray -

    I appreciate this feedback – thank you. This sounds like a safer method. I’ll test it on our guide unit and update the procedure.

    Sam Omiotek -

    THIS SET OF INSTRUCTIONS FROM YOU, IS ABSOLUTELY SENSATIONAL.

    I got this cover off quite easily. Still some resistance, but I didn't need this significant force at all.

    THANK YOU!!

    :)

    Cary B -

    There is a piece of plastic underneath the casing here. The PS4 I worked on got so hot on the inside that part of the plastic started to melt and warped some inside the metal plate underneath. This made it tricky to open the case, but by using spacers I managed to get it off.

    Kerstin -

    I found an easier method for myself is to have the console upright and pointed away from myself. From this position, wrap your fingers over the top of the cover, hooking it in its front with the last digits of each finger. This allows you to press with your palm into the top of the console and pry in an upward/outward motion. This feels safer as it took much less force to disengage the problematic clip.

    Callie -

  25. YWNY2VNT2SqRLxqF
    YWNY2VNT2SqRLxqF
    px2FCsaZYqeUcIJc
    • Remove the twelve 9.7 mm Torx screws securing the upper EMI shield.

    In my PS4, there is a small black Philips screw behind where the power lead connects to the motherboard. That screw connects the EMI shield to the inner metal where the power supply sits.

    Wouter Rietberg -

    I had exactly the same thing, and mine is a fairly old model of PS4. Confused me for a moment until I spotted it.

    Tom G -

    Can confirm this.

    This screw was on mine. To anyone reading this, flip the PS4 over and look where the pain in the ass power supply connector is.

    Black screw right there.

    If you have that screw of course. :)

    Cary B -

  26. fTffq2EBGNwnytyW
    fTffq2EBGNwnytyW
    DN3ZJPAhdkYapAKT
    Lf1QluHUHD4uNKrr
    • This step shows you how to properly unscrew the pressure plate.

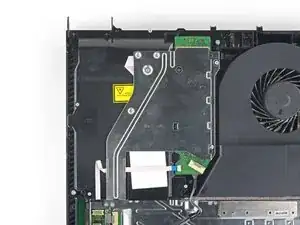
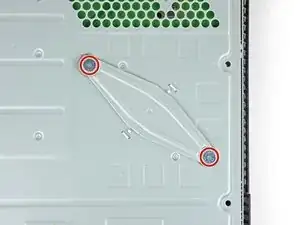
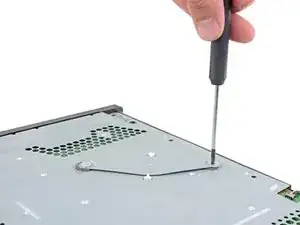
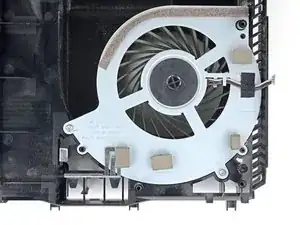
    • Remove the two 15.6 mm Phillips screws.

    • Gradually unscrew the pressure plate by turning each screw one half turn at a time.

    • Alternate between the two screws to maintain even pressure on the pressure plate.

    • Do not unscrew one side completely before unscrewing the other side or you may damage the processor.

    why does my PS4 have some metal thing attaching the plate to the metal beneath it?

    Beetroot -

    My PS4 also has 2 metal rings around each screw hole and 4 metal pieces 2 on each side closing in the same shape as the pressure plate as you take the pressure plate off?

    Geoff King -

    How strong do you tighten the screws when re-applying the plate?

    To the max, or stop one to two turns before?

    Andreas Raum -

    I've tightened mine until the screws became taut and I've not had any stability issues.

    hazelrat -

  27. 5keR1RSsB2b3iTLa
    • Remove the pressure plate.

  28. RYfSgfFXDlGid341
    RYfSgfFXDlGid341
    FigrCWmt6JZbUiMh
    • Remove the upper EMI shield.

    This is the 2nd PS4 I have disassembled and on both units I have found there is a black Phillips screw securing the upper EMI shield. This should be mentioned in the teardown as the EMI shield cannot be removed completely without first removing this screw and you risk damaging the EMI shield in the process . To locate the screw turn the unit over and you will see a small black Phillips screw located near the power supply prongs. There will be a set of arrows pointing to the screw. Once you remove this screw then you can fully release the upper EMI shield.

    Geoff King -

    Ditto. This is my first time disassembling a PS4. EMI shield didn’t lift off easily on one corner. Noticed the black Phillips screw holding it in place. I scrolled up in the tutorial to see if I missed it. Easy enough.

    Kwan Park Tom -

    All the ps4's I opened had this one Phillips screw. And I've cleaned/repaired ~12 units. So I think it's safe to assume that (almost) every one of them have it.

    Manoel -

    throw it way, electromagnetic fields dont exist

    Isaac Voorheis -

  29. BLJqWPsljRAMmBf6
    BLJqWPsljRAMmBf6
    uTyWtC3ItUpmEhY3
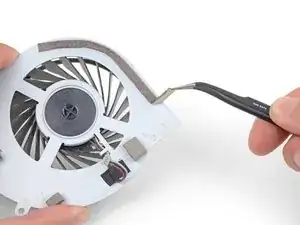
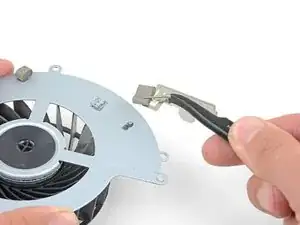
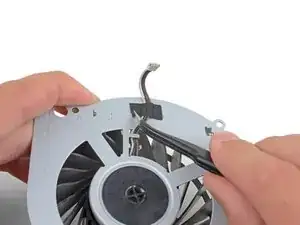
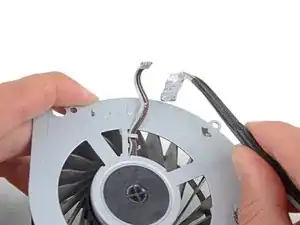
    • Insert the flat end of a spudger in between the fan cable and the motherboard.

    • Twist the spudger to lift the connector straight up and disconnect it from the motherboard.

    Mir ist der Stecker leider von der Platine gerissen 🫣 kann man den wieder dran löten?

    V. B. -

    The wires came out all seperate and the bit on the ps4 broke. What do i do?

    Caspar Krasauskas -

  30. 4RgFwh1JR6AENLhs
    4RgFwh1JR6AENLhs
    CtVlhGBWoYOXTLyi
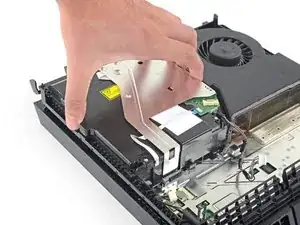
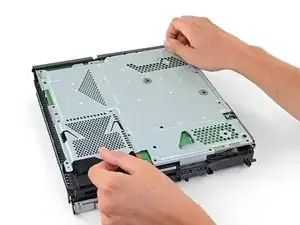
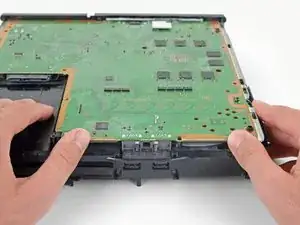
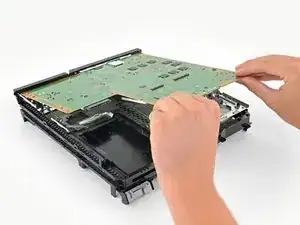
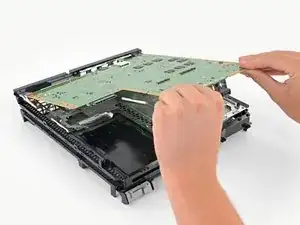
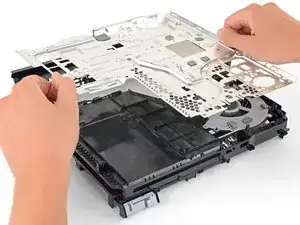
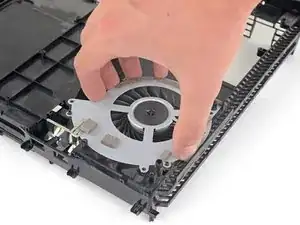
    • Grab the edge of the motherboard on the front of the PS4.

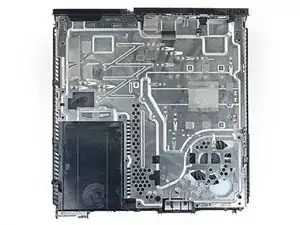
    • Lift the motherboard until the USB ports clear the PS4 case.

  31. vTfxB4lRi1NjiPLX
    vTfxB4lRi1NjiPLX
    CPwBRFVQEVALTJw1
    dobTJxmcCQVaXEwK
    • Lift the motherboard out from the PS4.

    • Apply a new layer of thermal paste to the processor before installing a motherboard using this guide.

    • Failure to properly install new thermal paste will cause your PS4 to overheat.

    • Insert the I/O side of the Motherboard in first, then lower the other side in.

    That shiny metal cover box on the opposite side of the hdi port shown in picture 30 at the very front is showing over heating signs I guess very brown around the edges I think is causing my PS4 not to show up on tv any ideas how to fix that hdi port looks fairly good to me but the black plastic port shows burnt signs as well that's on the same side of the HDMI port but the shiny metal cover is on the opposite side

    Newuser7878 -

  32. yWHLss2CjZLMVdME
    yWHLss2CjZLMVdME
    1TVrRWfcSVKSCbUt
    • Remove the three 6.2 mm Phillips screws from the lower EMI shield.

  33. C11xSOUWxmvHgkXy
    C11xSOUWxmvHgkXy
    jpGYJuJuZANQJBea
    • Lift the lower EMI shield and heatsink straight up out of the PS4.

  34. YZbYbMWqXpWTwIaN
    YZbYbMWqXpWTwIaN
    vX5wAxMKtkypXUpj
    • Remove the two 6.2 mm Phillips screws from the fan.

    The screw located to the far left in the picture above is in a different place in my PS4. In mine it is located in the hole at the very top right hand corner of the fan right next the the black plastic post that secures it in place. The other screw is located in the same position as shown above.

    Geoff King -

    Agree. Screw on top left is wrong. That screw is for EMI plate. The right screw is top right.

    Munir Ib -

    Hi Munir, thanks for pointing this out, are you doing this repair on a PS4 Pro or PS4 Slim?

    Sam Omiotek -

    Same comment about the location of the screw that shows up on the bottom left. You can see it's in the wrong place because it isn't there when lifting the EMI shield in the second picture of step 33, and the EMI shield has an arrow on it pointing to the actual screw location (barely visible in the photos, but visible).

    Model is CUH-1004A

    Bastien Nocera -

    It’s the screw to the top right and the screw pictured on the left comes down through the lower EMI shield

    Christopher DeSousa -

  35. R2fJSHPXappvgAaN
    R2fJSHPXappvgAaN
    sw4eR2JdKDogbdtV
    • Lift the fan straight up out of the PS4 shell.

    When installing the new fan, the holes may be slightly out-of-spec. If the fan is not completely seated, I suggest making a minor adjustment to the hole that is off with a Dremel bit. (the ball-like one worked for me). Tried to use a regular drill bit and power drill but couldn’t cut it. Dremel bit had it expanded perfectly in seconds. In my case, the errant hole was the one that fits into a plastic post, closest to the corner and at the bottom of the picture above.

    Donovan Ray -

  36. NxtK6P4yRJQL16eM
    NxtK6P4yRJQL16eM
    FKy5tDEXL3MMMXNv
    fpwd6g6isMWDLOuY
    • Use a pair of tweezers to carefully remove the foam padding strip from the fan.

    • Install the foam padding strip to the new fan in the same location.

    what happen if i don’t get all of them on there correctly?

    cutyoffapercy -

    what happen if i don’t get all of them on there right?

    cutyoffapercy -

    The padding strip was too degraded to remove intact. Instead, I purchased a rectangular felt strip from the hardware store. I inked the existing pad and used it as a “stamp” on the peel-away part of the felt pad and cut with scissors. Placed new curved strip onto new fan and trimmed height with X-acto blade.

    Donovan Ray -

  37. ualkNNjIUxfKUQgX
    ualkNNjIUxfKUQgX
    qWagwKkoVZZd5tcD
    YUvicBvgiAuTUKYH
    • Remove the foam padding pieces from the fan.

    • Use a hairdryer or heat gun to soften the adhesive if necessary.

    • Install these on the new fan in the same locations, using the adhesive left behind on the old fan as a reference.

    My original fan did not have any pads to transfer. Used foam weather stripping instead.

    Donovan Ray -

  38. jpyoxyEJZnspYlCQ
    jpyoxyEJZnspYlCQ
    AuyfXNQEoO22m1ES
    qPZWWZqMe5Q16xLt
    • Remove the adhesive strip securing the fan cable.

    • Place the adhesive strip on the new fan, securing the cable in the same location.

Conclusion

To reassemble your device, follow the above steps in reverse order.

Take your e-waste to an R2 or e-Stewards certified recycler.

Repair didn’t go as planned? Check out our Answers community for troubleshooting help.

Compare your new replacement part to the original part—you may need to transfer remaining components or remove adhesive backings from the new part before installing.

Sam Omiotek

Member since: 25/02/19

81085 Reputation

35 comments

Great guide, but where to buy a fan for the ps4?!

frankeinarhaugen -

Look one ebay, that's where my store gets the majority of out parts from. considering we fix computers.

jonathon saygidia -

Will this guide work with the CUH-1200 model?

Jose Alvizo -

excellent camarade !

Beaux travail !

Attention au principe de peter... Niveaux d'incom.......

je déconne !

P.S. Ne pas se ronger les ongles ca evite les pinces a épiler !

je déconne pas !

Inversement ce pas très esthétique...

Change rien !

Dall -

My PS4 has been overheating so I decided to take it apart and clean it. I cleaned it well but it still over heats the fan will try to start up but cuts back off plz help

Tristen hudson -

Replace the fan ... Yours works intermittently that probably means ut has a bad bearing.

chrisforfacebook1987 -

Does the Model work for the CUH-1116A ????

ITS HD -

Does the fan recommended work for the Model CUH-1116A if not do you know where you can recommend me to get one that's compatiable for it thank you.

ITS HD -

Well, after replacing the fan, triple checking every thing and plugging it back in…. I got nothing. No power at all.

took it all apart three times to make sure all cables, connections and touch sensors were making contact. Still nothing.

With the bad fan in it at least still powered on befor this.

Many help appreciated !

TomJ -

Did you find a solution

tchageman -

Did you find a solution? I’m currently having the same issue!

ketaamarie17 -

This was a great guide! I successfully completed the repair today. Thanks for the comprehensive steps and accompanying photos.

Dylan -

Thank you very much for this repair instructions. I do have one question. At the top of metal plate of the fan are none of the four (I guess) cooling pads shown on the pictures. With which material can I replace them (thickness?)? Thank you in advance.

Marinho -

My power button doesn’t work, but the eject works and the console seems to be running fine when I turn it on with my controller. Any ideas on what I did wrong?

Megan -

I followed the guide with no issues, but when I hooked my ps4 up again and pressed the power button, the console beeped, I got the blue light, but then it turned off. No fan, no screen, nothing.

The power button works, and there is power - otherwise I wouldn’t get a beep.

So I took it apart and reinstalled the old noisy fan. When I put it back together, same result.

Anyone have any ideas what the problem could be?

Derek -

Nice man. Very very so good your guide.

leo.woiciechoski -

Did this repair, fan is better but now my PS4 cuh-1116a won’t read any game discs?! It did beforehand but I did notice there is a bracket on the top of my optical drive? Is it in the wrong way? Could a wire being loose cause this and if so which one? Any help is appreciated thanks.

Charis Smith -

After I replaced the fan and thermal paste and reassembled my ps4, I have NO POWER at all. I have disassembled and reassembled countless times to make sure I didn’t miss something. All wires are correctly placed. Someone please help!

ketaamarie17 -

https://www.easeus.com/resource/how-to-f...

There is also a risk of frying components with static electricity if your were touching all over the motherboard.

Tom Riddle -

Cleaned out the dust and when I put it back together everything worked perfectly, and the stock fan is now silent.

Tom Riddle -

my playstation is now booting in Safe Mode… please help!

Joe Aguirre -

My fan circuit was damaged so i try to power the fan by an external 12V 1.5 amp power supply (your typical adapter 230v-12v)

However when i connect brown wire with +12v and the black one with Minus- , it spins for a couple seconds then stops.

Repeatedly does the same .

So my question is, where is the grey wire for and where do i connect it? Is it a speed regulator? Can i add the grey wire with the plus or the minus?

F.p. -

Great guide. Used it to replace the fan on my PS4 launch edition.

Hernan Trujillo -

I followed this guide step by step, things were going smoothly… after several hours I reach the finish line, I plug it all in get it hooked up, ready to play ,,, bam smoke and sparks come out the back and now its toast. .

jlc1167 -

My PS4 layout does not look like this in step 1? My model is CUH-1215A

Rick Sanchez -

Ps4 turns on but when I load a game the red line appears and it shuts off.

Jarrett Conrey -

Sam rules!!!

Katie Pena -

I replaced the thermal paste and now it's working great. No more overheating red light. Silent as a fish running full throttle. Thank you so much for making this for us!

Jarrett Conrey -

Thank you! Worked like a charm. The worst part was that it died right before the weekend so I had to wait longer to get the new fan. It was actually a pretty fun repair.

Andy Conklin -

why so much things just to get to the fan?

BrysonDowning998697 -

It is because the EMI shield has to be removed to access the fan screws, unfortunately.

Sam Omiotek -

Thank you. Great guide. I used it to disassemble my PS4 to clean it. Works great!

Benedick Miller -

İnanılmaz güzel bir rehber. PS4’ün sesinden eser kalmadı. Teşekkürler…

An amazing guide. Fan noise completely gone. Thanks…

Onur Gülce -