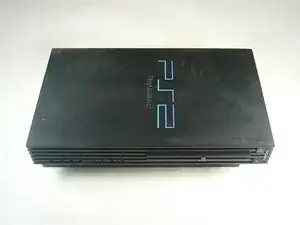
Introduction

Remove and replace your PlayStation 2's power board.

  1. BMYHguFIeCVHU3N2
    BMYHguFIeCVHU3N2
    FOkpWrVUKMHbWKuI
    rNGE4xfBQ5w3UBa2
    • Flip the PlayStation 2 over so it lays with the bottom of the device facing upwards.

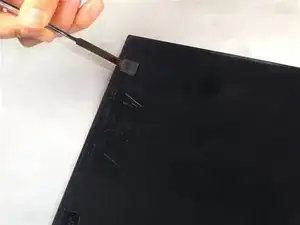
    • Use the flat edge of a metal spudger to pry the eight flat screw covers out.

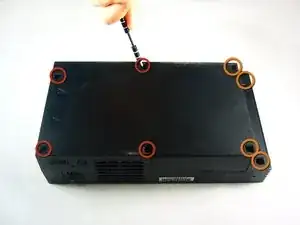
    • Remove the following eight screws securing the top cover to the bottom case:

    • Four 55.4 mm Philips screws

    • Four 18.0 mm Phillips screws

    Before proceeding to step 2, Take a look at your PS2, some PS2's have 10 screws (and screw covers) instead of 8 (i found them underneath the optical drive), these instructions have mislead me and i ended up breaking my top cover for my PS2.

    Tristan -

    Ich möchte daraufhin weisen, daß es bei der SCPH-50004 zwei verschiedene Schraubabdeckungen gibt.

    4x Kreuzförmig 4x rechteckig

    Sowie eine silberne schraube die sich an der unterseite aufhöhe des Reset-Knopfes befindet.

    Christian Lehnhardt -

  2. HqDNULiIEwP2Wawg
    • Some models have a different number of screws and feet. Remove all the feet and screws in the bottom of the case.

    • The 10 screw model has 6 screws in the bottom-most portion and 4 in the upper tray.

  3. mOuDWtEqDJZApTvu
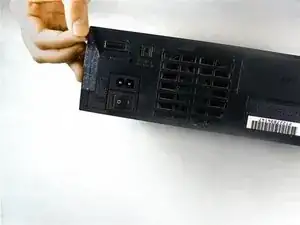
    • Peel the warranty sticker (located next to the main power switch) straight away from the case.

    • To avoid activating the VOID that may come up, heat it carefully to remove and replace it clean

  4. nyWcTfpYGE4MaySD
    nyWcTfpYGE4MaySD
    fvsbBetKYaRuZKV3
    • Flip the PlayStation 2 back to its original upside position.

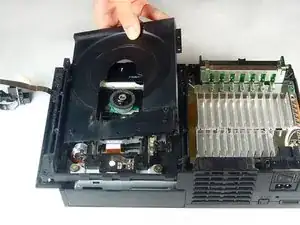
    • Lift the top cover off the bottom case.

    • To facilitate the removal, it is recommended to pry open the half closer to the power switch first while rocking the top cover towards the front of the bottom case.

    • Carefully remove the power cord that attaches the top and bottom halves by disconnecting the power cord assembly from the top case.

    If you have a 5000x model, then the power and reset buttons are attached to the console, not the lid. Therefore there won’t be a cord

    ARandomGuy231 -

  5. VDT6weYJGjTRmYVU
    VDT6weYJGjTRmYVU
    GglVQGuCQJqocx1W
    • Remove the two 6.4 mm black Phillips screws securing the optical disc drive to the bottom case.

    • Lift and remove the optical disc drive straight up out of the bottom case.

  6. MugDfrOchvAYiAsh
    MugDfrOchvAYiAsh
    t4RWHFXM133dUl3f
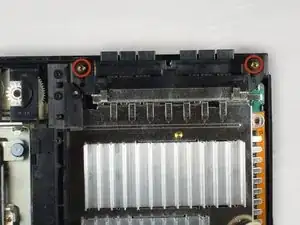
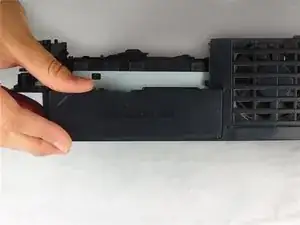
    • Remove the two 14.6 mm gold-headed Phillips securing the controller ports to the bottom case.

  7. UbNejveYA1llcYbQ
    UbNejveYA1llcYbQ
    R1ogsRCjqSLE3HhG
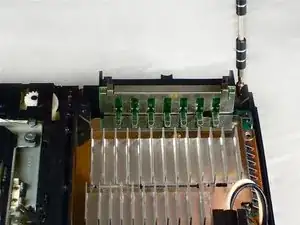
    • Gently lift the controller port board out of its recess within the bottom case.

    • Do not completely remove the controller port board. It is still attached via a ribbon cable.

    • Pull the controller port ribbon cable straight away from its socket on the controller port board.

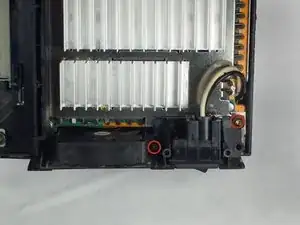
    • Remove the controller port board out of the bottom case.

    El conector del flex del modulo de conectores de los mando y las memory card no va a presión, para volver a colocarlo, hay que abrirlo.

    Marcos Morán -

    Controller is detached can we fix it?

    The clip which holds the controller is broken

    sravan kumbum -

  8. IAEQWGxMxLHZVavO
    • Remove the two 14.6 mm gold Phillips screws securing the fan to the bottom case.

  9. SnRjcGNL3twUQvHT
    • If there is a device occupying the expansion bay, make sure to remove the device. The expansion base should be empty.

    • Pry and remove the expansion bay cover away from its posts on the bottom case.

    If there is a harddrive in the system place switch on off position before removing and reinstalling because it may blow the fuse that runs the harddrive!

    stephen harrison -

  10. rwWBtoGvn5qIsBhs
    • Lift the motherboard assembly from its front edge and remove it from the lower case.

  11. pqLFnU6tAPSPCAsF
    • Now that all of that bulky plastic is out of the way, we can get to the fun stuff - electronics!

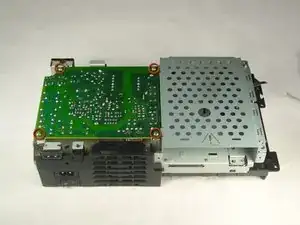
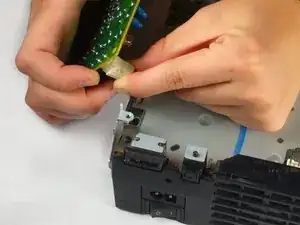
    • Remove the four 7.6 mm gold-head Phillips securing the power supply to the motherboard assembly.

    If you have a 5000x model, then the power supply will be flipped upside down (or right side up). the screws are in the same positions

    ARandomGuy231 -

  12. mZLNlvkpKlPVUHLK
    • Lift the expansion bay cage up off the motherboard assembly.

  13. vrn1yhCIaCsmNPfY
    vrn1yhCIaCsmNPfY
    lBleisRxx6tTqXab
    • Do not remove the power board yet. It is still attached to the motherboard assembly via the power board connector (highlighted in the first picture), which is located next to the main power switch.

    • Carefully lift the power board. You should now see the power board connector attached to the power board.

    • Pull the power board connector straight to lift it out of its socket on the power board.

Conclusion

To reassemble your device, follow these instructions in reverse order.

jwyoung

Member since: 04/11/09

2884 Reputation

7 comments

Where do I buy the new Power Board?

chanceman75 -

Where can you buy a new power board?

Logan Jorgensen -

Can u replace the fuse.?

brincp -

good news for us

VBlakeney -

Merci beaucoup, vous êtes le meilleur et le meilleur

Rahef Love -

Mir ist das weisse Kabel auf dem Board abgegangen, Laufwerk?, wo auf der Platine gehört es hin? Lötpunkt

Ari baka -

I changed the board and now its stuck in the browser system configuration screen

B W -