
Introduction
Use this guide to replace a broken display assembly.
-
-
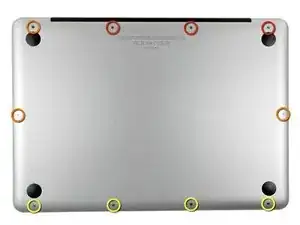
Remove the following ten screws:
-
Three 14.4 mm Phillips #00 screws
-
Three 3.5 mm Phillips #00 screws
-
Four 3.5 mm shouldered Phillips #00 screws
-
-
-
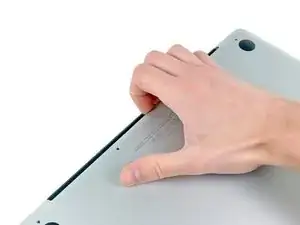
Use your fingers to pry the lower case away from the body of the MacBook near the vent.
-
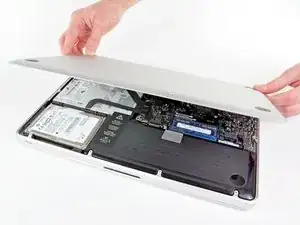
Remove the lower case.
-
-
-
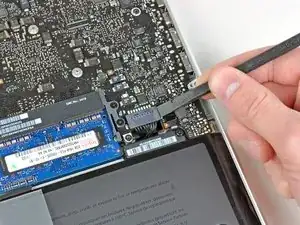
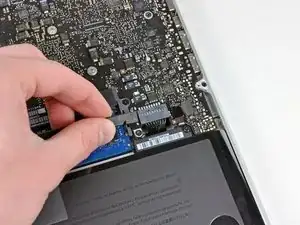
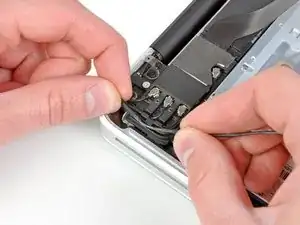
Use the edge of a spudger to pry the battery connector upwards from its socket on the logic board.
-
-
-
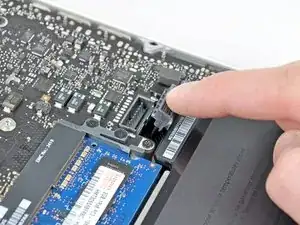
Bend the battery cable slightly away from its socket on the logic board so it does not accidentally connect itself while you work.
-
-
-
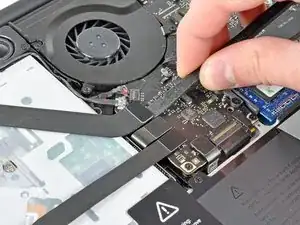
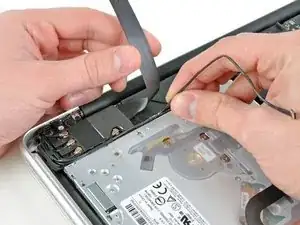
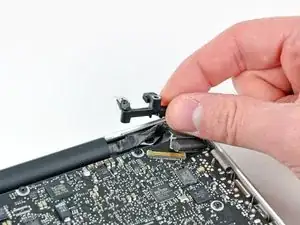
Use the flat end of a spudger to pry the AirPort/Bluetooth ribbon cable connector up from its socket on the logic board.
-
-
-
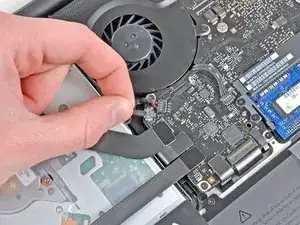
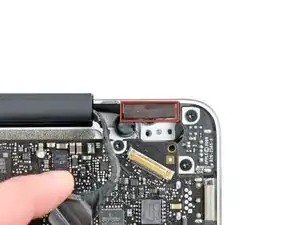
Carefully move the AirPort/Bluetooth ribbon cable out of the way as you peel the camera cable off the adhesive securing it to the subwoofer and the AirPort/Bluetooth bracket.
-
De-route the camera cable out from under the retaining finger molded into the AirPort/Bluetooth bracket.
-
-
-
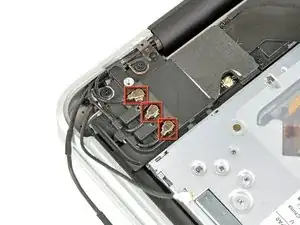
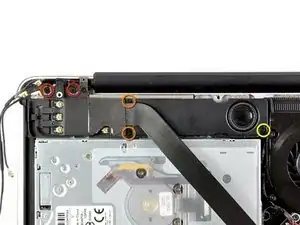
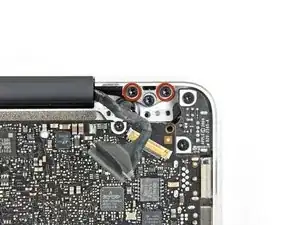
Use the tip of a spudger to pry the antenna connector closest to the logic board up from its socket on the AirPort/Bluetooth board.
-
De-route the antenna cable from under the finger molded into the AirPort/Bluetooth bracket.
-
-
-
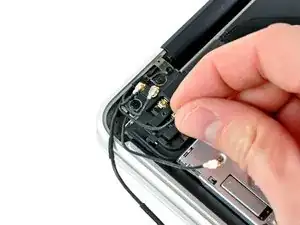
Using the method described in the last step, disconnect the remaining three antenna connectors.
-
De-route their cables from the slots cut in the AirPort/Bluetooth bracket.
-
-
-
Remove the following five screws:
-
Two 10.3 mm Phillips screws
-
Two 3.1 mm Phillips screws
-
One 5 mm Phillips screw
-
-
-
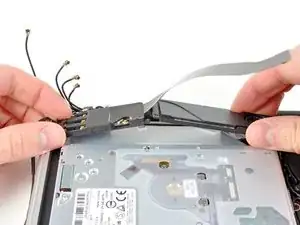
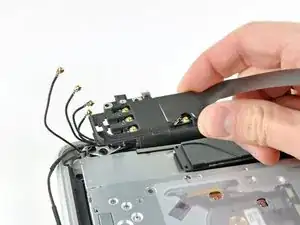
Pull the AirPort/Bluetooth assembly and the Subwoofer upward near the center of the side of the optical drive until they clear each other.
-
-
-
Remove the AirPort/Bluetooth assembly, minding the fragile antenna contact near the corner of the upper case.
-
-
-
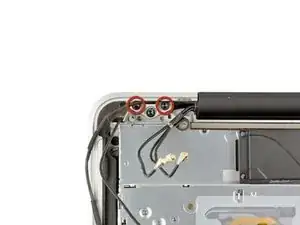
Remove two of the three 6 mm T8 Torx screws securing the right side of the display to the upper case.
-
-
-
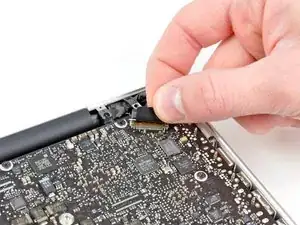
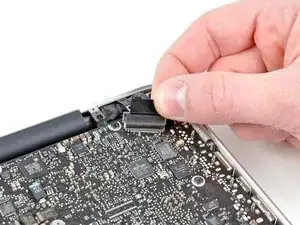
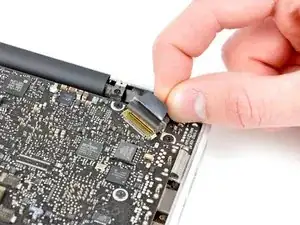
Grab the plastic pull tab secured to the display data cable lock and rotate it toward the DC-In side of the computer.
-
Pull the display data cable straight out of its socket on the logic board.
-
-
-
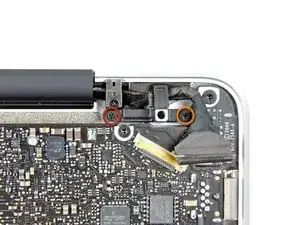
Remove the following two screws:
-
One 8.6 mm Phillips screw
-
One 5.5 mm Phillips screw
-
Remove the display data cable retainer from the upper case.
-
-
-
Remove two of the three 6 mm T8 Torx screws securing the left side of the display to the upper case.
-
-
-
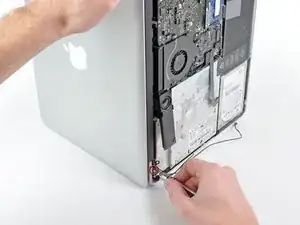
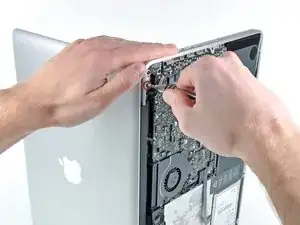
Open your MacBook Pro so the display is perpendicular to the upper case.
-
Place your opened MacBook Pro on a table as pictured.
-
While holding the display and upper case together with your left hand, remove the remaining T8 Torx screw from the lower display bracket.
-
-
-
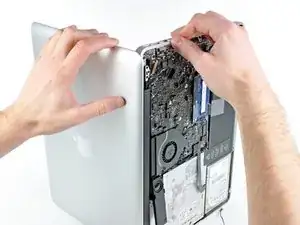
Grab the upper case with your right hand and rotate it slightly toward the top of the display so the upper display bracket clears the edge of the upper case.
-
Rotate the display slightly away from the upper case.
-
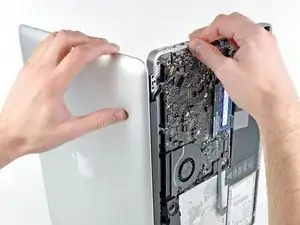
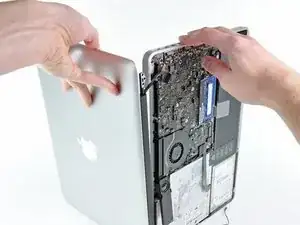
Lift the display up and away from the upper case, minding any brackets or cables that may get caught.
-


To reassemble your device, follow these instructions in reverse order.
26 comments
Just wanted to say thanks for the website, and easy to follow instructions! I just successfully replaced my girlfriends Macbook Pro screen today:)
Glenn -
This display assembly will fit into an 13 in - Early 2011 macbook pro?
Kike Sr -
No the connector in the logic board/video cable is slightly different.
Correct that the LVDS connectors are slightly different but you can modify them to fit using nail clippers if you are very careful!
Yeah! I did it. I had to use two different guides todo thelcd screen.but my MacBook is clear and no giant black crack. The mid 2012 "glass". Is plastic...just saying.
Can you give us a link to the two other guides?
How much weight can I save by removing the optical drive?
gunes314 -
You can save a lot of weight if lets say your installing a solid state drive or putting in a second hard drive but if you know that you use the CD/DVD disc drive a lot then you might just want to leave the drive alone.
Marshall WahlstromHelgren -
Tip: Use one of those weekday pill holders to have a cheep way to store screws you remove and each day of the week can be for different sizes or parts. It has been handy to have (much less expensive than the magnetic mat.
Robert Wacker -
Hello, where can I buy the screws I need in case I lose one of them?
taylornya -
iFixit sells a kit: MacBook Pro Unibody Lower Case Screw Set
Darrell Johnson -
I have one stripped screw... How opening without drill it?! Any suggestions please?
rodrigosady -
I also stripped a couple screws. I wasn’t able to open it up without drilling. After drilling the heads and removing the cover it was easy to hacksaw the tip and unscrew with a standard driver.
Michael Wilkens -
We have a guide for that!
How to Remove a Stripped Screw
Sam Omiotek -
My top tip - make sure you buy good quality Phillips screwdrivers and a magnetic holder. Cheap screwdrivers won’t get the screws undone safely. Without a magnetic holder you have no chance of getting the tiny crews in and out safely.
jeremyyoung -
A good Phillips 00 is your friend here. Also, when reinserting the screws, gently start anticlockwise and you wil feel a click at the start of the thread. This tells you you’re in the right place and less likely to cross-thread through force in the wrong place.
Iain Boyd -
I feel like these are 000 screws. Amazon sales describe them as such and my 000 screwdriver fits better
cam2000deluxe -
Before ordering a new Trackpad remove the existing battery and try clicking the Trackpad. If it clicks OK with the battery out the source of problem is likely a swollen battery, which should to be replaced even if it still works to some degree. From the side of the battery you will likely see the soft part of the battery bulging beyond the hard case.
Patrick Langvardt -
That’s absolutely correct as I can testify. With the battery removed I also adjusted the T6 set screw that adjusts the sensitivity of the trackpad click, evidently someone had cranked mine down tighter than the factory setting.
Gary Register -
Le quatrième paragraphe dans les instructions en français n’est pas correct : ce ne sont pas les 2 petites vis, mais les 7 petites vis qui sont inclinées. Et les 3 grandes sont bien verticales.
Degeorges -
Bonjour ! Merci de votre observation. J’ai corrigé la traduction. iFixit étant un wiki, n’hésitez pas à modifiez si vous remarquez une erreur :) Encore merci de votre attention et à bientôt !
Claire Miesch -
Tip: if you have a magnetic screw mat or similar, lay the macbook over the mat to make sure it catches any screws that may decide to fall of and hide under your table
Moritz -
Funny, it's not her hands that are doing the close ups. :)
Cinemated Man -
What's the difference between the shouldered and non shouldered screws? They look exactly the same to me.
MLNLRD -
the shouldered screws have a space where the threading stops and the head of the screw begins. i don't think the newer screw kits include them. i've lost most of my shouldered screws but the non shouldered screws will work, too. you just need to adjust everything carefully because a shouldered screw will stick out of the case instead of fitting flush if it's in a non-shouldered hole.
postjosh -
There are bateries labeled as "A1322" but marked as "High Performance" and rated 76.56WH/11.6V. Also sold as replacement for the MacBook Pro 13" mid 2012 Model A1278. Does the different rating, in particular the voltage, is compatible? Does it really provides some extra "performance" in any actual way?
Thanks
locutus -
does anyone know where to buy the shouldered 3.5mm screws? it looks like the current kit has substituted the non-shouldered version of the screw.
postjosh -
here's a comparison picture:
shouldered vs non-shouldered
postjosh -