
Introduction
My YogaBook battery was completely useless, so I bought a second one to use as a parts donor. When I tried following the first guide here (heat and suction cups), I also broke a corner of the glass, got disheartened, and gave up for weeks.
I finally got inspired again, and tried a new method which turned out okay in the end!
The secret? Super thin slicing tools: bits of soda can.
However, my first try also tore up the wifi antennas on the original Yoga Book. Thankfully I managed to remove them in working condition from the donor, but I'd like to find an even better way.
-
-
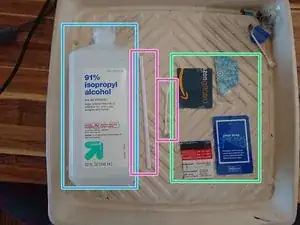
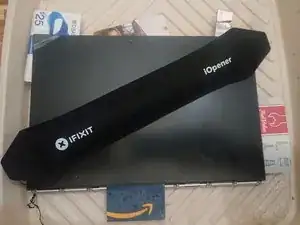
To cut through the adhesive, we'll need a *very* thin, but still rigid, tool. I'm sure you can buy something, but I reached into the recycling and cut shapes out of a soda can.
-
Suction tool to slowly lift the screen (an Anti-Clamp)
-
Heated compress (iOpener, or a wet towel in a Zip-Loc bag)
-
Thin flexible metal slicer (soda can here). The iFixit Jimmy or iSesamo might also work if thin enough, but I don't have one to try. In hindsight, I suggest drawing mm marks on these tools to be aware how deeply it's inserted -- though, alcohol might make the marker disappear.
-
Opening "bookmarks" like plastic cards or even cardboard, to keep adhesive from sticking the device together behind you.
-
Isopropyl alcohol (90%+)
-
Straw or cotton swab to deliver alcohol
-
-
-
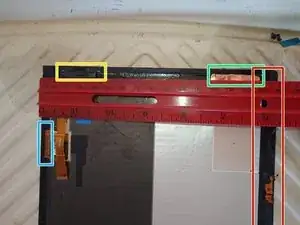
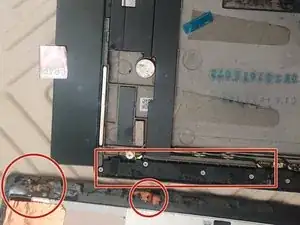
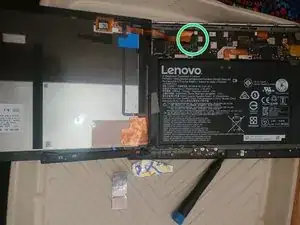
Top-left, around 7cm (3in) from the corner, or ~2.5cm (1in) down the side: Thin ZIF interface cable for the whole keyboard/backlight/tablet.
-
Top, between 4.5 and 70cm (~2 and 3 inches) from the left corner: the flexible cable folds over here and is very close to the edge.
-
Left side, 1.5-4cm (~0.5-1.5 in) down from top: there's a folded layer of (I think) digitizer here. I didn't run into it, but careful to not cut too deep.
-
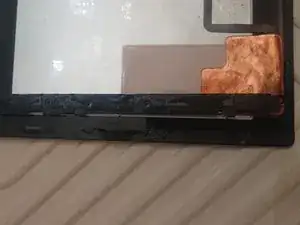
Left side, 12-15cm down from the top: there's a spot of copper foil protecting some delicate folded traces below.
-
Bottom, from left all the way to center: The wifi antennas are here. They are basically conductive paper, stuck onto a piece of plastic, with the screen adhesive stuck on top of that. I completely destroyed the first ones, and still damaged 1 of 3 on the second. Recommend not cutting here at all if possible.
-
Except for these two haptic vibration motors, you should not need to cut more than 4mm deep on the sides, and maybe 8mm deep on the top/bottom.
-
-
-
Heat an iOpener or other warm compress, and let it sit along one short side for a minute.
-
Then, attach an anti-clamp or similar suction cup to the middle of one side, close to the edge. Don't press down too firmly to 'set' the suction cup -- the glass is thin!
-
Lock the Clamp, and slowly crank it open just 1 turn. If the adhesive isn't loose enough to let the glass lift in the middle, apply some more heat while doing this.
-
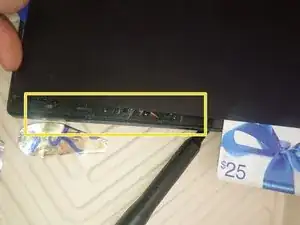
Once a small gap appears, insert your metal slicing tool about 4mm, release the Anti-Clamp, drip some alcohol in along the whole edge, and apply heat again.
-
After the heat and solvent have worked for ~30 seconds, remove the compress and start wiggling & sliding your tool up and down the edge. Try to free the whole edge, and slide just around each corner, then go to the opposite short edge and repeat.
-
-
-
Once you've gotten a tool inserted along one short side, cut it free with patience, heat, and alcohol. Then, repeat the previous step to get into the other short side.
-
Drip alcohol along the seam between glass and body to help soften adhesive. Re-heat the hot compress and let it sit over the seam, too, to help.
-
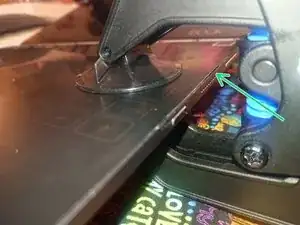
After both short sides are free, you can break the adhesive free from both haptic motors (circled in purple in step 2).
-
They're much deeper inside than the edge adhesive, so I cut a plastic card in half to gain some room, then reached in with 3-4cm of aluminum can tool to slice through that adhesive. It's gummy clear adhesive, not the black foam like around the edges.
-
-
-
Free the top, left, and right sides first, and the haptic motors, before working on the bottom.
-
This is where the thin Wifi antennas are adhered to the glass and screwed down onto the bottom case. In my first attempt, I didn't know this was a hazard, so I sliced right through the adhesive... and the antennas, too.
-
The second time I decided to not slice here at all. Instead, I broke the adhesive in the "clear" part of the bottom, put a bookmark in there so it didn't re-adhere, and applied lots of heat and alcohol here.
-
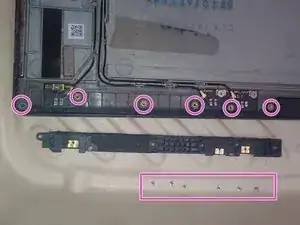
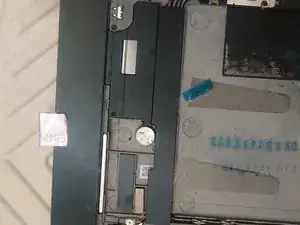
When all that's left adhered is the left half of the bottom, I started swiveling (in-plane yaw) the whole glass, gently, back and forth. With patience, and heat and alcohol, I was able to gradually reach each of the 6 screws holding the antenna bracket in place.
-
Here's a preview of what the left (wifi) antenna bracket looks like after removal, and where the scres are located.
-
After removing the 6 screws one-by one (P00 or P000), the glass was free! Check for any residual adhesive, and don't just lift straight up! You need to remove the ZIF cable, see next step.
-
-
-
If your experience goes like mine, once the bottom antennas are free the glass will be ready to lift up.
-
Lift a little, then tilt it to "open like a book" from right to left. You'll have to release the ZIF lock for the keyboard cable.
-
Remove the black sticker on top of the lock holding it in place
-
With a plastic spudger or fingernail, delicately lift the lock tab. It lifts up away from the cable (moving from left to right).
-
After that, the cable should slide free on its own!
-
Now, you just have to free the antennas from the glass. I suggest adding lots more heat, now that you can work safely away from the battery.
-
Set it on top of a hot compress, drip isopropyl alcohol on it, and peel back the adhesive(s)'' slowly and delicately!'
-
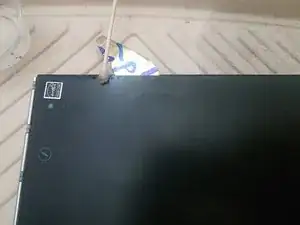
The antenna traces are orange-brown copper printed on the other side of black paper. You can see them, broken, in the 3rd image here. I should try to draw the shape of each antenna here to illustrate what to avoid, but I don't have those pictures yet.
-
-
-
If you're removing the battery, you might notice there are some blue plastic tabs. Seems like Lenovo had the idea of pull-to-release battery adhesive... but all 4 tabs on both devices were already broken, or broke off while unfolding them.
-


Before reassembly, clean off as much of the old adhesive as possible with alcohol, heat, and gentle scraping.
Remember to reconnect the keyboard cable ZIF connector, and reattach the tape on top of it. I suggest also powering on the tablet to make sure everything still works!
!!Note: it will not power on with the battery disconnected!
Then, reapply new adhesive where the old was removed from, and cautiously seal it back up!
