Introduction

This guide outlines the steps to remove and replace the battery in Big Jambox. Guide includes gaining access to the auxiliary board to unplug battery.

  1. FbdZmkEPUobQUF52
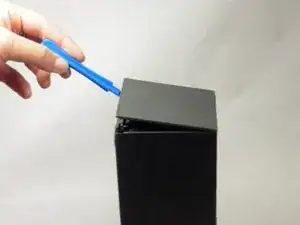
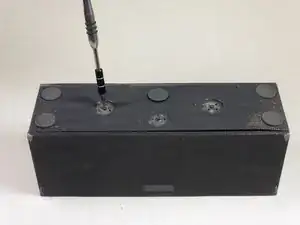
    • Remove both end caps by putting a plastic opening tool in the center of the seam. Work around the edges to pry the end caps off completely.

    • Due to interior clips holding the end caps in place, use caution when applying force.

    Can someone show the clips please in a photo?

    kenneth keen -

  2. gpR1qeYVfuiKrJPf
    gpR1qeYVfuiKrJPf
    4Xapn3AX3HIZYmBZ
    htYRDmTSEfZLbJMj
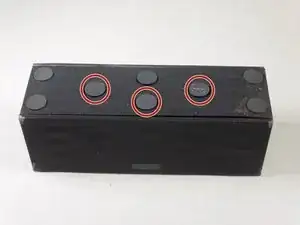
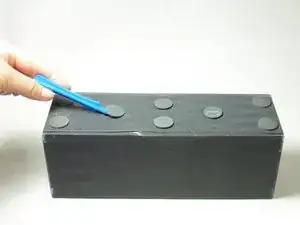
    • Turn the Jambox upside down. Peel the indicated rubber tabs off, using a plastic opening tool if necessary.

    • You may want to only take the tabs half way off to avoid re-gluing when reassembling.

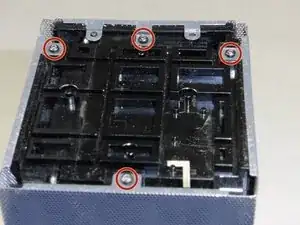
    • Remove the three T6, 7.0 mm screws under each rubber tab.

    • Because the screws are a different length, set the screws aside.

    I used rubber cement to reattach the pads. That will hold them in place and be easily removable in future.

    David Robinson -

    Can someone show a picture of the screws…and where they screw not…even just for form’s sake?

    Thousand Sunny -

  3. GVMKQYqV4vHagsML
    GVMKQYqV4vHagsML
    mxDNbPDkIpXGSfS5
    ZcDVcDPp2jorIIPE
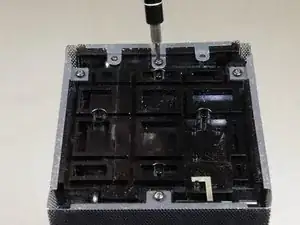
    • With the Jawbone logo facing towards you and with correct orientation, place the Jambox with the left end cap facing upward.

    • Unscrew indicated T6 9.7 mm screws.

    • Gently loosen the tabs from their anchor points so the bottom may be removed.

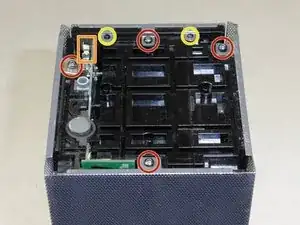
    • Flip the Jambox so the other end cap is facing up. The USB cable is on this side (metal grounding clip, indicated in orange). Repeat the above two steps.

    Make sure you pay close attention when removing the screw marked with a red circle that is in the left most position, as there’s a small grounding plate that will be completely unrestrained and free to get nice and lost only to be found later leaving you not knowing what the hell it is or where it came from should you not secure it before removing the panel that that screw secures. That grounding plate is crucial for the safety of yourself and your speaker, because it bridges the USB-micro power input jack to the metal frame. That means that should you lose it and put the speaker back together without it, your speaker will not be able to ground out and should there occur any surge during your charge cycle, like during a freak lightning storm, or whatever, your speaker won’t able to discharge that surge, which will no doubt fry your speaker, and likely kill whomever poor bastard happens to grab the speaker, say to turn it off during said storm as a safety precaution. SAFETY FIRST!

    Thousand Sunny -

    Btw, the screw I mentioned is shown in the third picture, since that small detail might have some play over success or failure in finding it…lol. Whoops.

    Thousand Sunny -

  4. Sh3tMvExQQTIIqZy
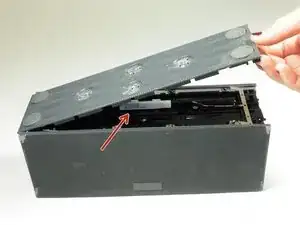
    • Pry up the bottom panel by lifting from the device.

    • Pull the bottom up. This may take a bit of force as the bottom is glued to device.

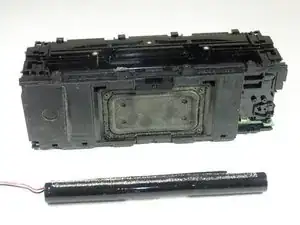
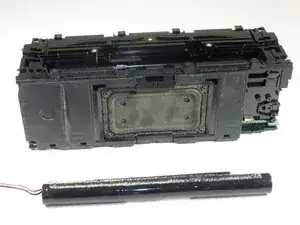
    • Once removed, the battery will now be visible.

    No glue on mine. Only two clips on each side (that you can see clearly in step 3 picture).

    Do not use force or you will break those clips.

    Jay -

    @jemdem (I assume this is the “Jay” involved) after looking at the pictures 3.1, 3.2, 3.3, I still don’t see what I would normally expect a “clip” to look like. Maybe the corners act as clips? If not, I can’t ‘clearly’ determine them, but it’s a fairly busy looking area with lots of recesses and all, so maybe they’re just blending in well?

    Thousand Sunny -

    There’s a plug on each foot in one of the corners that isn’t meant to be removed. The left one and the right one (when viewed so the writing appears correct way up), both have three pins and one plug, with the pins occupying three of the four corners (northeast, northwest etc.) and the plug occupying the remaining fourth corner. The left foot has pins in the upper right, upper left and lower left, and the plug which is part of the foot and plugs into the frame, is in the lower right corner, while the right foot is opposite, having pins in upper left, upper right and lower right, and the plug in the lower right. If that was too many ‘left’s and ‘right’s to follow along with, then just remember that the plug is on the lower-inside corner on each. The screw is in the center of each foot. If you pull too hard, or attempt to guide your pick/spudger all the way around when separating the foot, you could slice it right off, though adhesive will be needed for reapplying so severing isn’t the end of the world.

    Thousand Sunny -

    This is a reply to the third comment, and sorry for the reply not being immediately following, or better still, not a reply, and instead just correcting my comment, but I can’t edit it…anyway, I noticed a mistake in my description. The plug on the right foot is in the lower LEFT corner, not the Lower right. My apologies to anyone who followed my instructions about that foot and ended up damaging it.

    Thousand Sunny -

    …continuing, the last foot needing removed is the upper center, when viewed so the writing on the feet is correct way up. And the plug on that foot is in the upper position, so only separate the bottom and both sides to access the screw in the center.

    Thousand Sunny -

    After continuing with the side pieces, the ‘clips’ that were holding the end pieces on were indeed at the corners and are NOT visible, clearly or otherwise. In fact only the ‘well’ or socket that each of the clips insert into are clearly shown, however the clips themselves are on the end caps, not the main body. If the speaker you are working on appears to have been dropped before and the corners are at all crumpled inward, take extra care to try and straighten them back to original shape before attempting to unclog the caps because not doing so could result in the clips breaking off. This may sound difficult, but I managed to straighten out all eight corners of the one I’m working on with no issues using a pair of needle nose pliers that are toothless so as to not introduce any bite patterns to the grill.

    Thousand Sunny -

  5. 4eLBA2VEVUdE31sC
    4eLBA2VEVUdE31sC
    ZpLHTRAIClrqjMfQ
    • Before unscrewing, take a picture of the top view. That way, when you're reassembling the device, you'll know the orientation of the metal grounding plates.

    • Unscrew the eight indicated T6 9.8 mm screws. Remove metal grounding plates.

  6. mE1t61rJL3kgyFPA
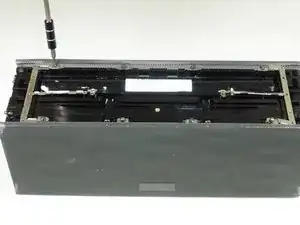
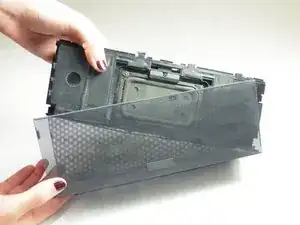
    • Once all eight screws are removed, pry the sides of the Jambox to lift the body from it's shell.

    It was at this precise moment (removing the shell) that I felt a small part hit my knee as it fell from the assembly and land in the carpet. It appears to be a small stainless grounding tab (clip) that I THINK came from the mounting pole beside the Micro B port and may act as a support and ground for the body of the port. Seems to fit but I dunno.

    Comotoes -

    It is a grounding clip and does belong on the power input jack and must be there if you want your speaker to safely ground out in case of a surge. Don’t lose it a please do put it back when reassembling your speaker. Also, it helps to read the comments attached to each step, if you had you would have read my comment regarding exactly this issue in previous steps. I’m glad you at least didn’t lose it when it fell, as it’s not something that is obvious when missing and most people wouldn’t even notice if it was lost.

    Thousand Sunny -

  7. SvF3JIkTNocSEpQL
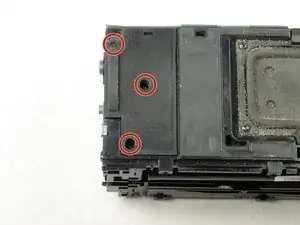
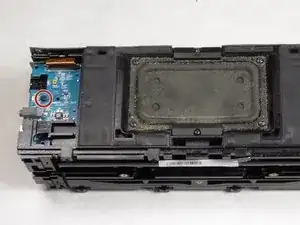
    • With the battery facing forward, remove the three indicated T6 9.5 mm screws.

    • Once the screws are removed, lift up the small plastic plate, revealing the auxiliary board underneath.

  8. eQDQTrtxMvI6LYbt
    eQDQTrtxMvI6LYbt
    IDRtsHS44FECAvBO
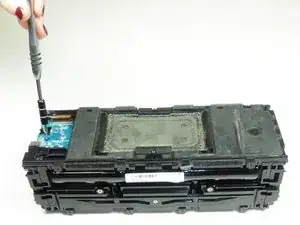
    • Remove the indicated T6, 7.4mm screw holding the auxiliary board in place.

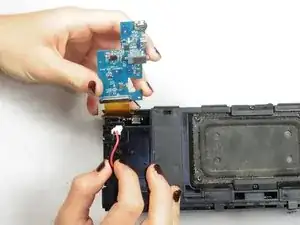
    • Carefully lift the circuit board up and off to the side.

  9. QmhisyJgqAFGMeEO
    • Pull on the red and black cables under the auxiliary board to disconnect the battery.

    The aux board in this photo is flipped over. Also, watch out for the power button as it is a completely separate assembly that just sits in there.

    Jeff -

  10. BBZVtxr6HlIaYRNn
    BBZVtxr6HlIaYRNn
    FdAl1vPReGlgceCv
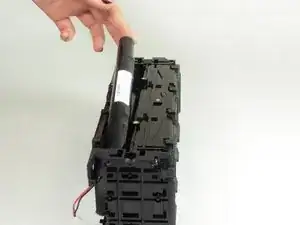
    • The battery is connected to the Jambox with double-sided sticky tape. Use your finger to pry out the battery.

    • Place a new battery in the old battery’s place. Reverse these steps to connect the new battery.

    • When plugging in the new battery, ensure the red and black wires are separated around pegs so that they are not pinched when the auxiliary board is replaced.

Conclusion

To reassemble your device, follow these instructions in reverse order.

Abby Cybula

Member since: 02/04/15

1986 Reputation

33 comments

Where do I buy the battery.

Kevin Foti -

http://www.ebay.com/itm/322588700358?ul_... :Here is someone who made and sell the battery for Jambox and Big Jambox, i hope this could be helpful

Lin -

да где аккумулятор купить то?

speedlexx -

на рынке покупаются стандартные 18650 и меняются на старые акку из колонки. что б пошла зарядка нужно дать больше ток.

цена вопроса ~ 1200₽ с работой

Max -

Where do I go to purchase a battery?

Edward Brown -

http://www.ebay.com/itm/JAWBONE-Big-JAMB... Here is someone who made and sell the battery for Jambox and Big Jambox, i hope this could be helpful

leandro -

I have been a tech for over 40 years. You did an outstanding job with description and great photos. Tech's are not know for this.

Harbhajan Khalsa -

This looks like a great guide. However, I've had this speaker less than a year and my battery should not be needing replacement. It won't hold a charge and I've tried all the other troubleshooting ideas except taking it apart, unconnecting and then connecting again.

John M -

Hey John...me too! I called their customer service and because my Jambox is just over 1 year old they said there was nothing they could do. They suggested I buy a new one!

I tried their suggestions: https://jawbone.com/support/articles/000...

No luck...it works fine if plugged in, but has to stay that way.

let us know if you find any answers! Thanks!

deb -

Here's what worked for me.

1) I followed all of the instructions above

2) I simply unplugged the battery,

3) plugged in the electrical charger cord

4) powered on the Jambox. it worked just fine

5) powered it off,

6) plugged the battery back in (white and red wires) and let it charge

7) put the jambox back together

Aaron McLean -

I put out battery from device, bought 3 standard battery 18650 for laptop and changed with old.

You should give more than 12v to start charging.

All costs less 20$.

Max -

Does anyone know what type of screwdriver to use for the screws under the rubber circles?

ceciseggie -

T6 same as others. don’t be surprised if the machine thread nut that is molded to inside doesn’t break off i just tighten them back with cover off and put some epoxy glue as i reattached cover

Edward M -

Was Hoping to Find this Process for JawBone Original -

I have two of these now maybe 5 yrs old - and both need new batteries.

But from what I see here - Looks like it'll be battle of Discovery -

Then figure out where to get the batteries.

In the meantime I received new Pelican 1050 case to keep them in

along with cords, etc. Perfect fit - bullet proof protection,

and playing music, just pop open the lid,, sounds great.

Philscbx -

My speaker doesn't work at all with USB charge nor regular charge.

Is that still battery? I am not sure about that because if it was the battery by having it plugged in it should work but here I have it plugged in and it doesn't work that makes me think that it's not the battery what do you guys think

Kasia -

I got a replacement battery for JAWBONE Big from ebay, it works great! here is the link:

https://www.ebay.com/itm/322783742637

Lin -

I did the procedure of removing battery and plugging in charger then reinstall battery. worked for me. the tiny screws are a pain. also panel that covers bottom with rubber pads has three machine threaded screws had two of three broken off. i epoxied then back to base.

Edward M -

The metal grounding clip fell off before I could see how it’s attached. I’m looking at Step #3 and the metal grounding clip indicated in orange, but the picture is a bit fuzzy and I can’t tell how it’s attached. Can anybody attach a photo or describe how it’s supposed to be attached? Thanks in advance!

John R -

Here is where you can find a good battery. https://www.ebay.com/itm/192329093200

tkuan -

excellent instuctions>

nisiwills -

I’ve had my Big Jambox—which preformed perfectly—for at least five years. Just replaced the battery following these excellent instructions. If the new battery lasts half as long as the first one , I will be happy! Great product. Sorry the company failed.

nisiwills -

Many thanks for these clear instructions. Did the replacement with a battery from AliExpress, now my speaker has new life.

Andrew Yerkes -

On the button side, beware the Earthing tab that sits above the charging port. You can tell when you re-assemble as it is the only tab that doesn’t have any paint on it. Also - top tip, when putting on the button end panel, keep your finger pushed on the BT pairing button to make sure it goes in the appropriate hole. I didn’t do this the first time, and the peg missed the hole and made the button stand out (and was unusable). In my frustration to remove the end panel again - I broke one corner :(

Great Tutorial, thank you.

Slh Ply -

Very simple install, a couple different options on Amazon come with the screw driver needed for under $30. Compared to how much the speaker cost new, this simple repair is well worth the time, even for a busy person. Thank you for the write up!

Tye Wilhelm -

easy peasy… thanks for the help!

Bryan Ripley -

Take a picture of the bottom of the big jambox so you can put the rubber feet back into the same location/orientation. Put the jawbone logo on the front of the big jambox in the photo so you know which side is the front/back. The rubber feet ONLY fit in the same spot that they came from - they have unique holes on the bottom of the feet that only fit into their respective locations on the case. The photo in this guide of the bottom of the big jambox does NOT have the feet in the correct locations. Thanks for the guide - 2023 putting new battery in to keep the tunes going!

djc6 -

What is the battery? Horrible to have to ask this really. Why is everything so hidden and coded? I am sick to death of this secretive nonsense.

Break Apple -

Please tell us what the battery is. These silly comments giving an ebay address are ALL EXPIRED and of no use - just adding frustration. If you had given an image in the first place then we could simply install one and get over this automated trash. Expose the criminals who are wasting the earth's resources through greed. I suspect that two 18560 batteries are inside this trash made in usa.

Break Apple -

Amazon has the battery now if your still looking. Just type in "jawbone, big jam box battery" and many come up. They even come with instructions so a lot of people must be doing this repair on these old speakers. I did it for one I fished out of he garbage and it works great!

Talkie -

電源座壞了

去那裏可以換修

程淑英 -

Really helpful guide, thanks! Living in Alaska, I can't have replacement battery packs shipped from Amazon, so I had to replace the bad 18650 cells in the old/bad pack with new ones previously obtained for another project. That was pretty straightforward, but... should you do it... be aware that the battery module circuit board inhibits current flow until it has been plugged into the motherboard, and then energized with external power. And then it all fires up and works! Weird but true, so don't despair when you take your VOM to the disconnected plug and it looks dead.

Doug Franklin -

Instructions and battery worked great. Probably 35 minutes start to finish. I bought my own T6 screwdriver FYI. Be patient.

C Smith -

Just want to add many of the batteries on Amazon come with a t6 screwdriver but you're way better off buying your own quality set. The one it comes with is cheap and will strip screws.

Talkie -