Introduction

If your Huawei P9 Plus won't hold a charge you can use this guide to replace the worn-out battery.

Before disassembling your phone, discharge the battery below 25%. The battery can catch fire and/or explode if accidentally punctured, but the chances of that happening are much lower if discharged.

  1. rfwQB6Hsx4QExALS
    rfwQB6Hsx4QExALS
    kNvWjeAeEOkSxesl
    • First switch off your phone.

    • Remove the SD and SIM card tray.

  2. CLP6PcycYfHFocK3
    • Remove the two P2 Pentalobe screws on either side of the USB C port.

  3. SnKQsZn3pLHHwbx1
    SnKQsZn3pLHHwbx1
    SYWrUmjlRsVZOkx3
    • Use an iSclack or a suction handle to separate the display unit from the rear case.

    • Do not fully separate the pieces as they are still connected by the fingerprint sensor cable.

  4. gD5ZKKObpLTybubJ
    gD5ZKKObpLTybubJ
    XQfD1RGfnMYC362v
    CXsdZNgYEJyCIV2d
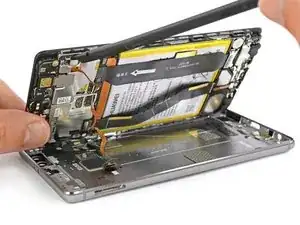
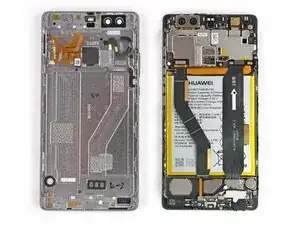
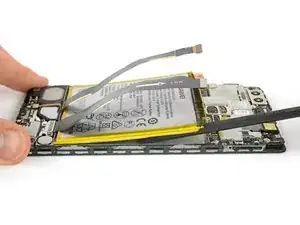
    • After separating the rear case flip the other half open to get to the flex connectors.

    • With a spudger unplug the flex connector of the fingerprint sensor and the one of the side buttons.

    • Remove the rear case.

  5. WcQskAHTHvCq6iyX
    WcQskAHTHvCq6iyX
    lpYSWnEH5po6EhHe
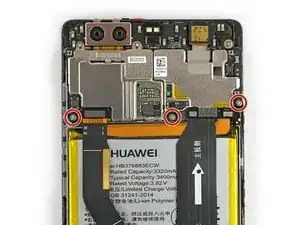
    • Remove the sticker that sits on top of the left screw above the battery.

    • Remove the three Phillips #00 screws that hold the metal plates in place.

  6. RnXRtd1vk2TFyZH2
    RnXRtd1vk2TFyZH2
    tiqDeABQxGNE5X2y
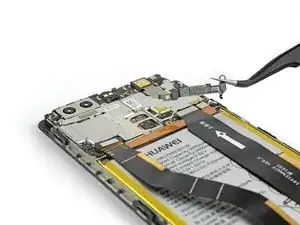
    • Both metal plates have little hooks. Use a tweezer to free them and unhinge the plates by carefully moving them upwards.

  7. CVQygvxoTVNmZQFe
    CVQygvxoTVNmZQFe
    ydSwPLCXuoePgRF6
    CZYMwLgNisUCTTdL
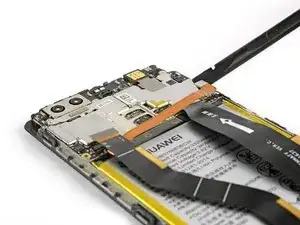
    • Use a spudger to unplug the screen flex cable.

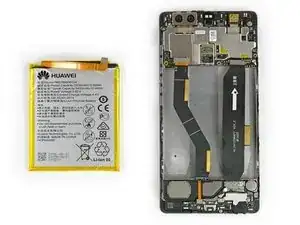
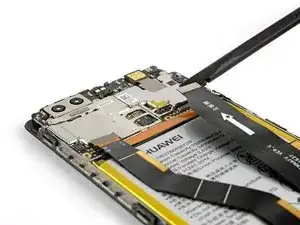
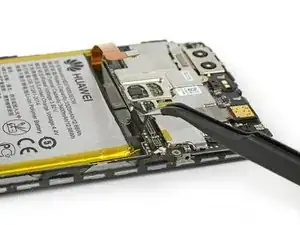
    • Unplug the motherboard flex cable and the battery flex cable afterwards.

  8. xVXqnSQtQwOhEuhh
    xVXqnSQtQwOhEuhh
    UoYD2UDkEVumbMUb
    • The adhesive strips at the top of the battery are less likely to rip if you pull them horizontally in a straight line and not upwards or in any other direction.

    • Use a set of tweezers to unfold the black tab enough to grab with your fingers.

    • Pull the first adhesive strip in a slow and constant movement.

    • Jerking or slackening your grip can cause the adhesive to bunch up and rip.

  9. Enu5ouFdYXGoPD3X
    Enu5ouFdYXGoPD3X
    TxW21IPJBUnVPdsn
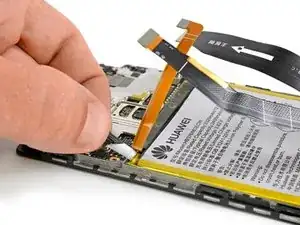
    • Loosen the end of the other adhesive strip with a tweezer and pull it out. If needed use the iOpener again to soften the glue a little.

  10. FAcoYS2wMecLBDGR
    FAcoYS2wMecLBDGR
    uTVtQnKWTxngExMH
    lmiO3ELJAnaKk3HT
    • Use a spudger to slide under the battery.

    • If you managed to pull out the adhesive strips you can easily lift out the battery. Otherwise use the iOpener once more to soften any adhesive leftovers. There are no cables under the battery that can be harmed.

    • Remove the battery.

    • When reassembling your phone, replace old adhesive with stretch release adhesive strips, double-sided tape, or pre-cut adhesive strips.

Conclusion

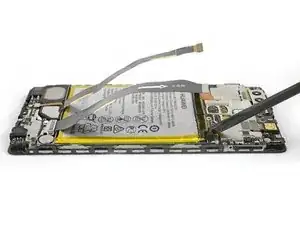
To reassemble your device, follow these instructions in reverse order and apply new adhesive strips where necessary.

Dominik Schnabelrauch

Member since: 23/11/16

224647 Reputation

One comment

Great tutorial, thanks alot!

Lior Nissim -