Introduction

Use this guide to remove and replace the home button including the fingerprint sensor in the Huawei P20 Pro.

Note: This guide instructs you to replace only the display while leaving the original frame and motherboard in place. However, some replacement screens for this phone come pre-installed in a new frame (a.k.a. chassis), which requires a very different procedure—transplanting all your phone's internals. Make sure you have the correct part before starting this guide.

Opening the Huawei P20 Pro will damage the waterproof seals on the device. If you do not replace the adhesive seals, your phone will function normally, but will lose its water protection.

Do not reuse the battery after it has been removed, as doing so is a potential safety hazard. Replace it with a new battery.
Before disassembling your phone, discharge the battery below 25%. If your battery is swollen, do not heat your phone. Swollen batteries can be very dangerous, so wear eye protection and exercise due caution, or take it to a professional if you're not sure how to proceed.

You’ll need replacement adhesive to reattach components when reassembling the device.

  1. xpDgRe5sC5HBFNfB
    • Switch off your phone.

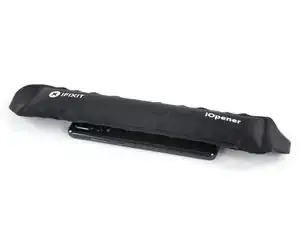
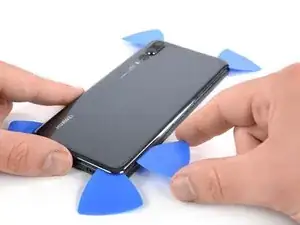
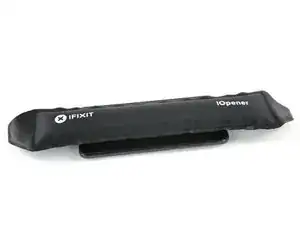
    • Use an iOpener to loosen the adhesive beneath the rear glass. Apply the iOpener for at least two minutes. You might want to repeat this step several times during the back cover removal.

    • The adhesive of the Huawei P20 Pro is of moderate strength, however a hair dryer, heat gun, or hot plate may also be used if you aren't able to open the device with the iOpener. Be careful not to overheat the phone—the OLED display and internal battery are both susceptible to heat damage.

    Ich hatte keinen iOpener. Daher hab ich das P20 Pro für ein paar Minuten auf eine Wärmflasche gelegt. Die Klebeschicht konnte relativ schnell gelöst werden.

    David T. -

    Bonjour à toute l'équipe, déjà un grand merci pour votre travail, j'adore vraiment l'état d'esprit.

    J'en suis à l'étape 1 et comme ma vitre arrière est cassé, la ventouse n'adhère pas.

    Donc plan B, comme suggéré malheureusement ma cyanolite ne semble pas adhérer sur le verre, j'essaie avec une bonne colle à chaussure car Trés solide et je laisse sécher la nuit en légère pression, j'espère avoir un minimum de prise afin de glisser les médiators mais le verre est bien brisé et j'ai un peu peur que ça parte en morceaux, croisons les doigts 🤞

    Je vous dirais pour la suite 😉

    Salut à l'équipe, vous faites un travail formidable, merci beaucoup

    cyp cabs -

    @cypcabs avec grand plaisir ! Bravo pour l'ingéniosité en tout cas ! J'espère que vous avez pu ouvrir votre Huawei avec succès entretemps.

    Claire Miesch -

  2. qLQSfjVYYigAlcsB
    qLQSfjVYYigAlcsB
    hjc3FkdK5AgAPPkq
    mC32MvX3MBTsGFdH
    • If the phone's rear glass is cracked, a suction cup may not stick very well. Try lifting it with strong tape, or superglue the suction cup in place and allow it to cure so you can proceed.

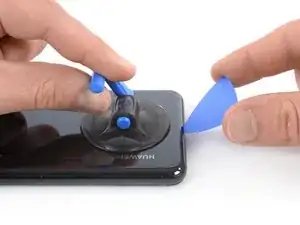
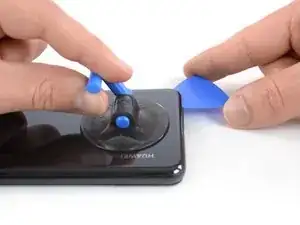
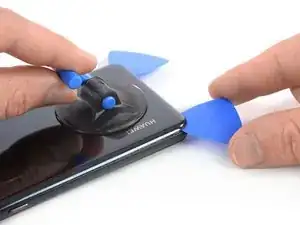
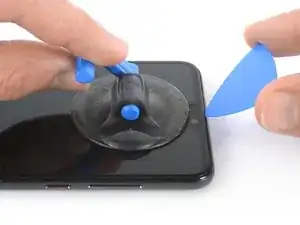
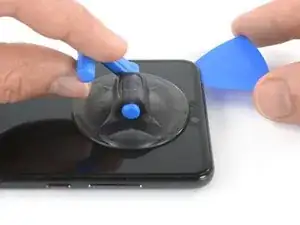
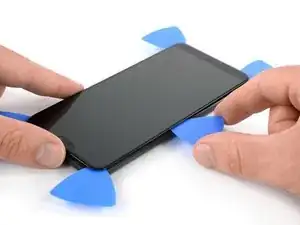
    • Press a suction cup onto the rear glass close to the bottom edge of the phone.

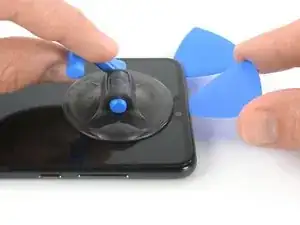
    • Lift the bottom edge with the suction cup, opening a slight gap between the rear glass and the frame.

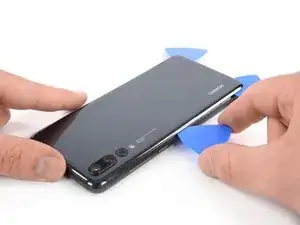
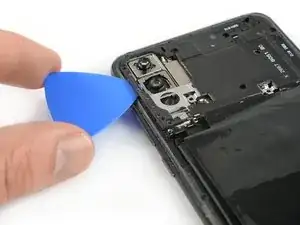
    • Insert an opening pick in the gap and slide it to the bottom right corner. Leave it there to prevent the adhesive from resealing.

    if the back cover is not broken, i’d suggest NOT to use an opening pick as if the phone was not heated enough, you may crack the glass on the edges. better use the iPlastix, it is thinner and less stressful for the glass.

    Stefano Restuccia -

    It is better to put a peak on the side because the side opens first than the bottom of the phone.

    이정일 -

    I have to agree that is is much easier to start opening from the side. Do read the rest of the guide though, to make sure you won’t hit something when opening it from the side.

    Jacob Cain -

  3. IKE2EPSZlMgYRUCW
    IKE2EPSZlMgYRUCW
    jSnSyxxrd3BcGmOS
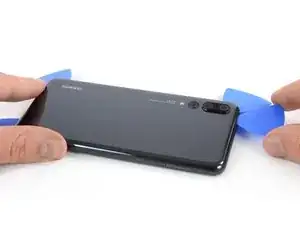
    • Insert a second opening pick and slide it to the bottom left corner. Leave it there to prevent the adhesive from resealing.

  4. grCAZb2cWgyJOJRU
    grCAZb2cWgyJOJRU
    UfGdHGnfRhWEfKlW
    QDqlKGmQ11vwxoMq
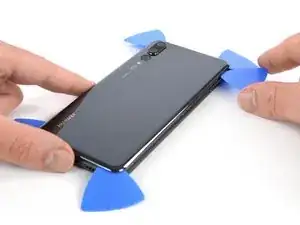
    • Insert a third opening pick at the bottom left corner.

    • Slide the tip of the opening pick along the left edge of the phone to cut the adhesive.

    • Leave the opening pick in the top left corner of the phone to prevent the adhesive from resealing.

  5. 6PUVXBeYmsNgNiYq
    6PUVXBeYmsNgNiYq
    wTA6yTcmQWEPFCKs
    • In case you're having trouble to cut the adhesive, reapply the iOpener for another minute to loosen it.

    • Insert a fourth opening pick at the top left corner of the phone.

    • Slide the opening pick along the upper edge of the phone to cut the adhesive beneath the rear glass and leave it in the top right corner.

  6. G4cCQI6GjiWrxlZC
    G4cCQI6GjiWrxlZC
    pJHckn3vUQZZRAHu
    36bUESsEL1YJwUQr
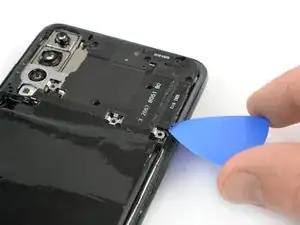
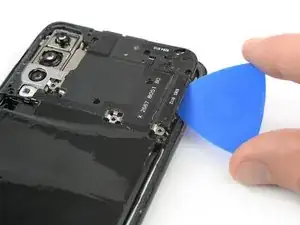
    • Insert a fifth opening pick at the top right corner of the rear glass.

    • Slide the opening pick along the right edge of the phone to cut the remaining adhesive.

    • Don't open the phone all the way yet. The proximity sensor flex cable is still connected to the motherboard.

  7. yiTIZnUSURwQO3Ca
    yiTIZnUSURwQO3Ca
    3mt2kVFnlifkDJCW
    opxbNEBmIBWBSqAl
    • Carefully lift the rear glass until you can reach the connector of the proximity sensor flex cable next to the rear camera assembly.

  8. WgEZU4VYwsBUAGoN
    WgEZU4VYwsBUAGoN
    1nbUiBTHAFOgANc5
    • Use the flat end of a spudger to pry up and disconnect the proximity sensor flex cable.

  9. TAPkFQDLU5kJaO3D
    TAPkFQDLU5kJaO3D
    GaqTJ3SVEspFhJqr
    • Remove the rear glass.

    • Before installing fresh adhesive and reassembly, remove any remaining adhesive from the phone, and clean the glued areas with isopropyl alcohol and a lint-free cloth.

    Das mit den Klebstreifen funktioniert nicht. Ich habe die Tube E6000 in die Dichtungen eingeklebt und so das Smartphone wieder zusammengesetzt.

    yellowlonghair ylh -

  10. RhCfvCP2nNsJcDAo
    • Remove the nine Phillips #00 screws (3.4 mm length).

  11. 6eEW4dJDhSwQOSxU
    6eEW4dJDhSwQOSxU
    kPKRhlu6aEZiXviX
    eJtdndfDWxgRVGXa
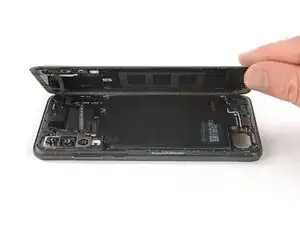
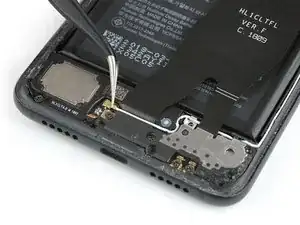
    • Insert an opening pick under the left side of the motherboard cover that includes the NFC.

    • Slide the opening pick towards the top left corner of the phone and twist it to pry the cover out of its plastic clamps.

  12. yI32FgFnGwScjPZ3
    yI32FgFnGwScjPZ3
    UEOwDhKgMsruF5jI
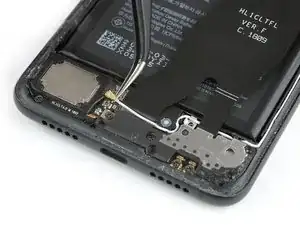
    • Repeat the previous process on the right side and twist the opening pick to pry up the motherboard cover.

  13. JqyvPfRcMGtBI4mr
    • Remove the motherboard cover.

    Porque cuando desconectas el nfc no vuelve a funcionar?

    Vanesa Gutierrez -

    a teraz to zopakuj po vychodňarsky

    Lukas Franko -

  14. ijkmoXtESVCJiZeZ
    ijkmoXtESVCJiZeZ
    iTbIVrBFioKSoZRp
    • Use the flat end of a spudger to pry up and disconnect the battery flex cable.

    Das Flachbandkabel kann einen Zentimeter zu lange sein. Ich musste ihn 2 mal falten, um beim Einbau die Steckerbuchse wieder zu treffen.

    yellowlonghair ylh -

  15. dRVcbRfvlBEBMQPf
    • Remove the five Phillips #00 screws (3.4 mm length).

  16. aLJFGIR5qdOSw1nf
    aLJFGIR5qdOSw1nf
    GxQqwFKuQEA4QVIq
    Hn6qxXQTNYlSiOPE
    • Use a pair of tweezers to disconnect the antenna cable.

    • Use a pair of tweezers to pull the antenna cable out of its routing.

  17. WjFoGJwRuMB2SjEy
    WjFoGJwRuMB2SjEy
    YUxFhmdAprnqkcla
    ZZFy4CJ2jvyUoRpv
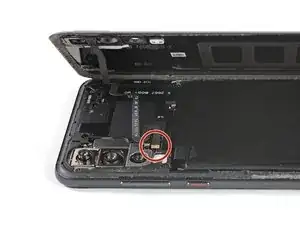
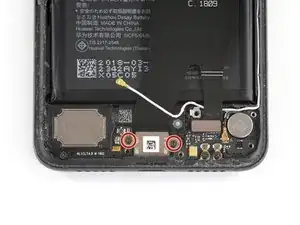
    • Slide an opening pick under the left side of the daughterboard cover and start to pry it up until you can get a good grip.

    • Remove the daughterboard cover.

  18. WFPCFWfVDOyoLHVI
    • Remove the two Phillips #00 screws (3.4 mm length) on both sides of the USB C port.

  19. hIPucWFKCkuUIbly
    hIPucWFKCkuUIbly
    NnOGHYOdvBFAlgSv
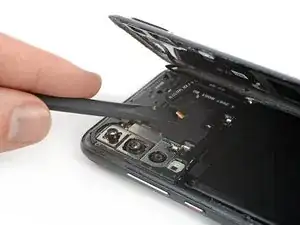
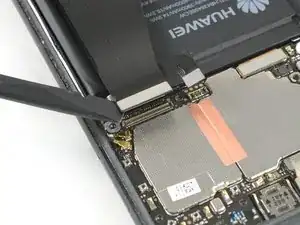
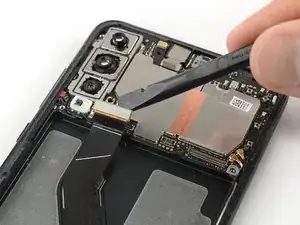
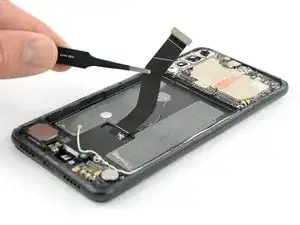
    • Use the flat end of a spudger to pry up and disconnect the upper end of the interconnect and charging port flex cable from the motherboard.

  20. R3tkatpff1K3MXJ4
    R3tkatpff1K3MXJ4
    kP2cguWrTth5vG3Z
    CSvR2useDMrAq2wC
    • Use the flat end of a spudger to pry up and disconnect the bottom end of the interconnect and charging port flex cable from the daughterboard.

    • Use a pair of tweezers to move the antenna cable out of the way.

  21. u2X23JxWbnoiFVdf
    u2X23JxWbnoiFVdf
    cFuhFTK2rQ2OvmE2
    RX1hDCP1F36TopEf
    • Use a pair of tweezers to pull the charging port out of its recess.

    • Remove the interconnect cable including the charging port.

  22. MrutJxsHnPn6ZLWX
    MrutJxsHnPn6ZLWX
    Jqm4lP33bbOIZh2D
    5uLnYZp4C1kXeRaa
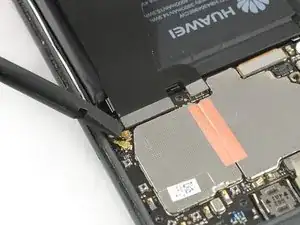
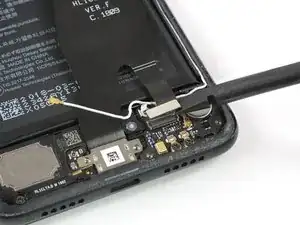
    • Use an iOpener to loosen the adhesive beneath the battery. Apply the iOpener on the display for at least two minutes.

    • In the following step, only apply the spudger in the areas marked in red, which is where the battery adhesive is located.

    • Avoid the orange area where the display flex cable is running.

  23. mJv65aPgEfEkc2ml
    mJv65aPgEfEkc2ml
    2jg5UrUfA5cHN5qT
    e6fOjp1mGvMYQyHs
    • In case you have trouble to pry up the battery the adhesive may not be loose enough. You can apply some isopropyl alcohol under each corner of the battery and allow it to penetrate for about two minutes to help weaken the adhesive.

    • Try your best not to deform the battery during the following removal process. Soft-shell lithium-ion batteries can leak dangerous chemicals, catch fire, or even explode if damaged. Do not use excessive force or pry at the battery with metal tools.

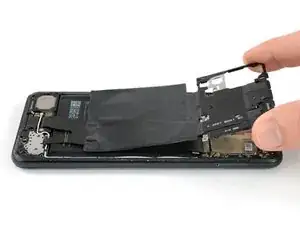
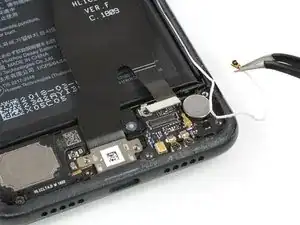
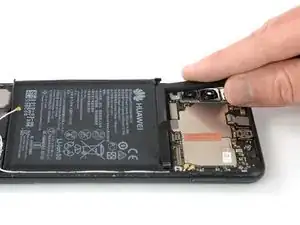
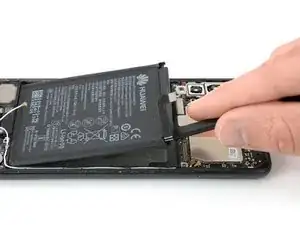
    • Insert the flat end of a spudger at the top left corner of the battery and start to pry it up.

    • Work your way down the left side of the battery and loosen the adhesive with the spudger.

  24. VMGvZvFNcqJBDvPH
    VMGvZvFNcqJBDvPH
    1KnojMrWoon1vFoD
    E4rJNmBrdHD4wAS3
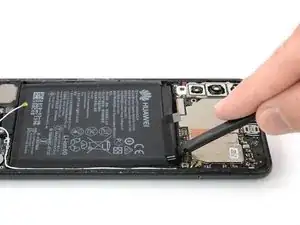
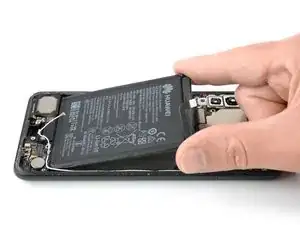
    • Insert the spudger at the top right corner of the battery and start to pry it up.

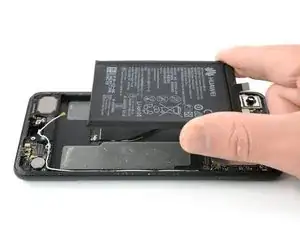
    • Work your way down to the bottom end of the battery to loosen all the adhesive.

  25. wNtSuGHbSRmCQeSO
    wNtSuGHbSRmCQeSO
    qSAtinQuCeuAJSiJ
    • Remove the battery.

    • Do not reinstall a damaged or deformed battery, as doing so is a potential safety hazard. Replace it with a new battery.

    • Before installing a new battery remove any remaining adhesive from the phone, and clean the glued areas with isopropyl alcohol and a lint-free cloth.

    • Secure the new battery with pre-cut adhesive or double-sided adhesive tape. In order to position it correctly, apply the new adhesive into the phone at the places where the old adhesive was located, not directly onto the battery. Press the new battery firmly into place for 5-10 seconds.

    Bonjour, le "ôter la batterie " m'a fait rigoler, trois fois chauffer le Iopener pour ramollir la colle et malgré tout, la batterie était tellement bien accrochée qu'elle est maintenant déformé, plier et même percée donc bonne à jeter, j'avais pas prévu de la remplacer mais j'y suis contraint 😑

    Merci encore pour ce tutoriel génial 👍

    cyp cabs -

  26. HG5ASGNroLDYcxsR
    HG5ASGNroLDYcxsR
    fJsZmUOI53iUNGRx
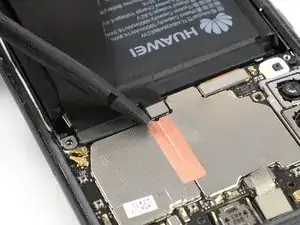
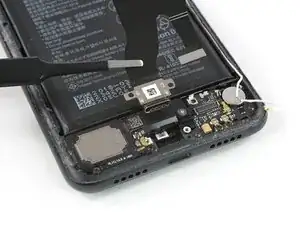
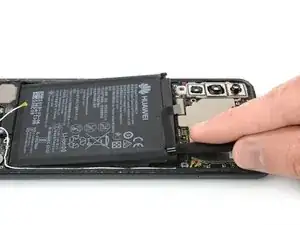
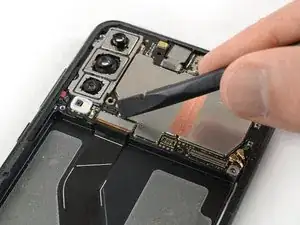
    • Use the flat end of a spudger to pry up and disconnect the display flex cable at the bottom left of the motherboard.

  27. lJMSoQaXxTvfGfaS
    • Prepare an iOpener and apply it to the display for at least two minutes to loosen the adhesive beneath.

    • You may need to reheat and reapply the iOpener several times to get the phone warm enough on all sides. Follow the iOpener instructions to avoid overheating.

    • If your display glass is cracked, keep further breakage contained and prevent bodily harm during your repair by taping over the glass.

    • Lay overlapping strips of clear packing tape over the display until the whole face is covered.

    • This will keep glass shards contained and provide structural integrity when prying and lifting the display.

    • Wear safety glasses to protect your eyes from any glass shaken free during the repair.

    Bonjour l'équipe, je ne comprends pas pourquoi, l'Iopener n'est pas plus large, ses dimensions ne correspondent à aucun téléphone moderne et la tenue en température est faible, en plus il ne supporte pas les chauffe à répétition.

    Peut-être pourriez vous suggèrer le décapeur thermique et nous donner des indications sur les températures à atteindre et les températures maximale...

    Simple suggestions😉

    cyp cabs -

  28. afwUW4tahSBiy5Ws
    afwUW4tahSBiy5Ws
    DWxMeadq5XD6oqex
    IjHRTJAYtw6iVaL5
    • Once the screen is warm to the touch, apply a suction cup to the upper edge of the phone.

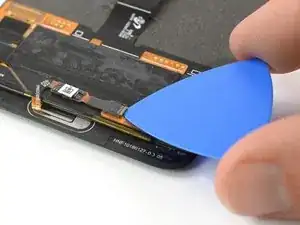
    • Pull the suction cup upwards and insert an opening pick in the gap between the display glass and the plastic bezel. Start to cut the adhesive by sliding the opening pick to the top left corner.

    • Make sure you get in the right gap between the display and the plastic bezel. Do not pry between the bezel and the midframe.

    There will be 2 gaps one under the screen glass(the one you should open) the secod notch down is where a fragile plastic frame is. Stay away from it and use the upper notch

    Abdulrahman Alzahrani -

  29. BZqsMQXGfS2H4Ewa
    BZqsMQXGfS2H4Ewa
    4Yua1VRaGjEIlaKM
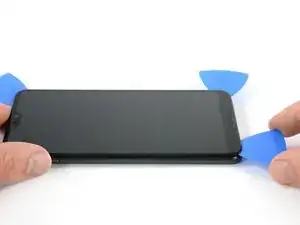
    • Insert a second opening pick and slide it to the top right corner of the phone.

    • Leave the picks in their places to prevent the adhesive from resealing.

  30. vREqTTyBpnIkpjG4
    vREqTTyBpnIkpjG4
    i4ph3g54dM5DbXYd
    qapPMy64qtQAA6MF
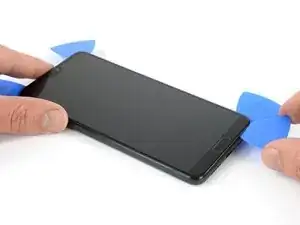
    • Insert a third opening pick at the top right corner of the phone.

    • Slide the opening pick down to the bottom right corner to cut all the adhesive. Leave it at the bottom right corner to prevent the adhesive from resealing.

    • If cutting becomes too difficult, reheat and reapply the iOpener.

  31. 6Kn6o2BNZKa5nHjn
    6Kn6o2BNZKa5nHjn
    OJc4GUaSE4OkHQke
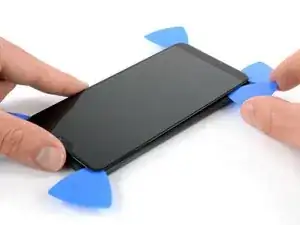
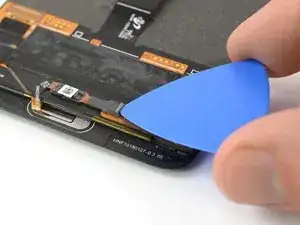
    • Insert a fourth opening pick at the bottom right corner.

    • Only slide the tip of the opening pick along the bottom edge of the phone to not damage the home button.

    • Leave the opening pick in the bottom left corner to prevent the adhesive from resealing.

    C encore moi, j'ai fini par pouvoir insérer un médiator après de nombreuses reprises à 25 centimetres de mon décapeur thermique réglé au minimum après 10 minutes de chauffe et en insérant au préalable sur 3 MM un cuter très petit, si ça peut vous servir 😉

    J'ai juste fait la place d'insérer mon 1er médiator et le reste à été tout seul, colle bien ramolli

    cyp cabs -

  32. ML4WQjjgyCbvyMku
    ML4WQjjgyCbvyMku
    Tl6WWukxOc6bTKHu
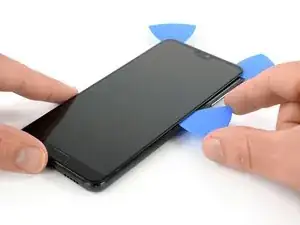
    • Insert a fifth opening pick and slide it along the left edge of the phone to cut the remaining adhesive.

    • Try not to remove the display all the way yet, the display cable is still threaded through the frame and adhered on the opposite side.

  33. Hjk5m4l1FplPtXbn
    Hjk5m4l1FplPtXbn
    jDFkHKGufhNYp4sI
    • Use a pair of tweezers to peel the display flex cable free from the frame.

    • Thread the display flex cable through the gap in the frame and remove the display.

    after this part, even after heating the screen it didn’t come apart in one shot, i had my digitizer, led, and protective all apart and still no access to remove the display flex cable, tore a cable connecting to the screen and now my phone is trash. somehow you managed to bypass this part and magically go to the part where you can see the home button? not happy. “Remove Display” you make it seem so easy yet this is the part that destroyed my phone. Please include the step 33b that we need, thanks

    Bruce Chartrand -

  34. CXXEKVZ3SEmZx2xd
    CXXEKVZ3SEmZx2xd
    BR24eVqF3fCb5Bir
    • Use an opening pick to open the black flap of the home button ZIF connector.

  35. QHJWhrqH4PUnGHGV
    QHJWhrqH4PUnGHGV
    YTqG2I3jZrSNdR3P
    • Use a pair of tweezers to gently pull the home button flex cable out of its ZIF connector.

  36. o3GmAoqYfHULeXeG
  37. OOIVTfrYDFcy3fYE
    OOIVTfrYDFcy3fYE
    rOPYulvxkIC6CNUC
    bbhBXXrNPYkXKccc
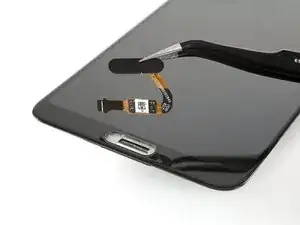
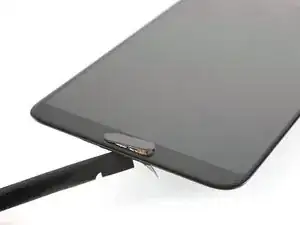
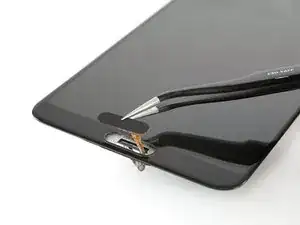
    • Apply a spudger to the backside of the home button and push it out towards the front until it comes off the screen.

    • Carefully grab the home button and thread its flex cable through the gap in the screen.

    • Remove the home button.

    • Before installing a new display, it's important to remove all traces of the old adhesive from the frame, and clean the glued areas with isopropyl alcohol (>90%) and a lint-free cloth.

Conclusion

The best way to re-apply the screen is with a sheet of custom-cut double-sided tape. Remove any old ahesive and apply the new tape to the back of the screen, then carefully feed the display cable through the frame. Align the screen and press it into place.

To reassemble your device, follow these instructions in reverse order.

If possible, turn on your phone and test your repair before installing new adhesive and resealing the phone.

Take your e-waste to an R2 or e-Stewards certified recycler.

Repair didn’t go as planned? Check out our Answers community for troubleshooting help.

Dominik Schnabelrauch

Member since: 23/11/16

224647 Reputation

11 comments

Hello, is p20 fingerprint sensor same as p20 pro and can u switch them betwin models? Thanks for answer.

michi125125 -

Is it really needed to dissemble all the phone? The more I look at tutorial, the more it seems you can just unglue the screen (while it's still attached to the phone) and remove the fingerprint scanner. I'm I wrong?

Christo Bd -

Hi Christo,

the display cable of the Huawei P20 Pro is held in place by adhesive underneath the battery. Not removing the battery and loosening the adhesive underneath the cable will result in damage to the display and/or display cable when trying to lift the screen. At the same time the glued cable will hold the display in place and it won’t be possible to lift the display high enough to open the ZIF connector of the fingerprint without causing critical tension to the cable. However it can be possible to do it the way you were mentioning but this will require some experience with smartphone repairs and a good amount of instinctive feeling.

Dominik Schnabelrauch -

Leider ist mit beim Herausdrücken des Sensors der Metallrahmen mit herausgefallen. Diesen bekomme ich jetzt nicht mehr fest. Was mache ich denn jetzt? :(

Thorsten -

Hi Thorsten, Ich vermute mal, dass der Metallrahmen auch mit Klebstoff von hinten am Display befestigt ist. Wenn du sagst, dass du ihn nicht mehr fest bekommst, liegt es daran dass es nicht mehr klebt oder der Klebstoff verformt ist. Falls noch gut in FOrm kann es schon genügen ihn warm zu machen und wieder ran zu drücken. Ansonsten muss man womöglich den alten Klebstoff entfernen, die Stelle reinigen und neuen Klebstoff anbringen. Zum Reinigen benutzt du am besten Isopropanol (>90%). Als Klebstoff bietet sich dieses doppelseitiges Klebeband an (könnte evtl aber auch zu schwach sein zwecks des Drucks auf den Button) oder ein Klebstoff wie der E6000. Allerdings ist es schwer zu sagen wie die Stoffe sich mit dem Display vertragen. Auf jeden Fall viel Erfolg mit der Reparatur.

Tobias Isakeit -

Habe den Rahmen erfolgreich mit dem T7000 Kleber befestigt. Hat sich eh erledigt, da sich beim Ausbau des Displays an der unteren Kante des OLED ein Riss gebildet und das Display nun nicht mehr angeht. 270€ für ein neues Display lohnt sich nicht. :(

Thorsten -

Super Anleitung, vielen Dank!

Bei dem P20 pro meiner Frau wird der Fingerprint Sensor heiß.

Ist das ein bekanntes Phänomen bei defekten Sensoren?

Norbert Bons -

I followed this manual, thanks for explaining all of this! Unfortunately my phone does not work any more. Hoping somebody knows what needs to be replaced:

When I charge it, charging light is on and it vibrates when I connect the cable as normal. It does go very warm around the port and also doesn't show charging progress. No screen image at all.

When I try to turn it on, the screen flickers in a couple of lines, then the backlight is on for a couple of seconds, then off again.

All the alarms still go off, with no way to turn them off because there is no screen image.

Because the alarms are still working I'm not completely sure the phone is off. My guess is that it is not booting, I think the alarms still work even though it is off, but not sure.

Thanks for any help!

Ilse -

I don't recommend removing the battery and display, it is possible to remove and install a new the finger print sensor only by removing the speaker (disconnecting the battery is also a good idea). It is a bit tricky to fiddle the flexprint through the hole and then below the bar of the frame to plug it into the connector, but it is possible and you don't risk to destroy the display during disassembly.

buergi -

In order to replace the fingerprint reader/home button, you need to remove the display and battery. You might be able to leave the battery in place, but the display has to be removed.

David Fear -

Hello, I have replaced the sensor, but the OS is not recognising it. Does the fingerprint sensor needs to be paired with the mainboard? I tried wiping the cache and factory reset, but without success. Thanks for any help!

Jiří Červenka -