Introduction

prereq – Use this guide to replace the shields of your Huawei Mate 10 Pro smartphone.

  1. rg3xpGgvKOjMBPWO
    • Switch off your phone.

    • Prepare an iOpener and apply it to the back of the phone for about two minutes to loosen the adhesive beneath the back cover.

    Erm… Simply impossible to open the phone this way…

    I used the iOpener for 2 mins as instructed, I’ve used even an hair drier for 30 secs on max power (could barely touch the phone after) and still with the suction tool I was not able to open the phone.

    It simply doesn’t budge!!!

    Miguel Oliveira -

    This was much easier than I expected! ;-)

    I put the phone on a hot-water bottle for about 5 minutes. I put the first pick in the side of the phone, not the top as shown in the next section. Then I kept the phone on the hot water bottle through all the following steps so that the battery glue was nice and warm when it came to that section.

    Oliver Moffatt -

  2. vJVBYc2fWjWoTSNG
    vJVBYc2fWjWoTSNG
    wgXxR6VJO4alrBKR
    illPhNTBeVFxigjt
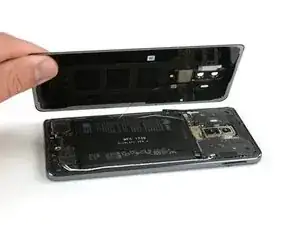
    • Lift up the back cover with a suction cup until you can insert the flat end of a halberd spudger.

    • Use the halberd spudger to cut the adhesive beneath the back cover on all sides of the phone.

    • Use opening picks to avoid the adhesive from sticking to the back cover again while cutting the adhesive on all sides.

    Faire attention à ne pas enfoncer trop le cutter/spatule hallebarde. Surtout à l’approche des boutons ON/OFF et volume, la nappe ne passe pas loin et se branche à coté de l’empreinte digitale.

    Bilan, j’ai coupé cette nappe et n’ai plus de bouton volume et on/off.

    Plus qu’à chercher la piece de rechange pendant que le telephone est ouvert ;)

    NeoX -

    I found it easiest to insert the first pick on the side of the phone, not the top as shown in the pictures. The side is slightly more flexible than the ends because it is longer.

    Oliver Moffatt -

  3. C5QkPmrDkMAECFTO
    C5QkPmrDkMAECFTO
    lV1jdUdq1oorWMA2
    • Don't remove the back cover all the way, yet. The fingerprint sensor cable is still connected to motherboard.

    • Flip the back cover over to the side.

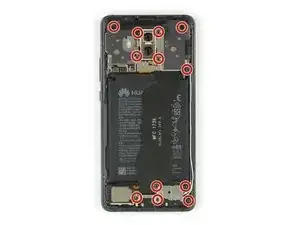
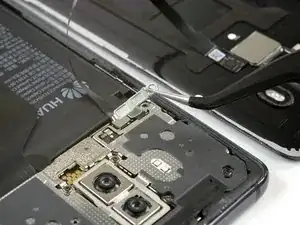
    • Remove the Phillips #00 screw which holds down the metal shield, sitting on top of the connection of the fingerprint sensor cable.

    When re-assembling, you can test the phone before putting the covers back on. If you test it before you connect the fingerprint reader then you need to re-start the phone before the fingerprint reader will work.

    Oliver Moffatt -

  4. VcxMNTBJfNQCqTLN
    VcxMNTBJfNQCqTLN
    Mx42vEmk5nW5QvKv
    • Use a pair tweezers to remove the metal shield covering the connector of the fingerprint sensor.

    • Disconnect the fingerprint sensor cable with a spudger.

    • When reassembling your phone apply new adhesive where it is necessary.

  5. tAqccddL4PorxOAC
    tAqccddL4PorxOAC
    SF3upv2yvfqMQaPC
    CNBw4EBW6koEH2Ex
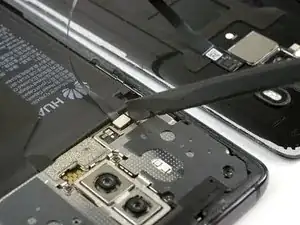
    • Remove the twelve Phillips #00 screws.

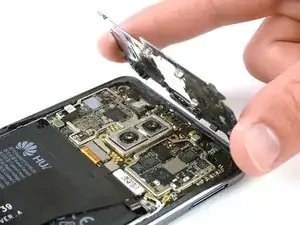
    • Carefully remove the shields on top of the motherboard and the charging board.

    • In case the shields do not pop out easily on their own after you removed the Phillips screws, you can use the pointed end of a spudger to pry them out.

    When re-assembling, you can test the phone before putting the covers back on. However, if you test it before you fit the top inner cover (the one in the middle picture above) the speaker will not work.

    Oliver Moffatt -

    The top and bottom inner covers both have tiny flanges which you need to insert into slots in the outside edge of the phone before you drop the rest of the cover into place. If you don't put the flanges in first the covers will not fit properly.

    Oliver Moffatt -

Conclusion

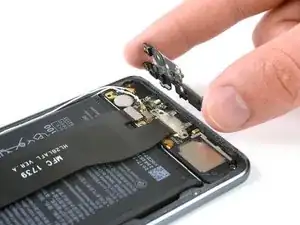
To reassemble your device, follow these instructions in reverse order.

Dominik Schnabelrauch

Member since: 23/11/16

224647 Reputation

0 comments