Introduction
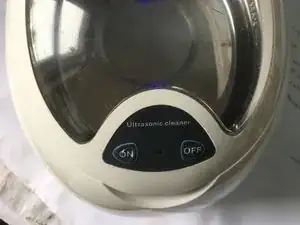
The 'Maplin Electronics' 450ml 50W ~50kHz ultrasonic cleaner failed to turn on and showed only the cosmetic blue LED light illuminating. Age about 5 years.
The main circuit board looked good and the problem was found to be a broken wire hidden in the electrical harness that goes through the lid hinge. Curiously this product cannot be found on the internet (prototype or fake goods?)
-
-
first image shows general view of the ultrasonic cleaner with switches in the lid, thus wiring for the two switches and two LED's (not shown) must pass through the lid hinge, which can caused wiring degradation after 5 yrs.
-
To check wiring, a full strip down is required (fairly easy). 3 screws on base loosen mains cable. 8 screws under lid, splits and removes lid. 4 sunken screws hidden behind rubber feet, separate top and bottom giving access to 8 screws which can be undone to remove the metal tank. 5 screws releases the PCB.
-
-
-
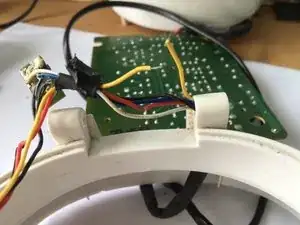
Image shows broken yellow wire (image taken after preparing for soldering). Note also damage to red wire insulation.
-
The four coloured wires shown were covered by shrink-fit sheathing which was partially removed. I knew the yellow wire was fractured as there was no continuity on a multimeter between the switch and the main board. The location of the fracture was determined using needle points attached to the multimeter probes, to puncture the wire insulation
-
The fractured wire was soldered and shrink fit insulated. Damaged red wire insulation was sealed with a tiny dab of Uhu glue. The shrink fit sheathing over the four wires was not replaced allowing the wires more room to move as the lid opens and closes.
-
-
-
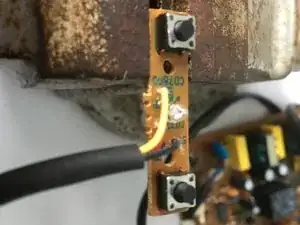
Image shows the two lid switches and red LED on a mini pcb (printed circuit board) (here held in vice). Note this mini pcb was held in place in the lid by hot glue. This was gently prised off using a few drops of alcohol. As was the other blue LED mini board. Removal of these boards made it easier to check wiring continuities.
-
While in the dismantled state, the switches were cleaned as they had a very poor continuity response which was not improved much with contact cleaner. Mechanical cleaning was carried out after popping off the metal squares with a sharp knife to gain access to the three terminals and sprung dome (cleaned with fine screwdriver and 600grit abrasive).
-
Switches were reassembled and fastened together by remelting remaining plastic blobs using a hot knife at about 150C and a touch of Uhu glue to make sure that the assembly was secure. Possibly easier to replace the switches?
-
The poor switches had caused operator induced damage to the plastic coverings over the switches, but had not yet broken the seal, which would have caused eventual corrosion and full switch failure.
-
On reassembly, ensure the silicone rubber seal between the metal tank and plastic body is visually well seated, else water could enter the electrical space on emptying or over-filling. I also used a smear of silicone paste to be extra safe.
Testing showed it clean eye glasses well and bat detector showed a satisfactory frequency of about 50kHz and used a satisfactory 43W power (rated nominally 50W)