
Introduction
-
-
While I was fitting a new rubber door seal to our LG Front Loader I needed a spring expander tool to install the new spring retainer. Not wanting to spend any money I cast about and made one from some bits.
-
-
-
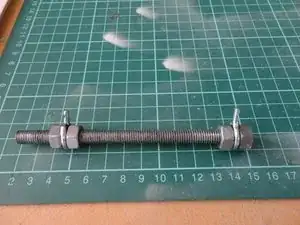
Grab some threaded rod. I had a 5" piece of M8 gal laying around. It's about $5 or so for a 4' length at the big green $2 shop.
-
Grab a couple of steel screw in hooks or eyelets. If you have hooks like I did then you have to bend the open end near closed so the threaded rod will go through it. Mine has a 1.1/4" shank but I cut most of it off anyway in the next step.
-
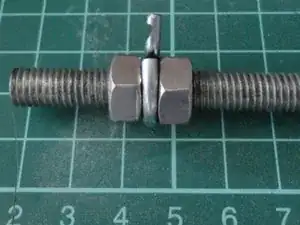
Put each hook or eyelet in a bench vice, hacksaw off the shank so approx 3/8" remains. Take a triangular cutting file and carefully file out a small groove across the remaining shank, filing a hard edge towards the end of the shank (see close up). This groove will grip the spring so make it deep and sharp enough. Repeat for the other eyelet.
-
-
-
Grab 4 nuts to suit the threaded rod (M8 in my case), and fit 2 at one end of the rod with your eyelet sandwiched in the middle, and the other 2 with the second eyelet on the other end.
-
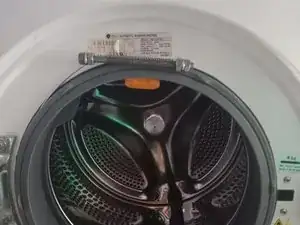
Leave one pair near the end of the rod and tighten the nuts up against the eyelet. On the other end, screw the nuts in far enough so that both eyelet shanks will enter the loops of the spring on your washing machine retainer.
-
-
-
To use the tool, simply move one of the eyelets in far enough on the rod so that both shanks will enter into the spring loops on the retainer.
-
Take a spanner and begin adjusting one pair of nuts towards the other end of the rod, turning each nut in turn to keep the shank close to straight. The spring will expand as you go and eventually will be wide enough to fit over your washing machine door seal.
-
With the retainer in place and the door seal fitted properly all around, loosen the same pair of bolts off until the tool is freed from the spring.
-


To reassemble your device, follow these instructions in reverse order.
7 comments
This is an awesome tool! I couldn’t put the clamp back in place and the spring was very stiff. I literally spent hours trying before following your method. Thank you for sharing!
Wow great.Fantastic.Simple tool but very effective.I googled as mine came out of the washing machine, so to realign it i had to google.Wow Wonderful.I dont have a M 8 and since it is lockdown I will buy it tomorrow. Thanks a lot Scott.God Bless you.
God bless you too Abraham :)
This is an excellent hack, especially because the tools actually made for this purpose are hard to come by. Making matters worse, any pre-fab spring expanders I purchased (I tried two different ones) didn’t open the spring wide enough on my Maytag machine. Grrrr!
However, I do have to say that this was no 10 minute project! I’m a capable DIYer, but between grinding down the threaded dowel to a manageable length, grinding down the hooks and grinding in the little slates that keep the spring attached to the tool, and working the tool to get the spring expanded enough took well over 10 minutes. Once the spring starts to expand, moving the nuts outward to further expand the spring gets more and more difficult due to the increasing resistance presented by the spring. The hook keep angling over until the second (inside) nut forces it straight up and down again as it is moved outwards. The right sized wrench - a small one - is essential. So is patience!
In the end, though, I was really happy to have found your post!