Introduction

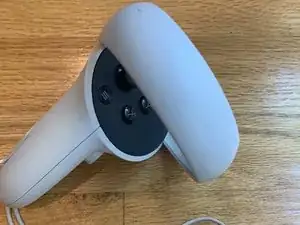
After long periods of using the Oculus Quest 2, controller drift can form, causing you to slowly move in-game when no input to the controller is provided. In this guide, you'll learn how to stop the annoying issue of controllers drifting.

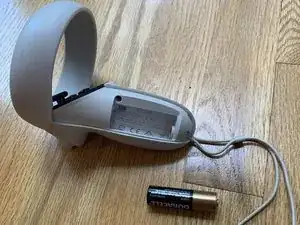
If you want to fully replace the joystick module in your controller, follow this guide.

  1. TjEZgfmvuxxdIwTB
    • Open the battery compartment and remove the AA battery inside.

    Better ways to do this. This is proven that it wrecks the controllers joystick and it will make the joysticks life span shorter by ALOT.

    Mark Zuckerberg said NOT to open the joystick compartment on a tweet, when fixing the Joystick drift issue. Look up different ways, or just send it back and spend a couple of bucks from a professional.

    WARNING DO NOT OPEN YOUR CONTROLLER AND PULL THE JOYSTICK!

    You have been warned.

    Ryo DerpDog -

  2. XJCIorx3N1Wp2qfH
    XJCIorx3N1Wp2qfH
    neuJxgssrTAspQBs
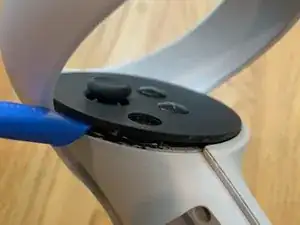
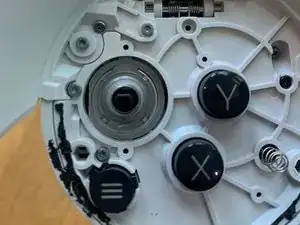
    • Remove the black plastic faceplate using an iFixit opening tool, Jimmy, or even a flathead screwdriver.

    • The plate is secured with adhesive and might be difficult to remove for the first time. You don't need to worry as the plate is additionally held in place with plastic posts.

    I can't even get the plate off without breaking it so now it's even worse thanks alot

    Jacob Galloway -

    with enough effort you can get it off without breaking it

    Seizure Salad -

    you can also use a lego brick dissembler

    Quincy Epoo -

    This does work, I used a Lego brick dissembler as another comment said. Just be gentle and wiggle it out. Do not force it because it will break, it is plastic after all.

    Tofu -

    I completed this with a box cutter and four pins!

    tim. -

    When I did this step I used a few guitar picks. The trick is to lift your way around the black circle. The first time I did this I heard a ripping sound from the guitar pick sliding AROUND the area and removing the adhesive. Do NOT just lift from one area. GO AROUND. Like opening a can.

    Aflannelshirt -

    after removing the plate, will the adhesive hold it together still once I replace the plate?

    Jeremy Anderson -

    The adhesive should still hold it in place but if not there are plastic clips that do firmly hold it in place.

    Seizure Salad -

    This helped me so much I could barely even play it was so bad bud I did this and now I don’t move at all 5 stars I thing I do want to note is that you want to be very careful and steady putting the joystick back on and not have it wobble around you could break that spring but overall 5 stars

    C T -

  3. 5JZ4qGITFwHSYYll
    • Gently pull on the top of the joystick until the cap comes off of the joystick.

    • The cap might not detach from the touch sensor spring. In that case, let the spring remain attached to the joystick cap and don’t forcibly remove it. If you do this, it's very difficult to reattach without damage to the spring.

    • There is a spring that's located between the joystick housing and the cap. Don't bend or break this spring as it controls the touch sensor.

    if the spring is bent and cannot easily or at all be reinserted to all four brackets that hold it in is it broken will it work without issues or does it only track if a finger is torching it?

    Realfixerupper -

  4. uwWH5fEIGSeNa3rl
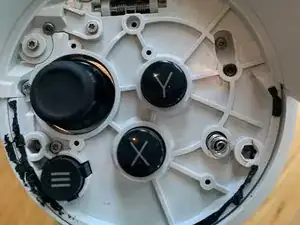
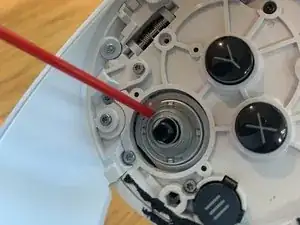
    • Start by spraying some compressed air into the joystick housing to get rid of any large particles inside.

    • Apply a small amount of contact cleaner or 90% or greater isopropyl alcohol to the joystick and move the joystick around, and then wait for it to dry.

    • Only use electrical contact cleaner or 90% or greater isopropyl alcohol. Other soaps and substances might be conductive and damage your controller.

    • Make sure to wait for the contact cleaner or isopropyl alcohol to dry before reassembling.

    This worked. Thank you!

    robertaccomando -

    Does the spring need to be reattach the casing of the joystick? Or is it fine if I just put the casing on

    Parker Rist -

    you don't have to worry about it just put it back on

    Seizure Salad -

    So if I only put on the alcohol and not the contact cleaner it will still work?

    Grady Spencer -

    By a small amount of contact cleaner do you mean like a few drops or a few ml

    Dominic green -

    What if the joystick won't come of?

    Trinity Gilley -

    what would happen if someone used 70% isopropyl alcohol?

    captain_perez -

    the high water content would damage the controller

    Seizure Salad -

    I did this with my first controller and it kinda worked but it never was as responsive as before, and over time got worse and worse.

    nate allen -

    Do you have a video of the steps to make it easier to understand?

    Kratos -

    I didn't had 90% alcohol so I've tried glass cleaner - it worked only a little bit, so I've tried to apply more... And as expected controller stopped working completely. Had to disassemble the controller completely (using ifixit guide too).
    Then cleaned excess fluid from a board near joystick. Also, I've opened the joystick itself and gently cleaned it's parts. After re-assembly joystick now works as good as new.

    Vladimir Petrov -

    Does the spring that’s located between the joystick have to be there or can I just take it off?

    alfredo reyes -

    This worked the first two times but now it is obnoxiously out of control.

    It doesn’t work anymore and my controllers are perfectly normal. Any other suggestions?

    Mason Miller -

    This guide worked! But I caused another issue somehow. Upon reassembly the joystick now makes a clicking sound when pushed to the bottom right corner and has developed drift. Do you have any suggestions for a fix?

    Adrien -

Conclusion

To reassemble your device, follow these instructions in reverse order. If you need a video demonstrating these steps, one can be found here.

Seizure Salad

Member since: 12/01/18

2620 Reputation

49 comments

I did that and it works, but now the touch sensor on the thumb stick doesn’t work. Any ideas?

briangerrard -

The spring that goes between the joystick housing and the cap is what connects the touch sensor to the controller. While i did not inspect the cap to see for myself i believe there should be a metal contact on the underside of the cap that the spring should be touching.

Tl;dr: Make sure the spring between the joystick cap and housing is properly connected to both sides.

Erik Sørhage -

Thanks, just what i needed.

Just one problem.

You never mention the spring that goes between the joystick housing and the cap. I understand that you took it off completely to get a better picture, but to me it seems better to not take it off completely and just let the joystick cap hang by the spring while you spray cleaner down into the housing. As long as you're careful not to bend or break the spring i believe this would lower the chance of the touch sensor not working like one of the users here already have problems with.

Otherwise the guide is good and on-point.

Erik Sørhage -

I should mention tho, i bought my quest on day one so perhaps my controller is an earlier model. On my controller the spring between the joystick cap and housing wasn't easily removable from either side, which is why i decided to leave the cap hanging. It could be that on later models the spring is not connected to the cap but instead is just pressing up against it.

Erik Sørhage -

The spring is still there! It might be a bit hard to see however and I’ll note that in the guide.

Seizure Salad -

after putting the faceplate back on the buttons are slightly shorter pls hepl

Balls HD 4K -

Make sure all the plastic posts click in place I and that you didn’t break any of the posts

Seizure Salad -

can you find a way you can do it without compressed air or any other paid air or cleaning products

Eli Brown -

Late reply, but these are the bare minimum for doing a fix like this. I mean, you could try blowing really hard with your mouth, but you can't really replace contact cleaner or 91% isopropyl alcohol. You should really have at least a bottle of 70% in your house anyway, it is an important first aid item and can also be used as a sanitizer for kitchen surfaces mixed in a spray bottle with water and a single drop of dish soap.

You do not want to use water or any water based cleaners like dish soap for this fix. There's a reason that was pointed out. You will ruin the rest of your kit.

Anthony Potter (WardenPlays) -

Any suggestions for a broken thumbstick cap? The base is cracked and I can't seem to find anywhere that can replace or repair it.

Julie Eves -

AliExpress.com - original controller joystick cap for oculus quest 2. $7.99

Deborah -

When reattaching the thumbstick on older Oculus branded devices, grab the spring and spin the stick clockwise (righty tighty) until the thumbstick and spring get reattached. If you don't do this, your finger sensor won't work,

Lanes -

I did all of the steps correctly and it's still sticking what should I do now?

michael pepka -

I did all of the steps correctly and it is still sticking what can I do now?

michael pepka -

thank you!!!!!!!!!!!!!!!!!!!!!!!!!!!!!!!!!!!!!!!!!!!!!!!!!!!!!!!!!!!!!!!!!!!!!!!!!!!!!!!!!!!!!!!!!!!!!!!!!!!!!!

Martin Bunzl -

Thanks for the guide! Very easy and fast. I just applied 4 drops of isopropyl alcohol, moved the stick a few times and waited about 15 min. for it to evaporate - but I tested it BEFORE putting the plate back. I recommend doing this test even BEFORE you open the controller so you can see if (or how much) it improves afterwards: wearing your headset, go to Settings > Devices > Controllers > Thumbstick Range and Deadzone > Calibrate. Move the stick around and see how it behaves (or misbehave). In my case it was jumping around very erratically, but after the procedure it was working perfectly! :)

Ricardo Ferreira -

the controller still drifts a lot should i try to find a replacement joystick or just buy a new controller

elijah -

It worked! I figured out that it helps a lot if you keep the battery on the controller when you unassemble it and try to move the joystick around with the oculus headset on and seeing when the stick drift stops, and when it does stop completely you can reassemble everything and it should work good as new! It's a relief playing games without worrying about my movement going wonky, definitely works!

saint -

I wouldn't recommend keeping the battery in the controller however as you may damage it while you're cleaning it

Seizure Salad -

Worked superbly! As easy as this was, I honestly didn't think it'd work. It worked perfectly. Thank you!

Kitt -

Thanks! This worked for me. I didn't have the iFixIt spray so I just poured a bit of iso alcohol over the joystick and spring. Then all I did was fidget the tick around to distribute the alcohol and let it dry. Instant fix

Shlum Hum -

I'm having difficulty getting the cap off the thumstick

Matthew Mcintyre -

Me too. I tugged until I felt like it might break if I pulled any harder. Also tried unscrewing it since some of the comments say you have to screw it back on for older models (but nothing about screwing it off), but was afraid to put too much force on it.

Chez Arctica -

you should be able to just pull it right off

Seizure Salad -

Now my joystick drift stopped, but whenever I move my joystick anywhere except to the bottom right, my oculus doesn’t think it moves at all. Help me please.

Drew Carter -

It isn't a smart idea to tell people to take the controller apart this is absolutely terrible advice

Ms Bunny -

ok??? there isn't really a good way to actually fix drift without taking the controller apart

Seizure Salad -

how else do you think internals get fixed?

CEO Ofnerds -

It's either do that or just buy one. At that point there really is no other choices.

Its like you telling people not to fix their cars.

Kevin Criswell -

Do you mean just regular stuff I put my contacts in or hydrogen peroxide

Quinton hillery -

if you put isopropyl alcohol in your contacts then you’d be blind and hydrogen peroxide would damage the controller

Seizure Salad -

ignore the guy that is trolling, contact cleaner is a automotive electrical cleaner, WD-40 brand specialist contact cleaner is sold at lowes/home depot for 8$, normal WD-40 will damage your controller though so buy the right can

NecroNomad -

Just done this and I'm very happy to say it worked! Thank you so much, very easy to do. I hadn't played in a month or so and was devastated to find out I had some rather annoying stick drift. All I used was an air duster and a flat head and presto no more drift.

Highly recommend someone to do this if they have stick drift.

I made an account just to thank you lol

Zachary Hughes -

When I put mine back together something happened where now the controller won't show up behind me

Austin Green -

This is normal. Due to the way the Quest 2's inside out tracking works it won't be able to track controllers behind you unless you're looking at them.

Seizure Salad -

Hello

I don't have a problem with the joystick but with the rear trigger.

It's like pressing on it when I'm not even touching the joystick, so I can't interact or select games.

Abdel Larbie -

Thank you very much. Now i can play 'Into the Radius' again, without constantly moonwalking 👍🏻

Oliver Latza -

I went through the guide and now my controller's light constantly turns off and on rapidly, and won't show up when I try to use my Quest 2, how do I fix this?

Cy Hamm -

I followed the instructions minimally and it worked for me. Much appreciated. I popped up the face plate, rubbed around the analog with cotton and 91% alc. I’m back in action now.

Ozzmon Dumas -

This lies it doesn’t work at all I’ve been trying this for 2 months and nothing has changed

Titanvictory -

Oh my goodness THANK YOU I cannot describe the pain of constantly moving to the left and alerting enemys In B&S.

Also the drift has just made me stop playing VR in general once again THANK YOU!

Innes Watson -

Dose dawn ultra soap work?

Fix my conttroler -

No, you will cause further damage to your controller.

Anthony Potter (WardenPlays) -

Are you sure this works what if I tryed it and it still has drift

James -

i reattached the plates and now my controllers don’t turn on

crev -

I have just used some contact cleaner on my joycons the left works perfect but the right won't turn on now is there a way to fix it or have I broke it for good

MIKEBULLY345 -

This worked perfectly for me thank you, had stick drift for so long got to the point of games being nearly unplayable, this has helped so much.

Jam_Guy -

i followed this and shed a tear looking at the joystick calibration and watching how it didnt freak out everywhere

wadr -

I followed this to fix my left controller drift, and it totally fixed it.

JP Lizaola -