Introduction
-
-
Remove the covers and unscrew the motor housing.
-
Unscrew cover and remove the guide tube.
-
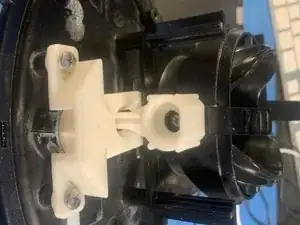
Bring the jet in the middle position by positioning the white arms as shown in the photo.
-
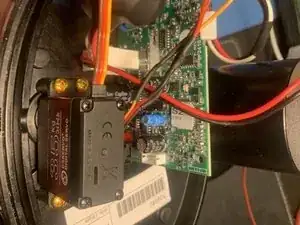
Unscrew the motor block and pull out the blue cable.
-
Open the motor block.
-
-
-
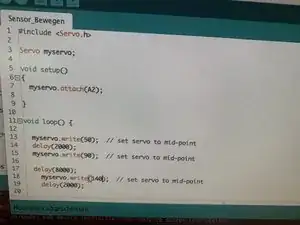
By hand or with a arduino code. The servo and the mechanics has to be both in the middle position.
-
#include <Servo.h> Servo myservo; void setup() { myservo.attach(A2); } void loop() { myservo.write(50); // set servo to mid-point delay(2000); myservo.write(90); // set servo to mid-point delay(8000); myservo.write(1400); // set servo to mid-point delay(2000);
-
This needs to be done carefully.
-
-
-
With the Arduino code you can test the alignement. There is a alignment mark on the bot itself.
-
The Servo can do 180 degrees, the robot needs around 120, so there is margin from the servo but NOT from the mechanics.
-
If the jet mechanic is at the stop and the servo want to go further, it will end with a loss. IMHO you can dare it by just by hand.
-
-
-
Try it out.
-
Keep in mind the bot needs some time to start all the movements. You can also try with the app with manual control.
-


Arbeite die Schritte in umgekehrter Reihenfolge ab, um dein Gerät wieder zusammenzubauen.
2 comments
Bonjour. 35kg de force pour un si petit servo ?
I assume you can take a smaller one but they are cheap. I took this model because it was labeled waterproof. Works like a breeze ever since.
Instarep -