Introduction
Before ordering the spares, check that your symptom is not simply a blocked filter or limescale. The instructions for cleaning the filters - particularly the boiler outlet filter under the overhang - can be seen at https://www.manuals.co.uk/delonghi/ec-22.... The boiler outlet filter requires a Philips #2 screwdriver on a right angle rachet drive to remove.
The EC220 has been around quite a few years, and luckily contains no complex electronics. There are similar models still in production with, I suspect, minor changes.
It's relatively easy to replace the pump, providing that you use this guide. I spent several maddening hours before I worked out the right technique. The pump is located in the narrow part of the chassis, tied in with rubber brackets to reduce vibration. Replacing it does involve a complete disassembly, including removing the boiler and un-clicking the plastic sub-chassis inside the lid.
It is also possible that the plastic 3-way (OVP) valve above the pump is faulty. This can cause a reduction in pressure and leakage of water.
Before you start, make sure that the machine is absolutely emptied of water. If it gets over the electrics, it will be very hard to dry out and possibly trip your house electrics when you test it. Water will come out of the boiler when it is removed, so have cloths and sponges handy to mop this up - a surprising amount came out of mine. Make sure that nothing electrical is sitting on the workbench that could be deluged, and put the machine on a tray to disassemble it.
You'll need a long handled T20 torx security screwdriver - the plug in bits will not work as you need to reach down long and narrow holes. A magnetic version will be useful as the screws are hard to locate properly in reassembly.
-
-
Pull the reservoir off upwards and empty.
-
Remove the drip tray and empty.
-
Turn the coffee maker upside down over the sink to get as much water out as possible.
-
-
-
Flip the coffee maker on its back
-
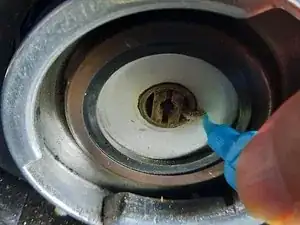
Using a right angled rachet screwdriver, with a Philips No.2 head, unscrew the stainless steel filter from the underside of the top section.
-
It will probably be filthy and need cleaning with hot water and a scrubbing brush. Use a pin to remove any blockages from the holes of the filter. You can also use a TeePee dental brush to remove debris from around the screw hole where the water comes out.
-
-
-
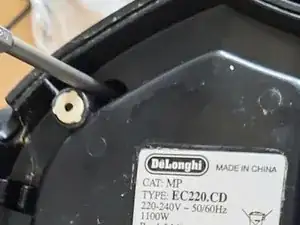
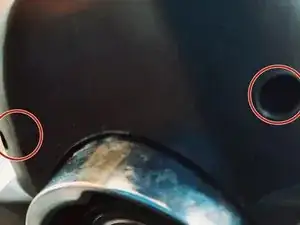
Flip the coffee maker over. The bottom cover is held on by 2 torx screws just to the rear of the front supports and two clips to the rear. Pull the bottom upwards from the front to release. The bottom cover then just clicks out to reveal the bottom of the pump.
-
-
-
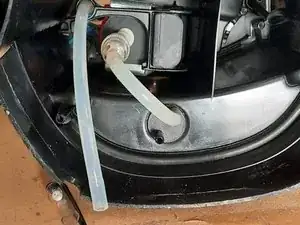
Remove the clear tubes from the reservoir valve that you have just exposed. They just pull off. Empty any water from the tubes.
-
Take a look at the filter that is in line with the pump inlet. This is often filled with bits of coffee. It is very hard to clean, but holding it under a tap with running water can be used to remove them.
-
-
-
The top cover is held on by 4 torx screws - two on the rear of the top by the reservoir down dark holes, and two on the underside of the front, near the boiler filter. The filter cover should just click off. Don't bother to remove any of the wiring to the controls
-
-
-
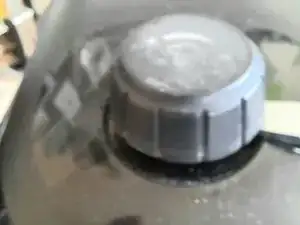
Pull the top knob off vertically - it is held on by friction to splines. You may need to give it some assistance with a screwdriver or iFixit levers.
-
-
-
Pull the clear tube out of the top of the coffee maker.
-
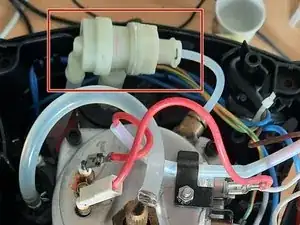
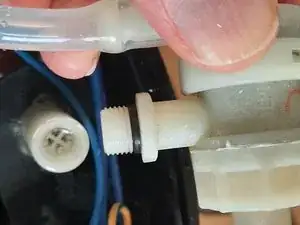
Locate the white plastic 3-way valve at the rear top of the machine. This is the Over Pressure Valve, and controls the pressure of the water flowing into the boiler through a simple spring mechanism. The excess water is returned to the reservoir via the clear plastic tube.
-
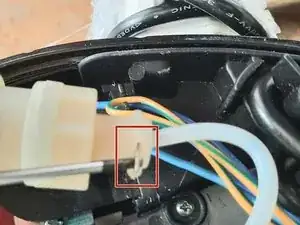
Pull the clip out of the valve that attaches a small tube to the boiler. You'll see that the clip traps a brass collar around the tube into the valve. Pull the tube clear.
-
Rotate the valve anti-clockwise to unscrew it from the pump. It can be a bit difficult to move.
-
-
-
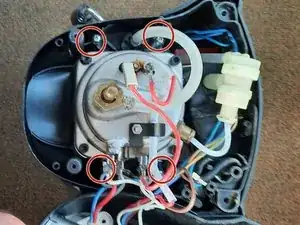
Unscrew the 4 screws holding the boiler down to the plastic sub-chassis.
-
Gently remove the boiler upwards, without disconnecting the wires.
-
The screws are retained by plastic widgets which will probably fall out when you remove the boiler. These simply slot back into the holes around the boiler hole in the chassis.
-
-
-
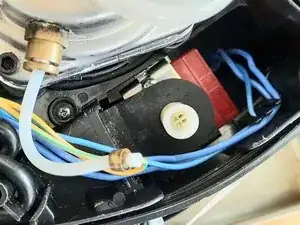
The plastic sub-chassis should now lever up with gentle persuasion and a bit of native cunning. You may need to use plastic picks etc to lever out the catches.
-
-
-
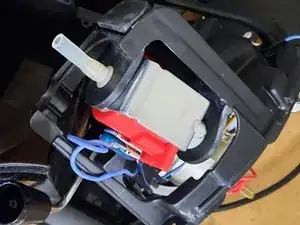
The pump should now be visible. Pull the rubber mounting plate upwards to release the pump.
-
Remove the two lucar connectors with blue wires from the pump.
-
-
-
Replace the pump and affix the blue wires back onto the terminals.
-
Insert the pump in the former position
-

To reassemble your device, follow these instructions in reverse order. Make sure that:
(a) the clip on the valve is behind the brass collar, trapping the tube into the valve port.
(b) the plastic sub-chassis is completely seated into the plastic housing (you won't find out that you haven't done this properly until you have screwed it all together),
(c) the plastic widgets that hold the boiler screws are completely seated into their slots.
(d) that there is absolutely no water around the electrics. If there is, hairdryer it until dry, and leave in a warm place overnight to ensure it is dried out.
It's best to test the unit outside and to stand back whilst it heats up, in case of any escape of red hot steam. I used a plug-in RCD to ensure that any electrical faults didn't impact the main house supply.
Remember to flush the unit through with a couple of litres of water to remove any oil or other contaminants from the system.
